|
If you would like to receive FREE Shop Hacks like this every Friday at 3:30 Eastern Time... subscribe below... What are your Tool Organizer Options and what might work best in your shop? There are 6 popular types of tool organizers... 7 if you count the pile of tools on your workbench ;-) The following poll was taken in the Shop Hacks Facebook group regarding which system you like the best... 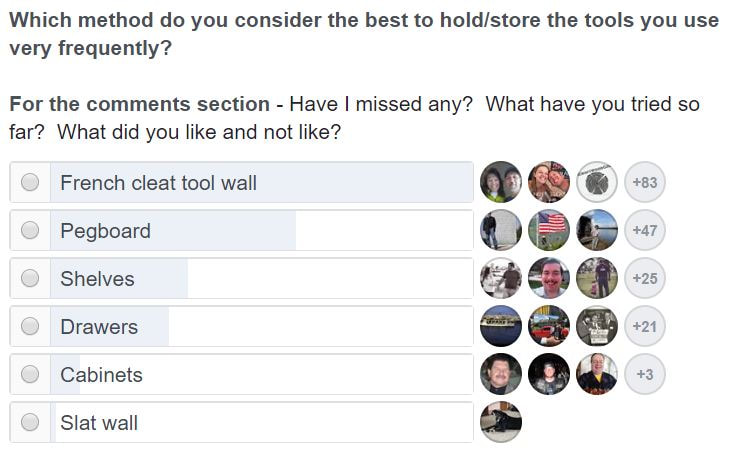 I was a little surprised about how much French cleats came out ahead of the rest of the options combined, but I understand why. I'll start with some pictures of each of the popular DIY options then we will get into which ones work best for different situations. At the end of the article I'll show you some of the systems available that you can purchase ready-made. Note... Don't miss next week's article because I will introduce a new organization product that you can use to Build YOUR Space! I'm excited to unveil this innovative but simple and inexpensive Shop Hacks system to all of you! I've improved on an already great system and I'll offer it in a package that takes the hassle out of organizing your workshop! Stay tuned... French Cleats - everything on my tool wall is hanging on a french cleat. I like them because they make it very easy to evolve my tool wall as my workflow and needs change. It is also cheaper and more versatile than any other system. French cleats are really the most versatile option because you can still use all of the other options on a French cleat wall. You can hang cabinets or drawer modules, shelves or even sections of pegboard is you want to. Pictures of Shop Hacks Facebook Group members French Cleat Setups Pegboard is the next most popular option. That's understandable since pegboard is readily available, is relatively cheap, has a wide variety of accessories available and has been around since our grandfathers were working in their shops. The photos below were submitted by members of the Shop Hacks Facebook group. Particularly interesting is Mike Gallucci's blue powder coated metal pegboard workbench design. Great job Mike and thanks for sharing your innovative creations with the group! Slat Walls show up from time to time and they are just as versatile as French cleat walls but they are not nearly as popular for some reason. I believe they are more popular in Europe than in the US. There are a number of very nice accessories available for slat walls. Shelves, Drawers, and Cabinets - I would venture to guess that 99% of us use some combination of these three in our shops. They are ubiquitous and readily available at any big box store in both ready-made and DIY options. They are the default choice if you don't want to spend your energy trying to make your shop as efficient as it can be. However they are horribly inefficient compared to open tool storage and tend to become dumping grounds and hoarding areas where tools and materials go to die. The Shop Hacks Philosophy - Never put frequently used tools or materials in a drawer or cabinet or on a shelf. Use open tool storage within arms reach of each of your work areas and you will spend much less time walking, sorting, opening, closing and moving things around and more time making, fixing and building. For more about how to organize your tools without feeling overwhelmed, check out these articles... tool-organization-how-to-organize-your-tools-without-feeling-overwhelmed.html workshop-organization-how-to-organize-your-materials-and-hardware-without-feeling-overwhelmed.html I ran a quick time study the other day to see how much time I saved by locating my frequently used tools within arms reach compared to where I used to store them - in a toolbox. It took me 3 seconds to grab a tool, touch the counter and put it back using my french cleat tool holder located next to my main work area. It took me 30 seconds to walk to the toolbox, open the drawer, find the tool and grab it, close the drawer, walk back then repeat the process to put the tool back. I'll let you do the math but I estimate that I buy back between 40 and 80 hours of project time EACH YEAR by having my tools in the open and within arms reach. You can organize all of your frequently used tools and materials in less than 80 hours of work so, IMO, it is a no-brainier to use open tool storage. One caveat... Open tool storage requires you to work on your dust collection first. Without effective dust collection and air filtration you will always have a film of dust on everything that is out in the open. The Shop Hacks Ultimate Air Filtration System will take care of most of the fine dust that settles on your tools after your work session is over but not everything. In future articles I'll show you how to achieve near 100% efficient dust collection on all of your tools (under 2 hp) with just a cheap shop vac. I've proved my methods using laser particle counter testing. Advantages and Disadvantages of Each System The following table is my subjective analysis of each system but think about it and decide for yourself if you think using open tool storage is worth the time it will save you over the years. Keep in mind that French cleat and slat walls may be used with all of the other systems which makes them universally compatible. I.E. you can hang cabinets, drawers and shelves using French cleats or slats. 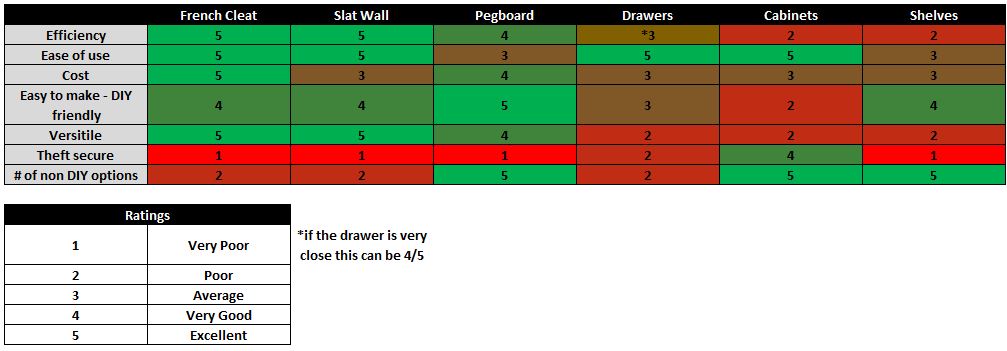 How to Build A French Cleat Wall I'll go into this in more detail next week but here's the general idea. None of this is set in stone so feel free to vary any of these dimensions as you wish. Cut up a sheet of 3/4" birch or Baltic birch plywood into 3" tall strips with a 45 degree bevel on one side. This will give you 15 cleats @ 8' long. That's about $2.33 per 10' of cleat using birch plywood. Birch plywood is not nearly as tough as Baltic birch but it works. You can even use pine, poplar or hardwoods if you are sure you have access to wood that will not warp over time. I hang 40# material organizers on 1/2" Birch plywood and they have held up fine using 2 screws every 8". I suggest using 3/4" material so you don't have to worry about the cleat pulling away from the wall if you can only secure it every 16" or more. The photos below show a 1/2" cleat but I suggest using 3/4". Below you can see tool holders, box/cabinet holders, and a French cleat shelf bracket. The variations are as endless as your imagination but this should give you a good feel for how you can use French cleats to organize tools. Make sure you don't miss next week's article where I will introduce a new Shop Hacks product that will make building your own tool holders much simpler and faster so you can focus more time making, building and fixing and less time organizing. That should give you some great ideas to help you Build YOUR Space. Next week I'll show you more ways to implement French cleats and introduce a great new Shop Hacks product that will make the task much faster and easier for you. Feel free to email me with questions, ideas or comments. I'm always interested in hearing what you are interested in so don't be shy. Check out other popular Shop Hacks Newsletters...
4 Comments
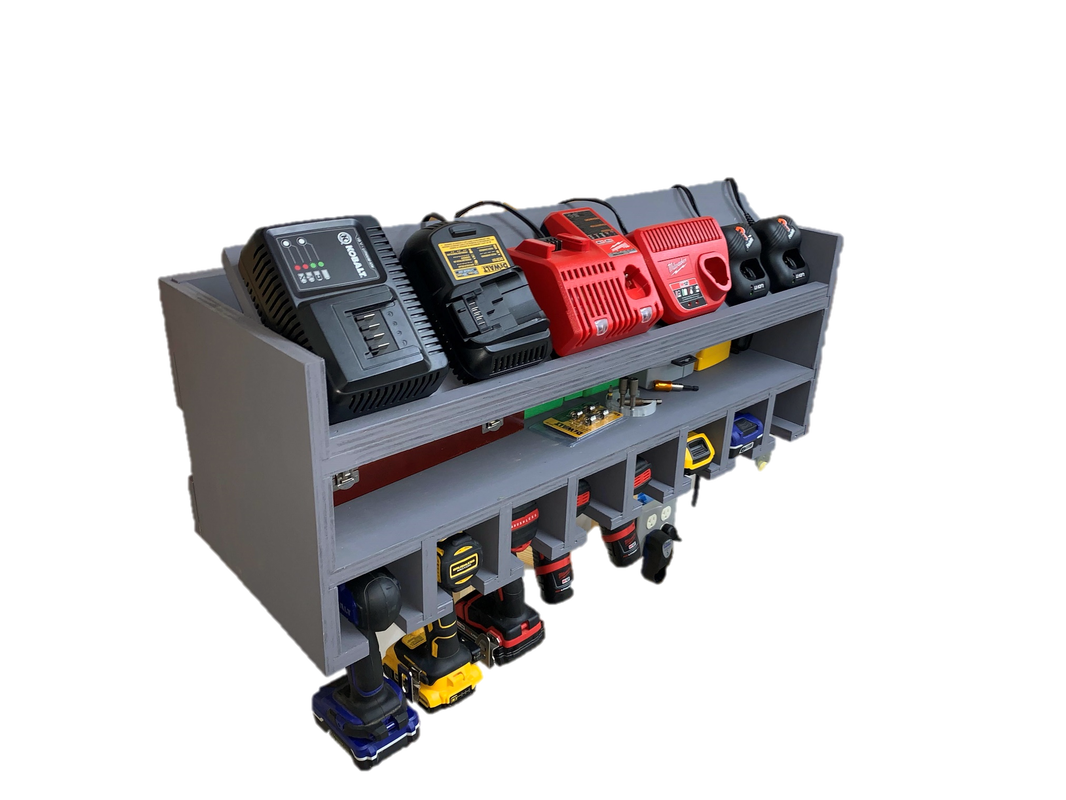
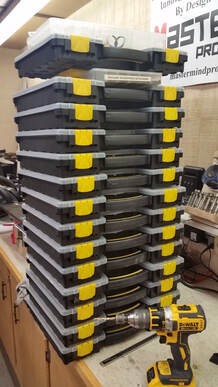
If you would like to receive FREE Shop Hacks like this every Friday at 3:30 Eastern Time... subscribe below... 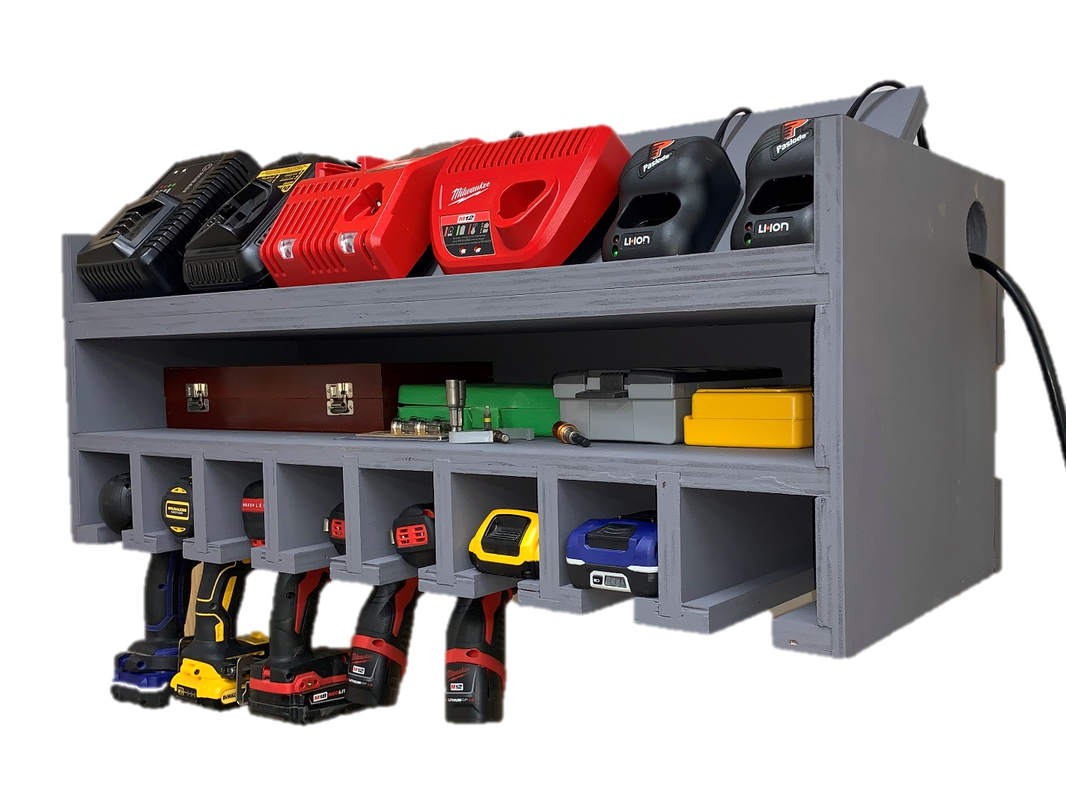 We've seen a number of drill/charger organizing stations over the past year on the Shop Hacks Facebook Group, but this one, designed by Shop Hacks member Tim Key, captured a lot of attention. It includes three useful features.
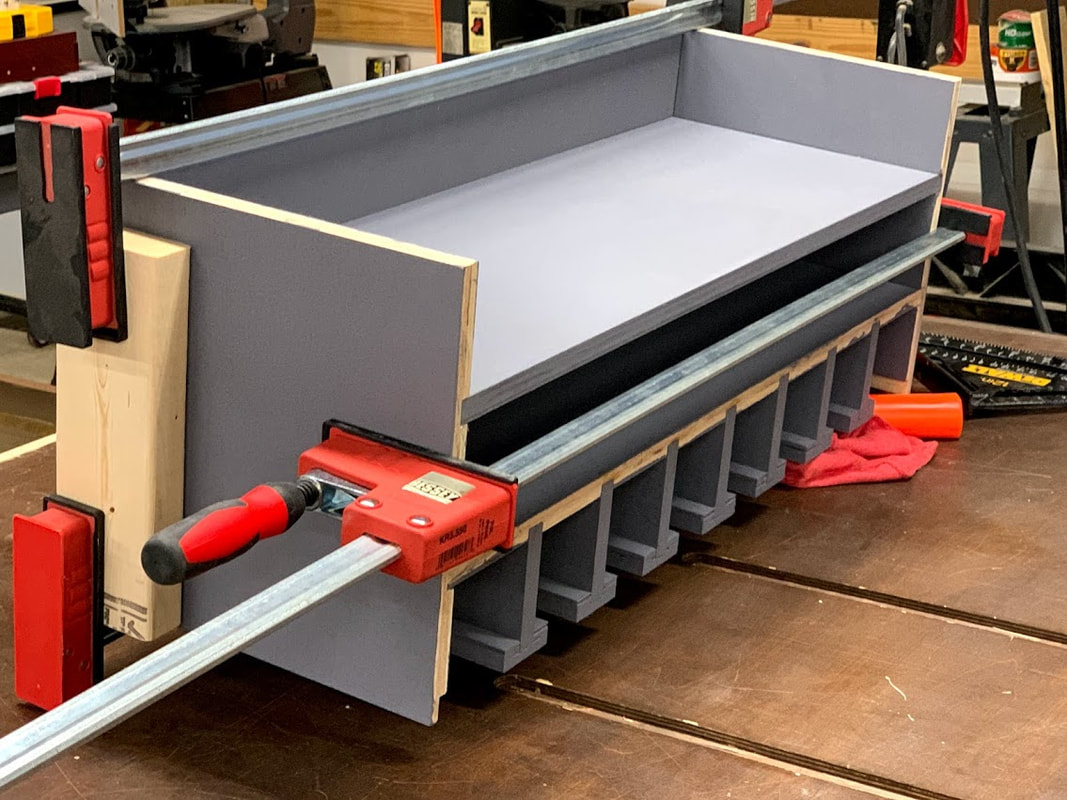
Let's Get Started Building YOUR Space! The first step is to break down your material per the following cut sheet. Order of cuts and specific dimensions are listed in the plans. Everything is based on 3/4" sheet stock. Tim used painted plywood and it turned out great. You can use any 3/4" sheet stock such as melamine, particle board, MDF or your preferred material. I like to use melamine. With edge banding it has a neat look and the light color has a way of making the shop much brighter once you start covering the walls with more and more white accessories. Baltic birch always looks great too no matter what you make with it. You can order 4x8x3/4 sheets of Baltic Birch through Menards if you have one local or your local lumber yard probably has it available. Note: Most sheet stock doesn't come in exactly 3/4" thickness. It can vary from 0.680" to 0.780" so make sure you measure the stock you use and adjust the dimensions outlined in the plans accordingly. If you would like to save time and make this build as simple as possible, you can support more content like this by purchasing plans for $4.95. The plans include the cut sheets, detailed dimensioned drawings, and tools and materials lists for this project. Shop Hacks is only sustainable through the generous support of those who purchase plans and hardware kits and through affiliate link income.  SHOP HACK: Write each part number on a piece of tape and stick them to each piece so they are easier to keep track of later Cut Dados Next, cut the individual features into each piece. The plans include detailed drawings as well as 3D assembly and cross section views to make this step very simple. There are many ways to cut dados. I used a table saw and a Freud 6” x 10T Pro Dado Set (SD206). Another popular option would be to use a router and jig (video link). Cut all of the dadoes to half the material thickness. The grooves are 3/8” deep if you use ¾” material. If you use a material thickness other than ¾” exactly then adjust your cuts accordingly. Assembly If you plan to paint your drill organizer, it is best to do so prior to assembly. At least all the interior parts. Avoid painting the dado and rabbet cuts or you may have a hard time getting it to assemble flush. I got a little paint in them but was still able to get flush joints in my assembly. 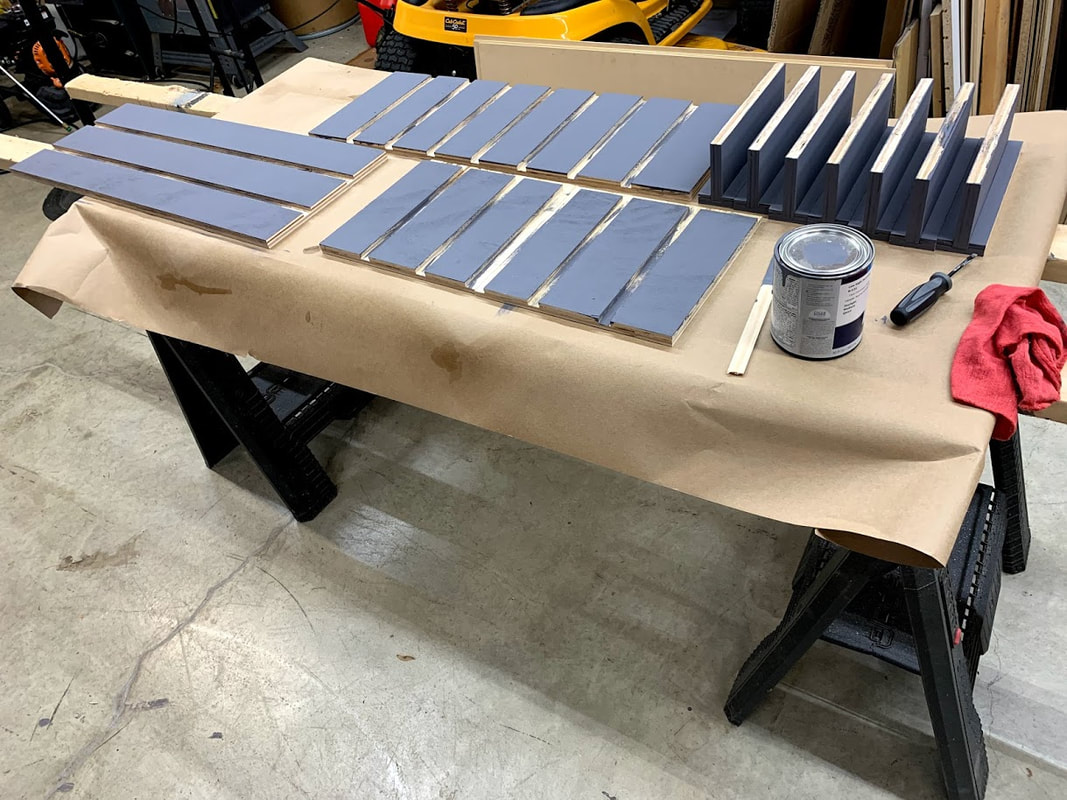 Bottom Shelf and Hangers Flip the bottom shelf upside down and flush the front against a straightedge that is at least ¾” thick. You want it to be easy to flush the front of the hangers with the front edge of the bottom shelf. I only glued the vertical hangers into place. I didn’t use any brad nails or screws. I glued and brad nailed the hanger bottoms with 1 ¼” brads. Get them all glued in and then clamp it down as best you can. I used another board and some weights and left it overnight. 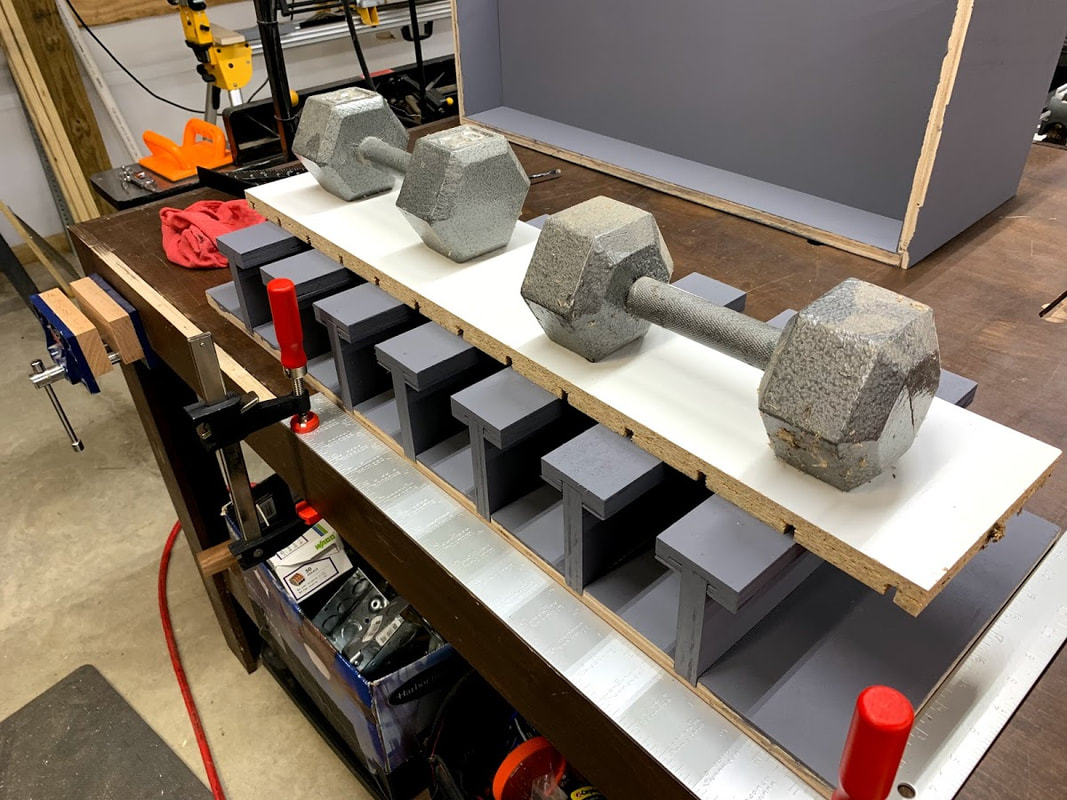 Side Panels, Back Plate, and Shelves This was the trickiest part of the build. My wife helped spread the glue quickly and helped hold parts together until I could get it into clamps. I used the following assembly process
 Install the angled shelf lip on the top shelf. Flush the straight edge of the lip with the front edge of the charging station. Use 1 ¼” brad nails along the top flat area of the lip. There is no need to glue this in, but you can if you desire. This component is to keep the chargers from slipping off the angled shelf. There should not be a lot of force against it. To install the angled shelf, I used a DEWALT DWHT46031 Aluminum 7-inch Premium Rafter Square behind the shelf to hold the shelf at the correct angle while flushed the front edge up against the edge of the lip. I used 5/8” brad nails along the length of the angled shelf and the used 1 ¼” brad nails on the sides to maintain the angle of the shelf. There is no need to use glue on this shelf. Install the two end rail hangers. Glue the rabbet joints and use 1 ¼” brad nails to secure them in place. French Cleat Hangers If you aren't using French cleat hangers to secure your tool holders to the wall, this may be a great time to get started. French cleats are a very simple method to hang anything on the wall. It's a very simple system. Just attach a cleat with a 45 degree bevel to the top of the organizer as shown in the figure below. Attach a brace of the same thickness to the bottom of the organizer. Then, attach another cleat with a 45 degree bevel to the wall with the bevel facing up. Now you can hang any tool holder on the wall cleat which allows you to rearrange your tool holders as you are working through your preferred workflow. Install the French cleat flush with the top of the charging station using glue and 1 ¼” brad nails. Attach the mating cleat (not shown) to the wall using screws at the height you wish to hang it. The bottom board keeps the charging station square to the wall. Use glue and 1 ¼” brad nails to secure it to the charging station.  The Power Outlet Cut a hole in the side panel on whatever side of the unit makes sense for your installation. I cut a 1 ½” hole. It needs to be large enough so that the wall plug can pass through. I used double sided tape to attach the power strip to the charging station. The paint would not allow hot glue to adhere to the station. Now you have a nice looking drill organizer that you can enjoy from now on. Don't forget to post a picture of your organizer in the Shop Hacks Facebook Group when you finish! We would love to see how you are Building YOUR Space! 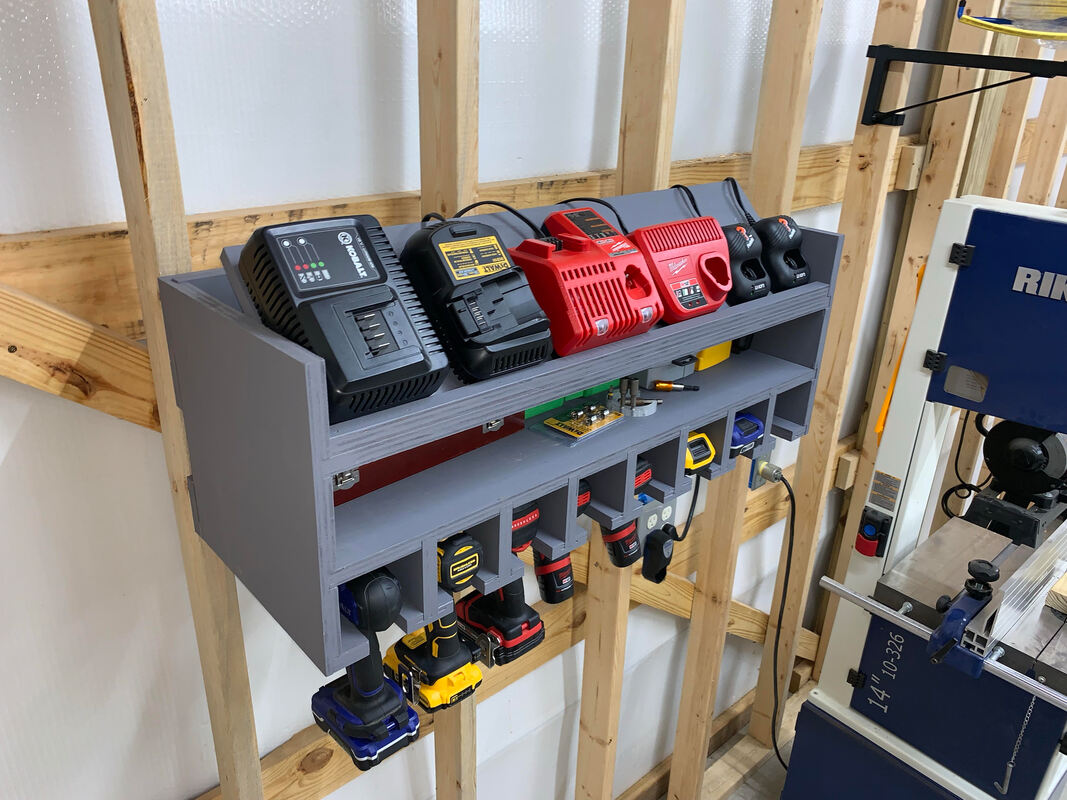 Zig Zigler once said, "You will get all you want in life if you help enough other people get what they want". That saying resonated with my core being and it is the basis of the Shop Hacks Innovators Program. My goal is to help as many of you build your dreams as I can while I'm building my dream. What is this program? In a Nutshell...
My hope is that this program allows motivated and innovative people like you to make money selling your product plans without the hassle and expense of the sales and marketing side. If you want to make $$ from your innovative and proven shop hacks then you will want to check this out. The draft details of the program are outlined HERE. I could have easily put plans together for my own version of Tim's drill organizer design and not split any of the profits. However, the thought occurred to me, "there is 1000x more collective talent in the Shop Hacks community than I have. They have talent and I have a marketing platform so why don't I work with these people in a way that can benefit all of us as a team". Let's partner to create something better than any of us could create on our own. Tim was using Sketchup (a low cost, entry level CAD software) when he first designed his drill organizer but was willing to jump in to learn Fusion360 (a more powerful and free CAD/CAM software). Having his design in Fusion made it easy for me to make the drawing views I wanted to use for the plans. He picked Fusion up very quickly and developed the CAD model and plans in just a couple weeks in his spare time. He put together the plans that are offered here and passed all of the information on to me to add the Shop Hacks branding. He's finished and is already working on plans for two more products. Without lifting a finger, Tim will accumulate residual income every quarter for as long as these plans continue to sell. I'm open to receiving ideas via just napkin sketches but the more work I have to do the less the royalty will be. However, all product ideas will be required to have the program steps completed prior to submission. Right now, for plans, I'm offering 50% of the profits for anyone who goes through all of the steps outlined in the program and summits a set of plans ready for release. We will start there but I will likely accept products that have fully functional prototypes without a CAD model or plans and offer a much lower royalty % . If this sounds like something you might be ready to invest in then go to the link above and read through the program outline. If you are still interested after reading through the program requirements, you will be directed to a link where you can join the innovators group to ask more questions, interact with other Shop Hacks innovators and brainstorm how we can make this program the most beneficial for everyone involved. I'm excited to help as many of you as possible to build your dreams, as I'm building mine! Shop Hacks Innovators Program Check out popular Shop Hacks Newsletters...
Promotion.... Build YOUR Space with these Shop Hacks products...
If you would like to receive the Shop Hacks Newsletter every Friday at 3:30 Eastern... just click the button... When I designed the Shop Hacks Ultimate Flip Top Workbench I wanted a way to make it mobile that didn't require any hardware to protrude beyond the base of the cabinet. I couldn't find any mobile tool bases that were concealed so I designed my own using common tools and materials and the DIY Mobile Tool Base that I'll show you how to build today was born.  You may have noticed that I didn't include the adjective "ultimate" in the name of this product. While it works wonderfully and I couldn't be more pleased with it, I see this as more as a idea generator for applications for the cylinder concept used here. There probably won't be that many people who want to build this exact mobile base. However, this cylinder design can be adapted to have anywhere up to 15 feet of stroke if you like. I have made versions of this to lift close to 200 lbs over 3 feet with a residential water supply and a hose. Think outside of the box and consider what you might be able to do with such a low cost DIY hydraulic cylinder design. If you come up with some ideas then post them in the Shop Hacks Facebook group with the rest of us. I can't wait to see what might come out of this.
The concept and implementation are fairly simple. I built 6 hydraulic cylinders out of PVC pipe, filled them with water and used a simple 12VDC air pump to pressurize the cylinders that lift the cabinet off the floor. When the cabinet lifts the casters are pushed against the floor which makes it mobile. When the pressure is released the cylinders retract and the cabinet rests firmly on the floor like it would if it didn't have a mobile base. You can see how it works in the short videos HERE. You can see more details about how the system works in the following photos and illustrations... With a little trial and error you will be able to build this system from the information in this article. If you are interested in saving some time by having detailed instructions, more illustrations and detailed drawings for each component you can purchase the plans HERE for the discounted price of $5.95 published only to Shop Hacks Newsletter subscribers until 9/10/19. The plans include 27 pages of photos and dimensioned drawings as well as a complete hyperlinked parts list to you don't have to search for parts. Shop Hacks is solely supported through the sales of plans and affiliate links so thank you for considering a purchase to support more free content like this to help Build YOUR Space! Affiliate links take you to the sales pages for products mentioned in this article. They are listed at the exact same price as you would see if you search on your own but Shop Hacks receives a small commission from anything you purchase within 24 hours of clicking on an affiliate link. Its a free and easy way to support more content. If you are interested in plans for the Ultimate Flip Top Workbench (pictured below) that inspired this build, just click on the link to find out more. Tools required: You won't need any special tools or materials to build the DIY Mobile Tool Base with DIY Hydraulic Lifts. Here's a list of tools that you will need...
The illustration below shows you an overview of the top assembly at a glance. All of the numbered parts have associated drawings or purchase links in the plans.  The illustration below shows you the detailed components of the Hydraulic cylinders. Again, the detailed dimensioned drawings and part links are included in the plans.  The hydraulic cylinder is made from Schedule 40 PVC pipe, a wooden or plastic plug epoxied into the bottom of part number 2, a plastic retaining ring, an O-ring, a steel retainer rod and a couple barbed fittings. The grooves can be cut using a table saw or router table setup. I outline a method to safely and accurately cut the grooves in the plans. You need to drill and tap the NPT holes for the barbed fittings. I made the mistake of just drilling them and trying to tap them with the fittings themselves and it cost me a lot of wasted time trying to fix leaks. WARNING: Do NOT pressurize PVC pipe with air only. Even though this assembly can probably handle much more pressure than the pump can deliver, there is a chance in just the right set of circumstances that it could crack and shatter causing it to send sharp pieces of plastic flying. So, this system is meant to be an "air over liquid" system. All of the cylinders are filled with oil or water and the air pump pressurizes a relatively small volume of air. I used water in mine because my shop never goes below freezing. If your shop goes below freezing then you should add antifreeze or use oil instead of water. The following illustrations show how the system works overall. When you press the momentary switch it turns on a 12VDC air pump that pressurizes the cylinders and they extend. When the cylinders extend they press against the bottom of the cabinet, or against the frame supporting your tool, which forces the casters down and lifts the tool. You can move the tool on the casters. When you want it to be planted firmly you just pull the pressure relief valve which releases the air and forces the cylinders to retract under the weight of the tool. I'll show the cylinders extended and retracted to make it clearer. So, there you have it... a DIY mobile tool base with DIY hydraulic lifts that you can make in your own workshop. Like I mentioned earlier, the plans include 27 pages of detailed instructions, photos and illustrations if you want to save some time.
I may consider selling hardware kits that include the items you might not have readily available. If you are interested in seeing a hardware kit made available for this system just let me know in the comments or in the Shop Hacks Facebook Group. I"ll include a few links to some of the parts I recommend for this build to get you started... Set of 4 @ 3" Casters with a 300 lb each load rating. Sealed lead acid 12V battery 12VDC Air Pump 5A Momentary Switch Don't forget that you can modify this design to have as much stroke as you want and use it for other purposes. I'm looking forward to seeing what some of you will come up with! When you SUBSCRIBE to the Shop Hacks Newsletter you receive a helpful article like this one every Friday at 3:30 PM Eastern. The workbench may be the most used piece of equipment in most shops. Workbenches range from a pair of sawhorses with an old door or piece of plywood laid across them to a work of art like the one below that Richard Csepregi posted in the Shop Hacks Facebook group. (Click on the photo to see more details in his post) 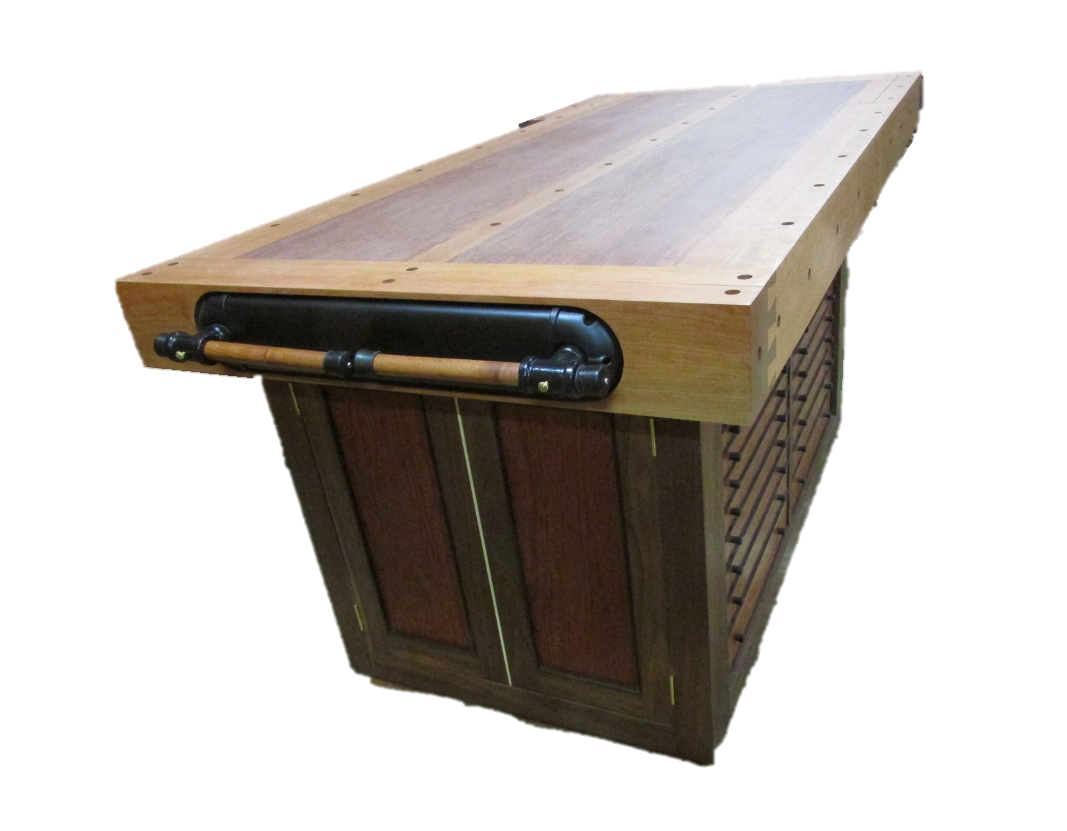 We all have a workbench of some sort. I think it is a fair bet that 99.999% of our workbenches don't look nearly as nice as Richard's ;-) Chances are that your workbench looks more like the one below. In this article I'll discuss the various materials that you can use to build or restore the most common types of workbenches and how much each option costs for a 2' x 8' version... a common size for a countertop type workbench. You may be surprised to find that you can restore your workbench to for a little over $1 per square foot. 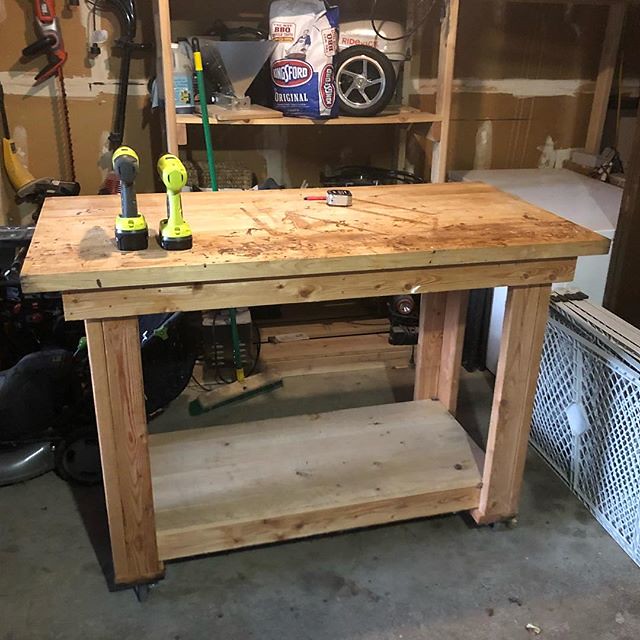 Shop Hacks exists to help you Build YOUR Space! Let's get started... Based on the results of this Shop Hacks Facebook group poll, it looks like Plywood and MDF make up the bulk of your workbench tops but pine and hardwood round out the top choices. It's not difficult to imagine why. Plywood and MDF are readily available, cheap and durable and make great general use work surfaces. Pine and Hardwood can be made into thick, flat tops with plenty of mass to absorb energy, which is essential for hand work such as chiseling. We also have mechanics and metalworkers in the Shop Hacks tribe and they often use metal workbenches to handle heavy metal parts and fabrication as well as oils and greases. There's no perfect workbench for everyone but this article will help you determine what fits your needs the best. 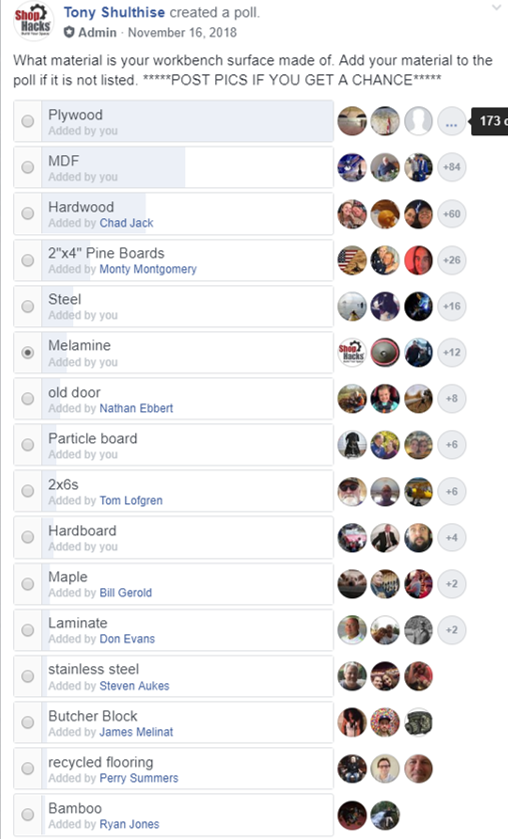 I've used many types of workbench surfaces over the years. Plywood, laminate, MDF, melamine, flooring products and epoxy coatings. They all have their own unique advantages. Let's talk about "shop feel" for a minute... Many of you are aware of the transformation my workshop has been undergoing over the last few years. I've been focusing a lot of energy on two goals for any shop improvement I make...
This second point is something that never crossed my mind for over 30 years. I was very happy with organized tools and materials, a few florescent lights, dingy gray floors, block walls, ineffective dust collection and a very basic workbench made of dark stained plywood. I don't have pictures of the very start of my journey to create a workshop destination but these photos will give you a feel for the transformation that has occurred over the past couple of years. For me, the transformation involved the following areas...
My workbench may not be what you are looking for but I would venture to say that the way it makes me feel is something that you are looking for. The original workbench top was a dark stained plywood. I later covered in floor tiles (see picture inset above). The floor tiles looked good for a while but quickly started looking terrible... bad choice. I saw a few videos from Mike Quist at Stonecoatcountertops YouTube channel where they have hundreds of videos showing step by step instructions showing how to perform epoxy countertop restorations. I decided to see if I could make something of my mess. The photo below shows the before and after results. Full disclosure... Stonecoatcountertops.com provided the materials for the epoxy countertop restoration in exchange for a "how-to" video. I'll post a link to that video in a future article. There are other epoxy companies but I will say that SCC products were super easy to use and I chose them because they have more video resources and tech support than any other company I could find. For these reasons, I didn't approach any other companies. 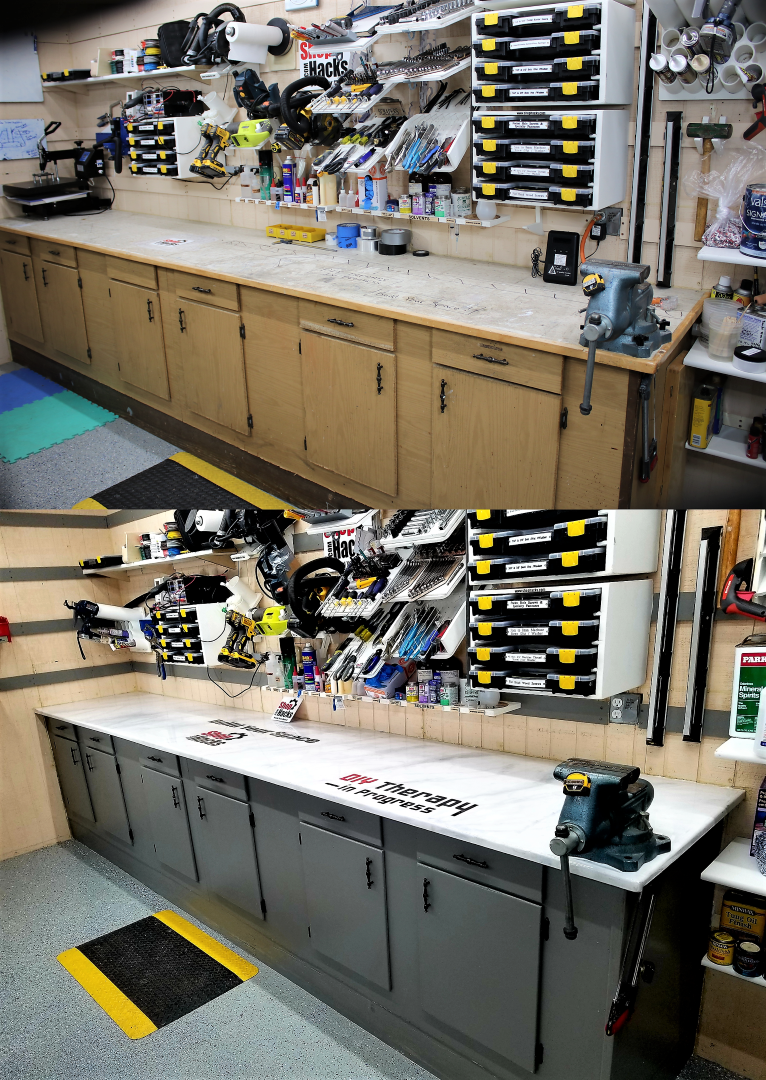 Below are close up pictures to give you a better feel for what you can do with less than $5 per square foot and one day (or less) of labor... 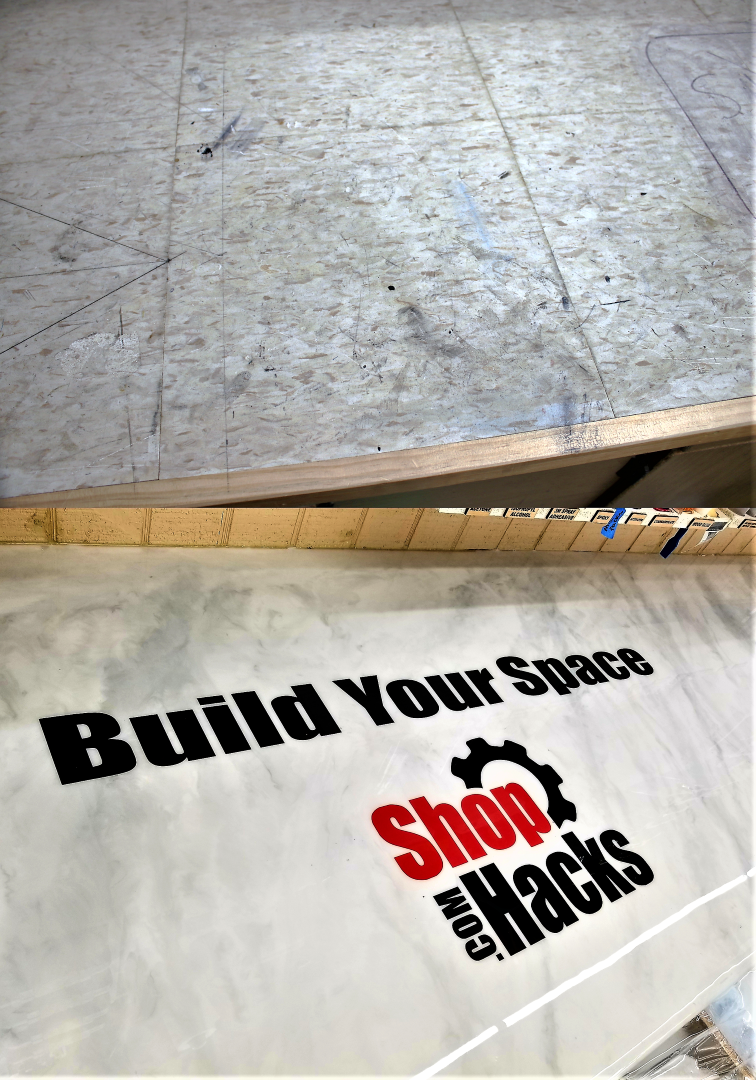 I have been using this workbench for almost a year now and it still looks great. I have melamine top workbench that I use for any heavy duty pounding and sawing but I use this bench and the Shop Hacks Ultimate Flip Top Workbench the most. Other than scratches my epoxy coated benches still look like new. You can hit them with a hammer without damage. If they ever start to look bad I'll just sand the tops and pour another skim coat of epoxy and it will look brand new again with just an hour of work and less than $20 of epoxy. If you've never given much thought to improving the "feel" of your shop, it may be worth a little effort. Creating a destination has many rewards. After coating my floors, installing a LOT of LED lighting, getting dust collection and air filtration completely under control and updating the look of my workbench, my shop feels like a completely different place. It really is a destination... a place to crank out new products or just to hang out and soak in the feel of a great looking space where there are not expectations other than my own. This is what the Shop Hacks motto, "Build YOUR Space" is all about. Side note... I cut all of the vinyl graphics you see in these photos. If you are interested in learning more about vinyl cutters you can find more information on the website HERE. Common build/restoration options and costs Without going into too many details let's just look at what some of the most common options and how much they cost. Price often dictates the materials used for a project. To help you quickly determine which options are feasible for your workbench just multiply the length x width to determine the number of square feet then multiply that number by the cost per square foot for the materials that are listed below. I’ve also included the cost to make a typical 2’x8’ bench top using each option. The table below lists options from least expensive to most expensive. Links to materials are provided for reference. Use this as a reference to decide what materials and coatings are right for you. 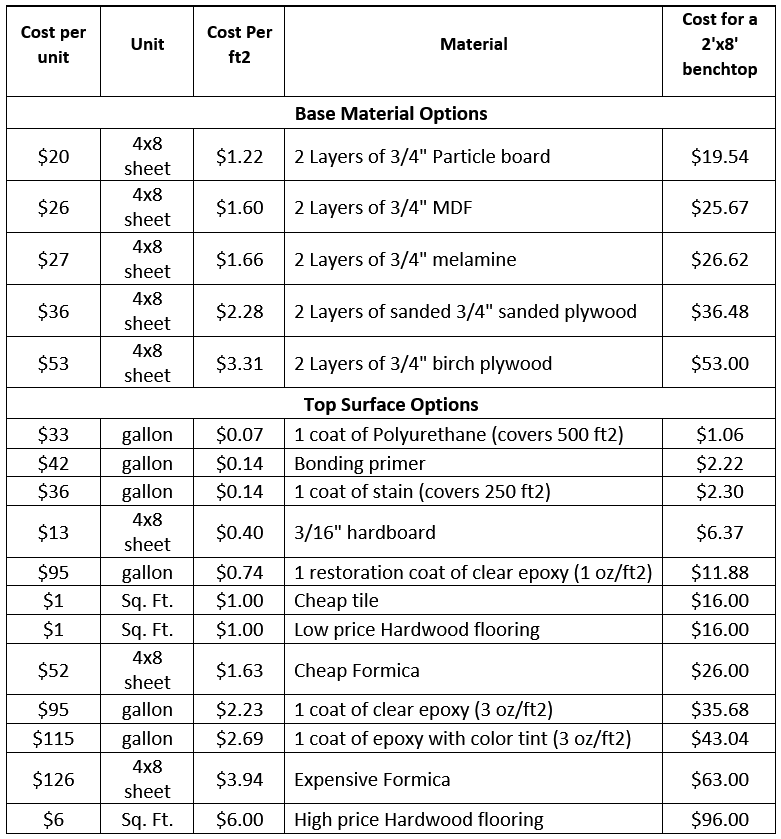 Links to sites where prices were derived are provided below... Workbench Top Material options... $19.54 2 Layers of 3/4" Particle board $25.67 2 Layers of 3/4" MDF $27.00 2 Layers of 3/4" melamine $36.48 2 Layers of sanded 3/4" sanded plywood $53.00 2 Layers of 3/4" birch plywood Workbench Top Finishing/Coating options... $1.06 1 coat of Polyurethane (covers 500 ft2) $2.22 Bonding primer $2.30 1 coat of stain (covers 250 ft2) $6.37 3/16" hardboard $11.88 1 restoration coat of clear epoxy (1 oz/ft2) $26.00 Cheap Formica (This is likely available much cheaper at specialty stores) $35.68 1 coat of clear epoxy (3 oz/ft2) $43.04 1 coat of epoxy with color tint (3 oz/ft2) $96.00 High price Hardwood flooring ...More details about each of the options... 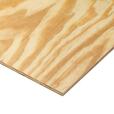 Plywood, Melamine, MDF and Particle Board Base Materials Two sheets of ¾” melamine, MDF or particle board will provide a very functional surface that can last a long time. They are certainly one of the cheapest options available. Add a coat of paint and/or polyurethane and you have a functional, durable work surface that is inexpensive and that will last a long time for under $2 per square foot. Because it is very smooth, flat and easy to work with, MDF is an ideal base for an epoxy countertop finish. You can choose to use melamine with no extra finish. Melamine provides a fairly durable surface that is easy to clean. If you wax the melamine then glue will not stick to it. Plywood is also a good base material that comes in at $2.28 to $3.31 per square foot for a 1.5” thick bench top.  Paint and/or Polyurethane If you already have a workbench or countertop then you can sand it down, add a coat of bonding primer, some paint and a coat of polyurethane and you will have a nice looking surface for under $0.25 per square foot. Throw in some low cost vinyl graphics under the polyurethane and you will have a unique custom work surface for just a few dollars.  Tempered Hardboard Tempered hardboard on top of workbenches and counters is a great option for a very durable surface that is easily restored if you use it often for gluing, fastening, cutting, drilling and painting on the surface. A coat of paste wax to seal the hardboard and make glue less likely to stick to it. If you don’t like the dark color of hardboard you can paint it and put a coat of polyurethane over the paint to seal it up then some paste wax to keep glue from sticking. 3/16” hardboard comes in at a low 40 cents per square foot which makes it a very popular option.  Tile and Hardwood Flooring Depending on how you use your workbench or countertop, you might also consider covering it in tile or hardwood flooring. Ceramic and composite tiles can be a durable option that provide latitude in terms of patterns and colors. Ceramic tiles certainly are not good for operations that involve a lot of impact or cutting but are very suitable for things such as potting or food service. They are also offered in woodgrain patterns that look very realistic yet offer very high durability. Tile costs range from about $1 per square foot to over $5. Hardwood flooring is another option that offers a very durable and unique looking surface for just about any operations. It is very quick and easy to install. Hardwood flooring ranges from $1 per square foot to over $6. If you search around you may even be able to get enough offcuts to cover your workbench for almost no cost. Check with your local flooring distributors to see what they have available.  Epoxy Coating As you can see, epoxy coating your countertop or work surface can yield amazing results. I chose to use epoxy because of the high end look it provides for a relatively low $5 per square foot price tag. It also doesn’t require any special skills or artistic talent to obtain an amazing look. I also wanted to embed my company graphics into the workbench and epoxy coatings make this very easy to do with a very professional looking final result. While epoxy coating is on the higher end of your options in terms of cost, it is also without a doubt yields some of the most spectacular results. As mentioned earlier, epoxy resin is great for many applications but it is not ideal for every application. Below is a list of strengths and weaknesses of epoxy coatings: Why I used epoxy resin for 2 of my workbenches: • I do a lot of assembly and electrical work on this bench. I have 3 other benches that get most of the cutting, sawing, pounding and gluing so I’m not worried about destroying this one. • It looks amazing. You can obtain a gloss or matte finish that looks stunning. It also allows me to add branding graphics under the final flood clear coat which look very professional. • Versatile. You can create many different looks. Your imagination is the limit. You can coat just about any surface with epoxy. A wide range of colors, tints and metallic additives are available. • Self-leveling. It will create a very smooth and flat surface on any level surface even if the surface contains cracks or imperfections. • Easy to use. Anyone can use it to get amazing results. • SCC’s epoxy resins have no VOC’s so you don’t have a strong smell while applying it. • SCC’s epoxy resins have UV inhibitors included to make them suitable for use outside in indirect sunlight. • Epoxy resins are very resistant to chemicals and solvents • Heat resistant. SCC’s countertop resins are heat resistant up to several hundred degrees. They will soften with extended exposure to high temperatures but they will not scorch easily. • Epoxy resins are easily repaired. Just sand and polish scratches out or lightly sand and apply another flood coat to make the surface looks as good as new. Situations where you might not want to use epoxy resins: • Due to the cost and time required to rework an epoxy countertop it may not make sense to use epoxy in areas that see a high level of abuse such as drilling, cutting or very high temperatures such as grinding, milling or welding areas. In those areas a cheaper material like tempered hardboard that is easily replaced or a very durable material like steel may be more appropriate. Workbench Ideas Flip Top Workbenches Flip top workbenches allow you to pack more tools in less space. Mobile flip top workbenches are the ultimate in space and workflow efficiency. I frequently use two other workbenches besides the one I showed you earlier. I got very tired of dragging my mitersaw out of storage every time I needed to make a simple miter cut or two. So, I designed the Shop Hacks Ultimate Flip Top Workbench. This is a mobile flip top workbench which allows 3-second access to my mitersaw when I need it but allows me to use it as a workbench the other 99% of the time. It includes a concealed electro-hydraulic lifting mobile base. I use it as an assembly and sanding table 99% of the time. It has 8 built-in power outlets powered by a single cord so I always have a power outlet close at hand. It also has a very innovative integrated dust collection which powers a blast gated port on one side for a tool such as a miter saw, planer or a sander. The other side has an integrated 5" x 24" high air velocity downdraft table that is very effective at capturing sanding dust. It also makes clean-up a breeze. Just one swipe of your hand and all of the dust on the table is sucked into the downdraft port. A single vacuum connection on the side of the cabinet supplies both sides of the flip table. I.E. the tool on one side and the downdraft table on the other. I installed the Chop Stop (coming soon) miter-stop fenceless system. With the Chop Stop I never have to measure or mark my stock. Just set it and forget it. The T-track for this system can also be used to clamp stock in place while using the workbench side of the table. Multi-function Workbenches For heavy duty pounding and work holding I use this melamine top workbench attached to my cabinet saw shown in the photos below. Please excuse the obscene use of color on this system. It not the looks that count... it's what's on the inside, right? :-) This workbench has the following features...
I hope this article gave you some ideas to Build YOUR Space. If you have some ideas to share feel free to post them in the comments below. You can also reach me at [email protected] if you have any questions or if you just want to suggest topics for future articles. Be sure to join us at the Shop Hacks Facebook group where you will find great workshop improvement ideas posted every day. Check out popular Shop Hacks Newsletters... Promotional... Build YOUR Space... and begin transforming your workshop into a destination starting with one of these Shop Hacks products...
It has finally arrived... the Shop Hacks Ultimate DIY Air Filtration System build article. You can design your system with the information in this article or buy the plans to get all the exact dimensions to speed up the process. I've spent many weeks building and testing many systems and this air filtration system blows them all away. If you are interested in a deep dive into previous articles that cover all of the testing and findings you can find them here... Air Filtration System Shootout Article - Deep Dive Please consider supporting more Shop Hacks content by purchasing the Plans and/or Hardware. They are both discounted 10% for Newsletter subscribers until 8/25/19 . Plans Include
  The following summarizes why this system is worth building. You can build it for under $100 if you only use one filter now and for under $200 if you use all five filters to get the max performance and a virtually maintenance free system. Even using only one filter it will still outperform the Powermatic PM1200 but flow will drop off sharply as the filter gets dirty. The more filters you use the less the flow will drop over time. With 5 filters you may be able to run the system for many years without any filter maintenance.  Let's jump straight into the build... Overview and Supporting Notes Depending on your level of experience, this build should take between 3 and 6 hours to complete for a first-time build. Every part is detailed in the drawings throughout these plans. Don’t forget to purchase the remote control timer that allows you to keep the system running for 30 minutes, 1,2 or 4 hours after you leave your shop. You can find it at this affiliate link… https://amzn.to/2ZsvcyA A note about affiliate links… Affiliate links help Shop Hacks offer quality content to you for free via the Shop Hacks Newsletter and Shop Hacks Facebook group. When you purchase anything from Amazon within 24 hours of clicking on an affiliate link Amazon gives Shop Hacks a small commission. Using the link doesn’t affect the price you pay at all but it does help Shop Hacks help you Build Your Space. Thank you for using affiliate links! Required tools: Circular saw or table saw Router Jig saw Drill, bits and a 1.25” spade bit, Forstner bit or hole saw. Pencil Straight edge Optional tools: Pin nailer Caulking gun Here's a copy of the parts list with the part number followed by the part name... 1 20" 2264QM High Velocity Fan (affiliate link) 2 Filter (affiliate link) 3 Front Panel 4 Horizontal Panel 5 Vertical Panel 6 Rear Panel 7 Cord Cover 8 Speed Control Cover 9 Filter Clip 10 Filter Clip2 11 Hanger Block 12 Hook 13 Fan Clip 14 Chain 15 #6 x 5/8" long flat head wood screw 16 #6 x 3/8" long flat head wood screw 17 Caulk 18 Wood glue 19 Construction adhesive A detailed parts list with hyperlinks to all of the hardware used in this build is included in the plans. You can also see the hardware used in the photo earlier in the article.
When you are finished your parts should look something like this… 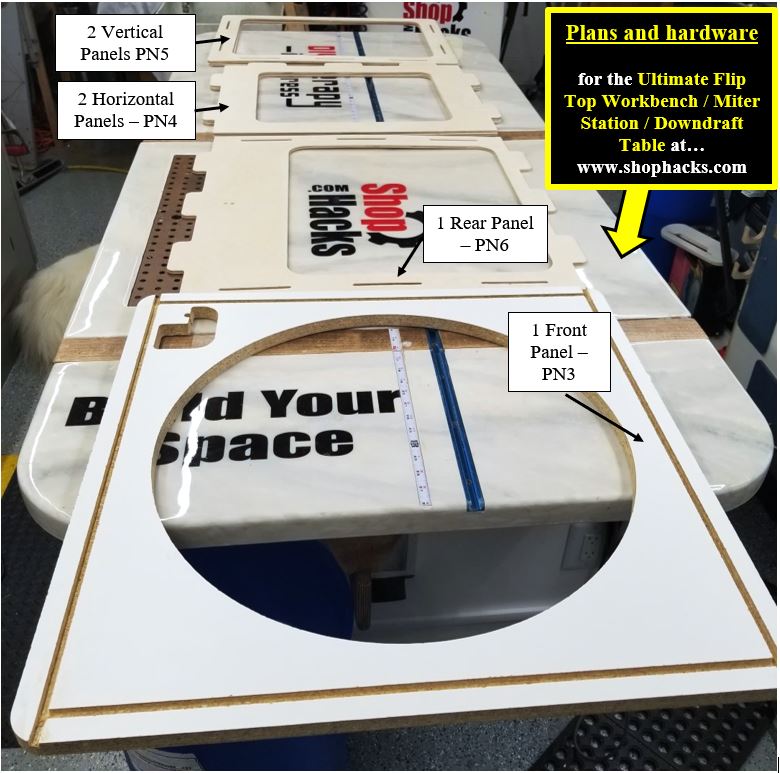 5. Next, dry fit all of the parts to ensure they fit together as required. Don’t worry about gaps here or there. Note: Be careful to place the Rear Panel in the orientation shown relative to the speed control cutout on the Front Panel. This will allow proper placement of the power cord through the Rear Panel. Gaps will be filled with caulk from the inside in a later step. The assembly should look something like ,the following photo… 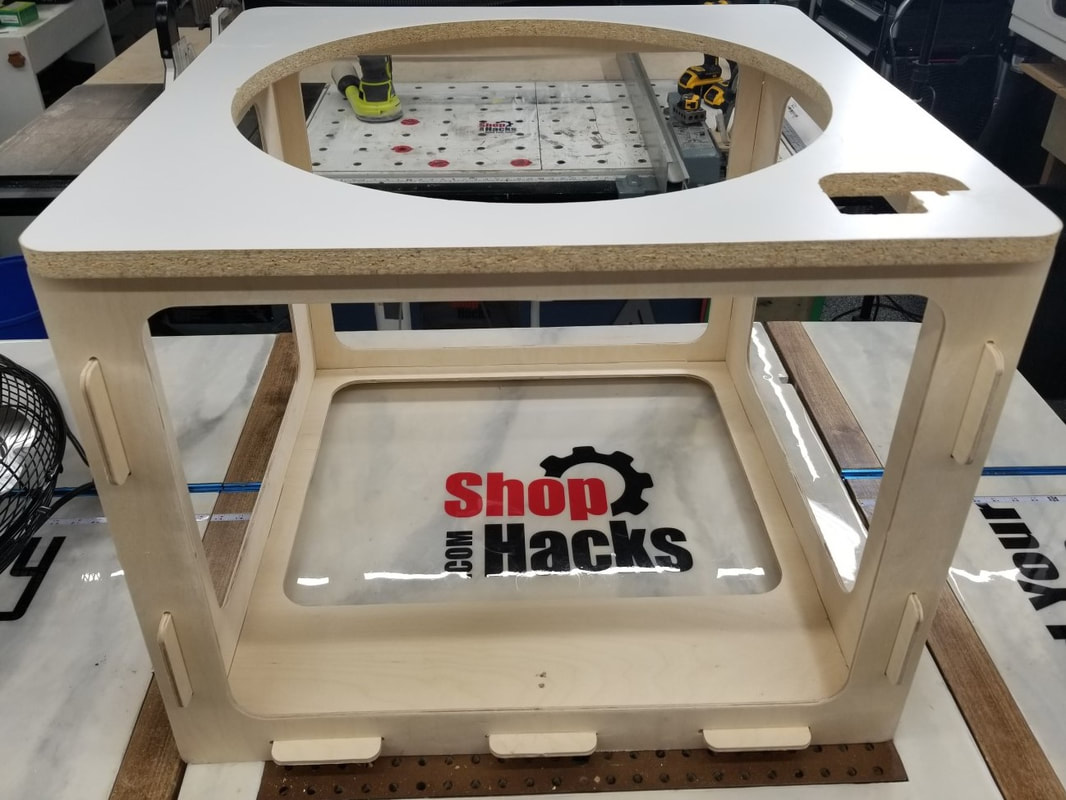 Once you are happy with the dry fit it is helpful but not necessary to pin nail panels in place after you glue and reassemble them. I just pin nailed everything together dry then added glue along the inside joints after it was assembled. This provides more than enough strength to hold the assembly together. I bought a Metabo (formerly Hitachi) pin nailer for this project. It came highly recommended on by a lot of people in the Shop Hacks Facebook Group and I’m super pleased with how it performs. It sets the pins at the right depth regardless of the material type that I’ve used it on. Here’s an affiliate link to the pin nailer the group recommended and that I used… https://amzn.to/31X1qzD Apply construction adhesive along the slots on the back side of the Front Panel (PN3) then clamp it to the frame. Next, insert the fan through the hole in the Front Plate from the back side and install the 4 Fan Clips (PN13) using 4 #6x5/8” flat head wood screws (PN15). It helps to predrill the holes for the clips before installing the screws. 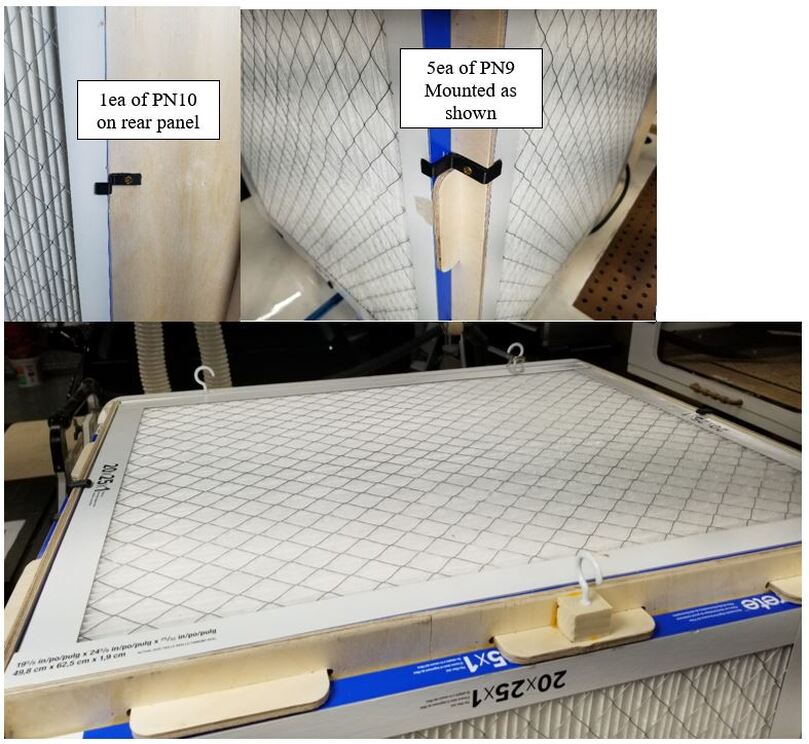
If you used melamine, sand or chip off the area that will be under the Speed Control Cover (PN8). This will give something for the glue to adhere to when you attach it. Slip the fan speed controller through the hole in the Front Panel and install the bolt that came with it to secure it to the Front Panel. Use glue or construction adhesive to attach the Speed Control Cover to the Front Panel over the fan speed control assembly. Place the plug through the hole drilled in the Rear Panel (PN6) then attach the Cord Cover (PN7) with glue or construction adhesive to seal up the hole. I cut the Cord Cover into two pieces to attach it. If you use thin plastic or a flexible material you can just cut a single slit from the hole to the outside. I added a zip tie to the cord to act as a strain relief. Sand down any sharp edges that could damage the cord. Apply caulk over all of the seams and any areas where unfiltered air might enter the housing. You want all of the air to be forced through the filters to get the maximum filtration efficiency. Now you can install the Filters (PN2). They should be a snug fit if your dimensions are just right but you can add small blocks or press in small wedges to hold them in place if they are loose. You should be able to use these filters for years before they need to be replaced so you don’t need install a quick release mechanism unless you just prefer to do so. If you purchased the Shop Hacks hardware kit for this build you can install the optional Filter Clips (PN9 5ea and PN10 1 ea), Hanger Block (PN11) and Hooks (PN12). PN10 attaches to the rear panel only. Iron-on edge banding adds a finishing touch but is certainly optional.  Don’t forget to add the remote-control power switch with timer functions https://amzn.to/2ZsvcyA . This will allow you to turn the system on when you need it and leave it running for 30 minutes to 4 hours after you leave your shop to make sure the fine dust is removed before it settles all over your tools and projects. Does positioning or orientation matter? I ran a test with a smaller air filtration system to see if adding an extra fan in the shop to circulate more air would make any difference in terms of the effectiveness of the air filtration system. As you can see from the figure below, adding a recirculation fan in the shop made no measurable difference. The finest and most dangerous particles act more like gasses and disperse evenly throughout the entire space. This means that as long as your system is placed in the same room as where you are creating the dust the placement and orientation won’t matter. You can place it under a bench or in a loft or wherever you want.  However, temperature differences between the floor and 8’ up can vary as much as 20F so the placement of your system may matter in terms of how hot your shop feels. If you are in a very hot climate then it would be best to draw the air into the system as low as practical. If you live in a very cold climate then try to draw air from up high but try to not allow the air cause much circulation where you work or it will feel like a constant cold breeze.
I don’t have any long term tests on the filters that I recommend for this system, however, I do have a similar system with similar filters that has been running for 3 years now 24/7. I’ve swept the filters a few times but they are caked with dust and still perform very well. They are still 80% efficient at removing particles 0.5 microns and larger and the flow rate hasn’t dropped noticeably. How many filters do you need to use? This system will perform better than the Powermatic PM1200 even if you only install one filter. However, over time the flow rate will drop faster than the PM1200 because the filter area is lower. With two filters you can go longer between cleaning the filters. With five filters you should be able to use it indefinitely without having to clean the filters. I don’t have any tests to see how it performs under heavy dust conditions over long periods so I can’t make any promises but I am confident that it will always outperform the PM1200 system when used under the same conditions. I hope you enjoy your Shop Hacks Ultimate DIY Air Filtration System! It will be a great add to your shop and your lungs and heart will thank you for many years to come. Several weeks ago I presented the test results from tests of 10 different air filtration systems. The results were amazing and a $100 DIY system beat the $500 Powermatic PM1200 air filtration system by a pretty wide margin. You can read that article HERE. Below is a summary of some of the performance results from that article. Particle counts were logged using a laser particle counter. All tests were performed by cutting about 12 ft of ½” MDF and 12 ft of ¾” melamine on a table saw with the blade elevated 2” above the stock (to create more dust). For reference, the green band at the bottom of the graph is where you want your shop air to be for a healthy environment. Anything above that band is unhealthy.  I learned a great deal during the air filtration system testing and I'll distill the most important findings in this article. I learned enough to design a system that you can build yourself that will outperform the equivalent of two $500 Powermatic systems! Next week I'll present the Shop Hacks Ultimate Air Filtration System in a "How-To" article. This article is laid out as follows:
How many filters are ideal and why? The surface area of your filtration material matters. It matters a lot. Each time you double the filter material area you cut the flow resistance at any given flow rate down by 4x. If you increase the filter area by 4x you decrease the resistance 16x. Increasing the filter area by 10x decreases the resistance by 100x. You get the point... put mathematically, the flow resistance at any flow rate decreases as the square of the filter area. What does this mean in practical terms? For a 20" box fan the flow using 1, 2 and 4 @ 20"x20"x1" new (clean) filters is...
For the Lasko High Velocity Fan
As you can see, the benefits of adding more filters drops off after two filters. However, dirty filter will have about 2x the resistance of a clean filter. This means
So, a 4 filter system with dirty filters will perform 35% better than a 2 filter system with dirty filters. I have a 3 year old, 4 filter system in my shop and I've only swept the filters a few times and it still performs very well. It is nearly a no-maintenance system. For this reason, the Shop Hacks Ultimate Air Filtration System will be modular. You can use 2,3, 4 or 5 filters with it depending on your budget preferences. That will allow those who want to save some $$ to use just two filters and those who want the least amount of maintenance and the highest performance to use 3, 4 or 5 filters. What Fan and Filters Should You Buy? After running the Air Filtration Shootout Tests I realized that lower MERV ratings do not mean that filters will have lower resistance to flow. In fact, THIS filter, when clean, has a lower flow resistance than ANY filter I've tested, including cheap fiberglass filters. I found this test data to back up this notion...  So, the stacked MERV 8 and MERV 11 filter configuration that I used in the Air Filtration System Shootout was both more restrictive and filtered fewer particles than a system using THIS filter alone. I'll link to the fan that I'll design the Shop Hacks Ultimate Air Filtration System around below also.
I look forward to presenting the Shop Hacks Ultimate Air Filtration System design and a link to the plans to you in next week's article. If you have any questions in the meantime, please leave them in the comments section below this article! I'll be happy to help you out.
If you haven't subscribed to the Shop Hacks Newsletter then just click the link below to opt-in. This Newsletter comes out each Friday afternoon and contains tips that will help you Build Your Space! Workshop Organization - How to Organize Your Materials and Hardware Without Feeling Overwhelmed8/2/2019 If you aren't already subscribed and enjoy this type of content, you can subscribe to the weekly Shop Hacks Newsletter below. A sad but far too common shop related quote ... "I refuse to throw anything away, and never put anything back away. Eventually it gets so bad I don't even want to go in my shop." Does that sound familiar to you? We can all use some help organizing our workshop materials and hardware. Do you have a jar of screws that you just keep adding to thinking that one day you it will save your life? How about a scrap bin full of 20 years worth of off cuts that you are sure you will need one day? Have you ever started to organize that jar of screws or your many bins full of various hardware only to give up because there were just too many ways to sort them and it wasn't obvious at all which way you should choose? In today's article I'll show you how to organize common workshop materials and hardware. This article can help you get over the hump. I'll show you how I organized my hardware including pictures of several ways to store hardware and materials. Your workflow will likely dictate very different solutions than mine, but these ideas can be a starting point. Hopefully they will offer some extra encouragement to help you Build Your Space! 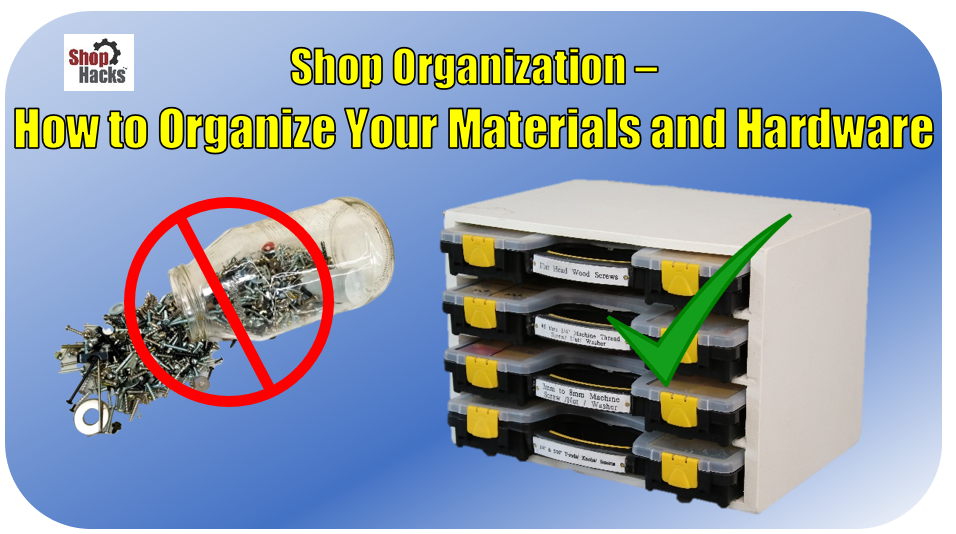 The idea of getting organized is very exciting. The act of organizing is certainly not a fun task. Why would anyone go through the work needed to organize materials and hardware? Three years ago my shop was a disaster area. I reached a breaking point after tripping over some sheet goods for the thousandth time. They were stored in the path from the door to my main work area. The frustration of not changing finally exceeded the dread of making a commitment to change. I had no idea at the time how these changes would totally transform how much I enjoy my shop time. Check out the before and after pics below. These pictures will give you a feel for the difference a concerted effort can make and I hope they encourage you to take those first steps forward. You can do this too. I'll show you where to start and how to go about the decision making process and I'll share about the specific organizers that I use that transformed my shop. 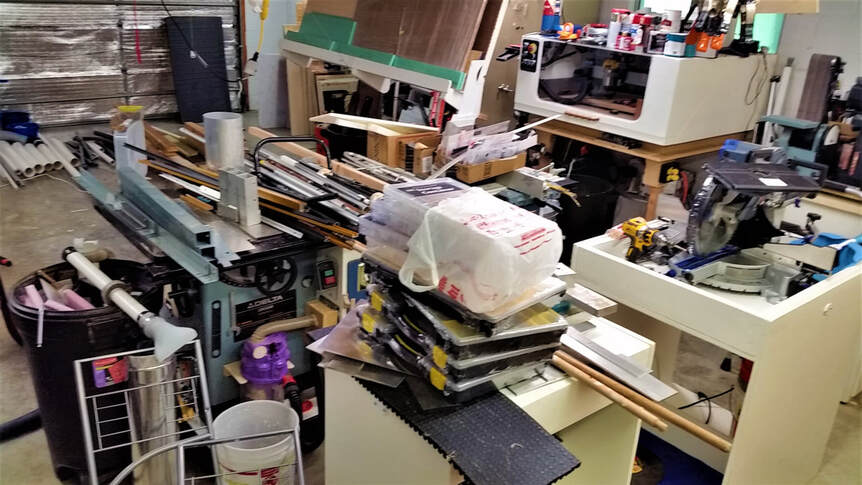 BEFORE: Piles of Materials EVERYWHERE 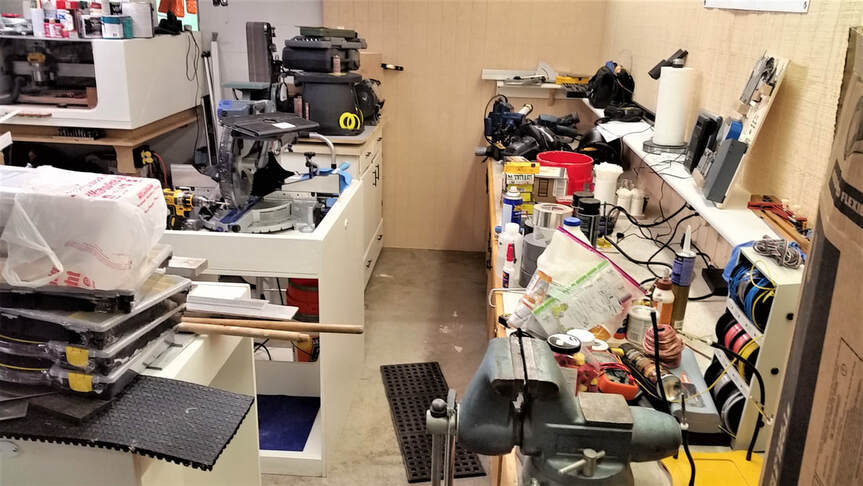 BEFORE: Every Horizontal Surface is Covered up 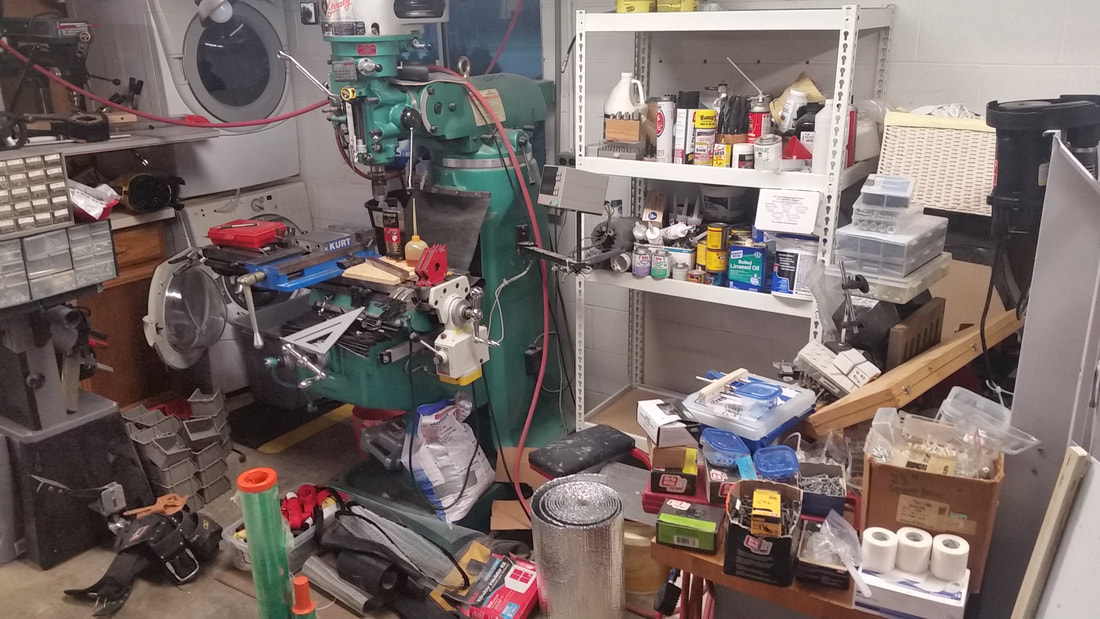 BEFORE: Paints, Solvents, Hardware in Disarray 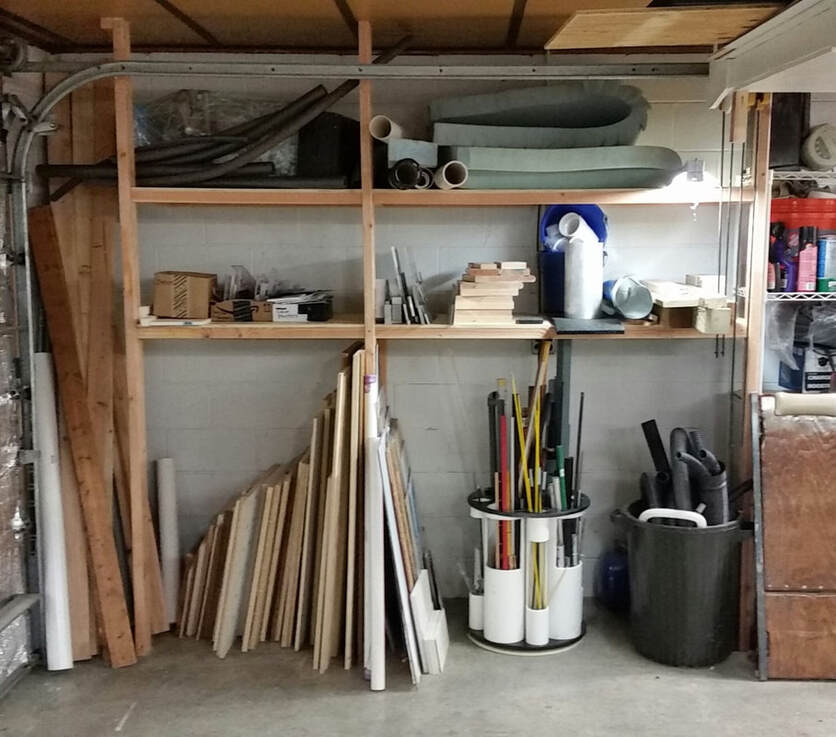 AFTER: Neatly Organized  AFTER: FREEDOM!! Workbenches Free and Clear and my most used tools and materials are within arms reach All Materials and Hardware are in Labeled Locations and my shop stays like this all the time now that it's so easy to put everything away. Why Get Organized?? When I look at these 3 year old pictures of my shop, I realize that I've already forgotten how I worked for almost 30 years. I would NEVER consider working like that now that I've experienced a whole new level of workshop enjoyment. In the past my shop would get very disorganized. I would cover every horizontal surface with tools and materials again. Then, occasionally, I would spend a couple hours rearranging junk so it felt more organized (but nothing like it is now). I was always fighting for working space and wasting time.  How much time does it cost to be disorganized? One of the most common sayings I hear all the time is, "My shop is a mess but I know where everything is.". That may be true but you are still wasting a lot of time if you are keeping unused items in your active work areas and if the items you use 80% of the time are not within arms reach. Think about how many times an hour you have to walk to get a tool or a piece of hardware. Let's just assume that you walk 10 ft to get a tool or some piece of hardware or material at least 15x per hour that you work in your shop. That's probably a low estimate for most of us. Assuming it takes 20 seconds to get what you are looking for that's close to 5 minutes per hour wasted on motion and hunting for things. Let's just say 10% for an even number. If you look at the photo above you will see that I have pared my tools and materials down so that the items I use 80% of the time are within arms reach. Compared to my previous setup I now get to spend 10% more time making, building and fixing things vs. cleaning, sorting and hunting. I spend around 2,000 hours a year in my workshop so that adds up to around 200 hours (5 full weeks) that I get to spend on projects vs wasting time hunting. Let's say you spend 10 hours a week in your shop. Using the same numbers as above... Organizing your tools and materials can allow you to spend over 50 more hours each year doing what you love vs. walking around, hunting and sorting! What would you make in your shop if you had an extra 50 hours per year to spend without taking time away from anything else? What Should You Do First? As I mentioned earlier I had several false starts when I tried to organize my shop. If you try to organize everything you will fail. Work on one work area at a time. The more organized I get the more I realize that less is best. This is why it is imperative that you only try to organize what you physically touch over 10 sessions or so in any particular work area. If you haven't touched tools, hardware or materials in that work area in the last 10 sessions in your shop then trust me, it needs to go into a storage area or out of your shop. Save room for the tools, materials and hardware that you use 80% of the time in each work area and mount them all within arms reach. I previously wrote an article about How to Organize Your Tools Without Feeling Overwhelmed. In that article I show you how to pare down the tools to increase your efficiency and buy back as much as a full week per year of extra project time without taking that time from anything else. Click on the link to get more details about how this principle makes everything about organizing your shop much easier and more efficient, including hardware and materials. Organizing Your Hardware The first organizing task that I completed was to organize my screws and other small hardware pieces. If you want to succeed you will have to make some uncomfortable decisions to get everything you don't touch on a regular basis out of your work areas. You got where you are with comfortable decisions. If you want to spend more time doing what you love and less time hunting and sorting then you will eventually have to do this anyway... empty your junk drawers, jars, etc... into the garbage. If you just can't bring yourself to do that then put them away in a storage area that doesn't use valuable space but get everything out of your work area to start with. Unless you have expensive hardware that you already have slated for a specific project you are better off starting with a clean slate. You can buy hardware relatively cheaply at Harbor Freight or Tractor Supply so don't hang on to your random assorted hardware. Put together hardware bins and organizers It is easier to show you what I did than to try to explain it. I'll show you what I ended up with for every organizer.
 4. I labeled every bin and placed them with the ones I use the most frequently closest to me. Below are 4 sets of 4 organizers that I felt were worth keeping in my active work area within arms reach. I stored everything else away from my work area. Organizer bin labels I created: Bin #1
Pictures of the contents in each hardware organizer: I should reiterate that your setup will most likely look totally different than mine. I ended up using about half of these on a frequent basis so I could have saved some time and just put the rest in storage. It doesn't hurt to have to walk to a storage area for something you only use occasionally. However, it saves a lot of time to have everything you use frequently within arms reach. Organize only the items that you actually touch and store or purge the rest. I store refills for frequently used hardware in a storage area. I used the Harbor Freight hardware organizers. They have held up very well and I can recommend them for in shop use if you have a Harbor Freight store in your area. If you don't have a Harbor Freight store near you or if you want something more durable for rough use then you might be interested in one of the higher end sets listed below. Disclosure: The products listed are affiliate links. By using these links you won't pay any extra but Shop Hacks will receive a small commission on each purchase. Thank you for your support that enables me to continue creating these articles to help you Build Your Space! If money is no object then you might consider investing in the Festool Sortainer system
If you are content with a very good and durable system but don't want to spend 3x as much for it then the Sortimo T-BOXX G was highly recommended in the Shop Hacks Facebook group.
Spray Paint Can Storage... I used to keep my spray cans in an old refrigerator but I found that I didn't like having to bend over and move the cans in front to see what I had in stock behind them. I designed the rack to pack the cans as closely together as I could. It hangs on a French cleat which makes it easy to relocate. I've relocated it a couple times already. Some people would prefer to store volatile compounds in a flame rated cabinet and I can see their point, but I prefer this method. 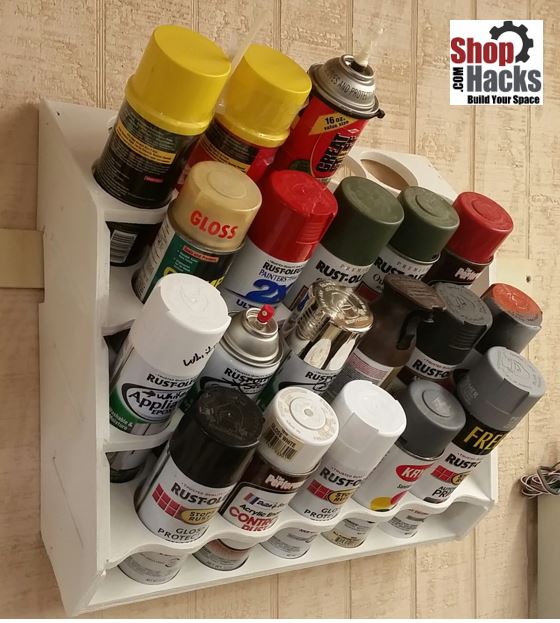 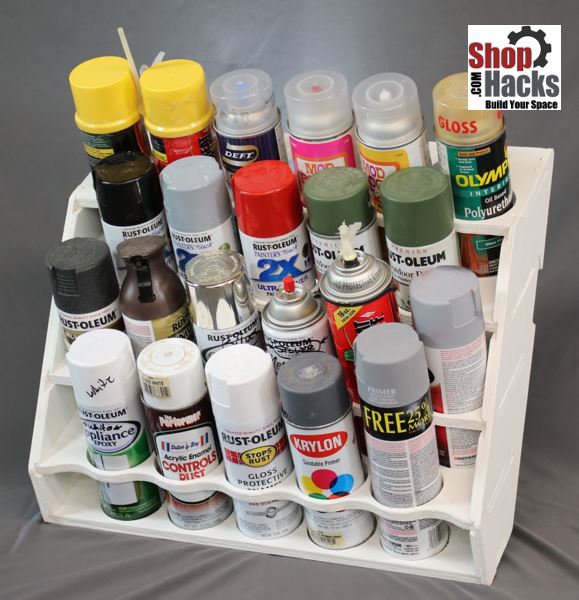 Adhesives and Solvent Storage... I originally stored my paints, adhesives and solvents on shelves. I had to walk half way across the shop just to use them. I paid attention to which ones I used the most often and made simple routed pockets in melamine boards for them. Every location is labeled so I know what is missing. Without labels most of these organizing systems fall apart so don't skip this step. This may seem like an inconsequential change but it has saved me many hours in just a couple of years now. I haven't had to change any of the boards to accommodate different shaped containers yet but, if I do, I can easily modify the CNC file and cut another one out in 10 minutes. Before and after pics below... 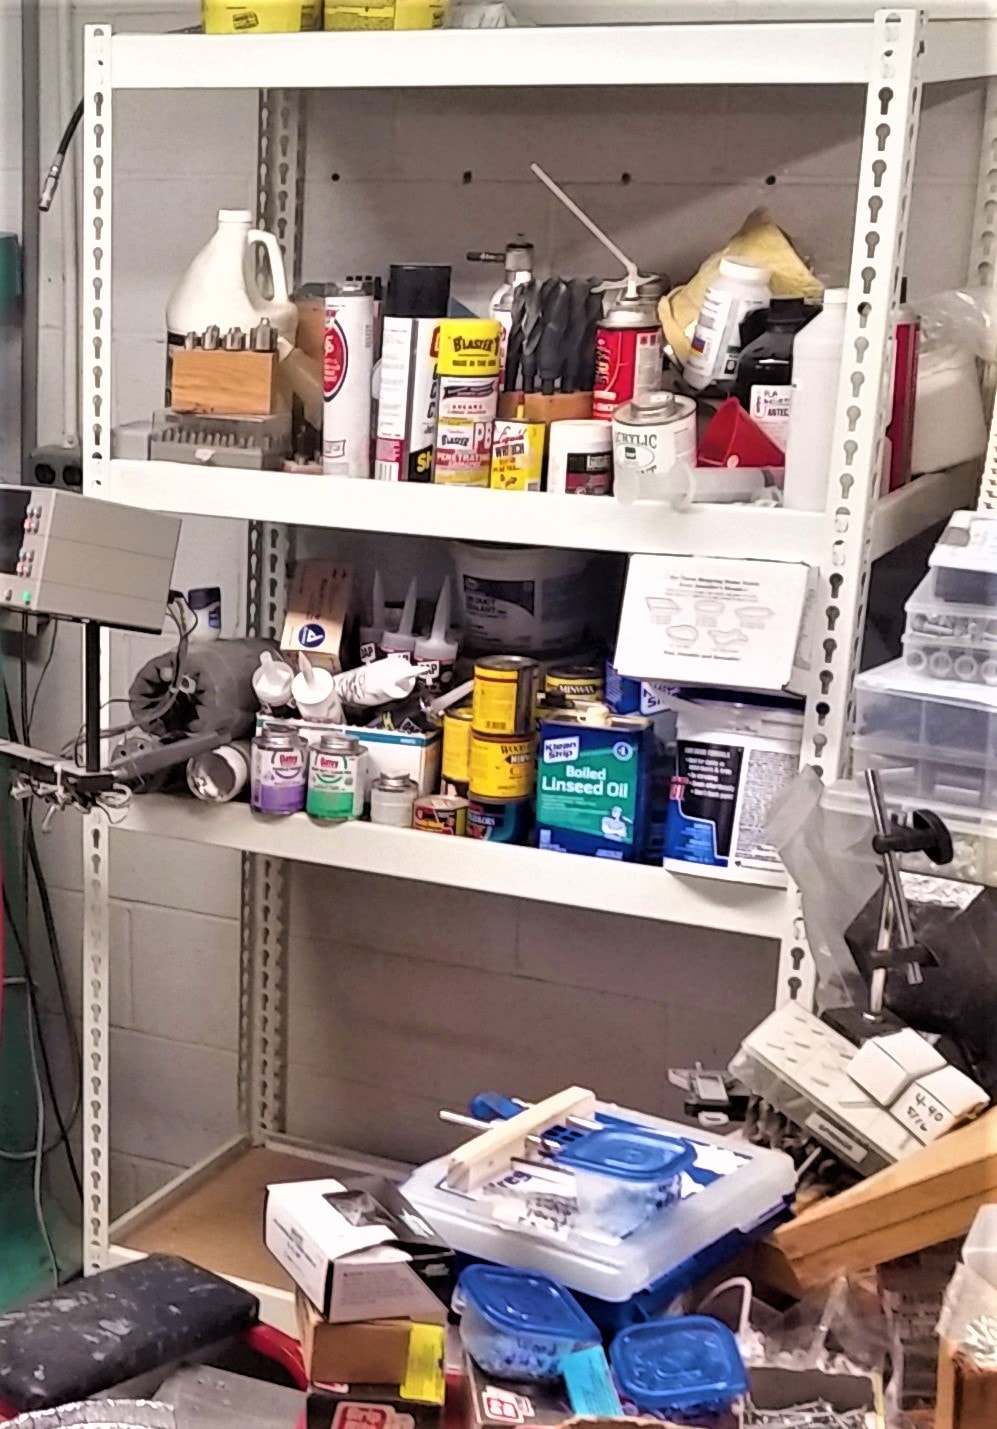 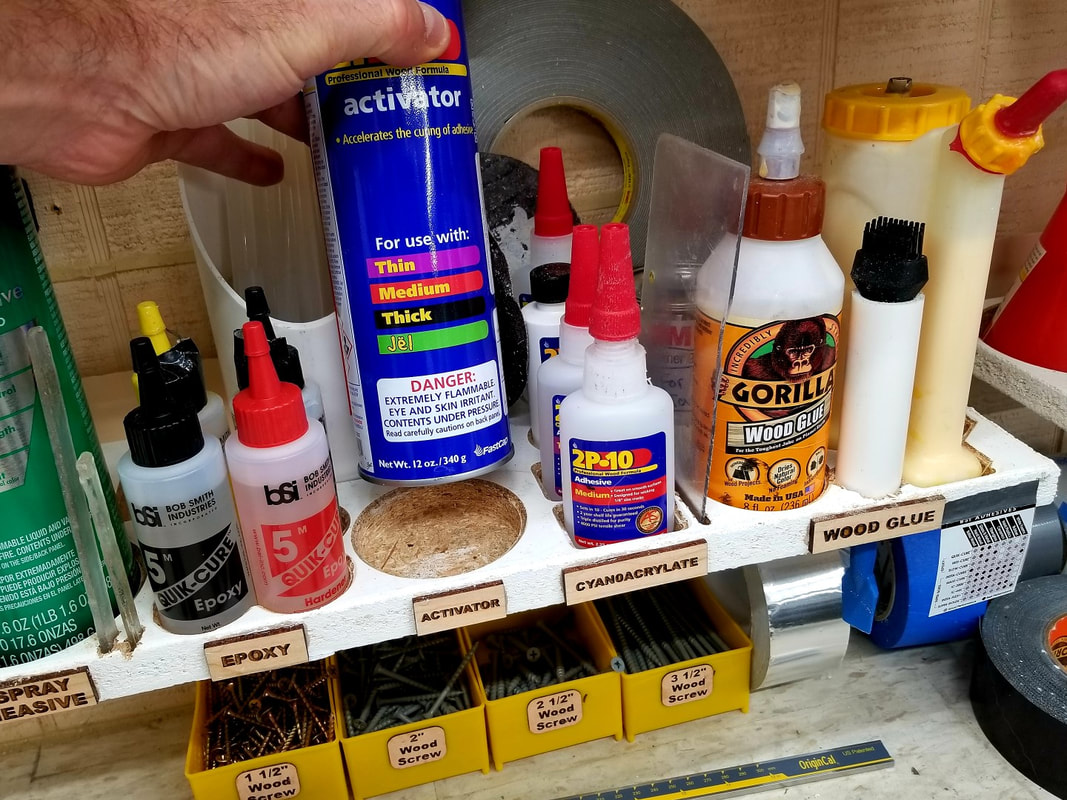  Sheet Goods Storage... Unfortunately I don't have any pictures to show the "Before" chaos in my shop. I tried three different methods to store my sheet goods.
I didn't like having to lower the rack and move things just to get to something in the rear. I found that I often would forget about stock that was stored here because it wasn't easy to see everything at a glance. Cool innovation but unfortunately it wasn't very practical for my work flow. The sheet goods storage method I like the best so far... Sometimes the simplest way ends up being the best way. I can easily pull out any sheet I want without moving or lifting around another sheet and I can easily see everything I have available to use with a single glance. 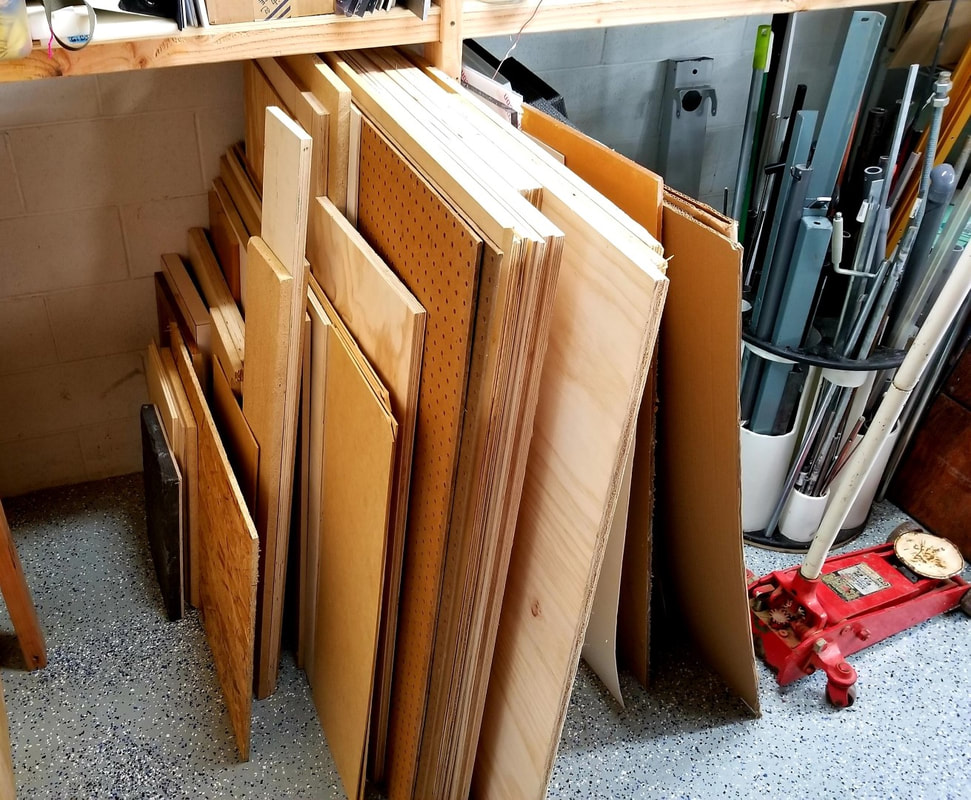 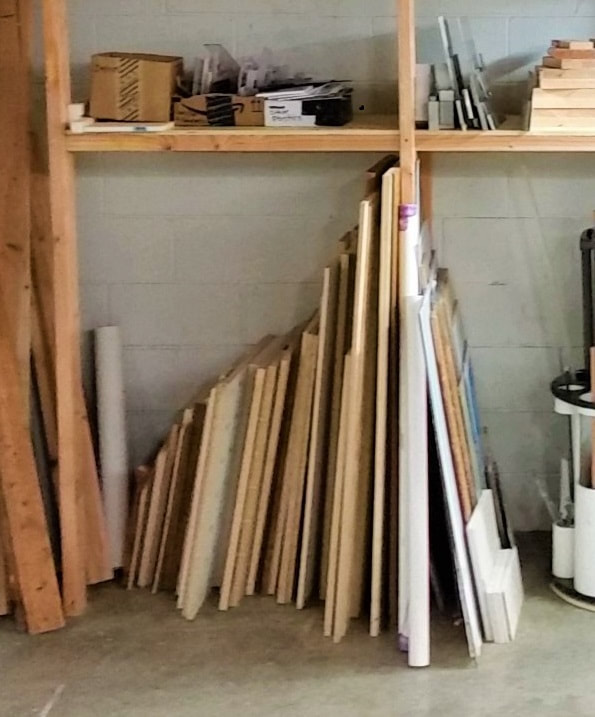 CNC Router Work Area... I use my CNC router a lot so I didn't want to have to walk to another area to get anything that I used for CNC tasks. Except for a drill and driver I have everything I need within arms reach of my CNC. I almost always screw my stock to the waste board so I have various length screws mounted on magnets in the lid. Various fixtures and hardware are stored in a drawer just below the CNC. Bars, Rods and Tubing Storage... I don't use bars, rods and tubing very frequently but just frequently enough to justify storing them in my shop. Below are some before and after pictures. The organizer is on a lazy Susan bearing so I can rotate it to access any of the stock I need without reaching around anything. 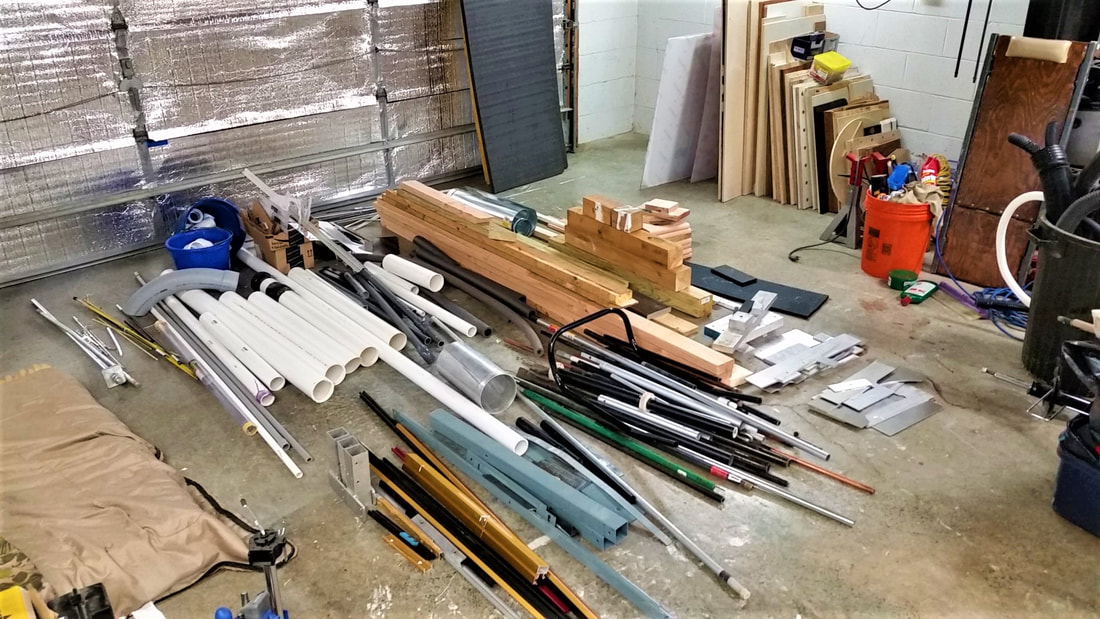 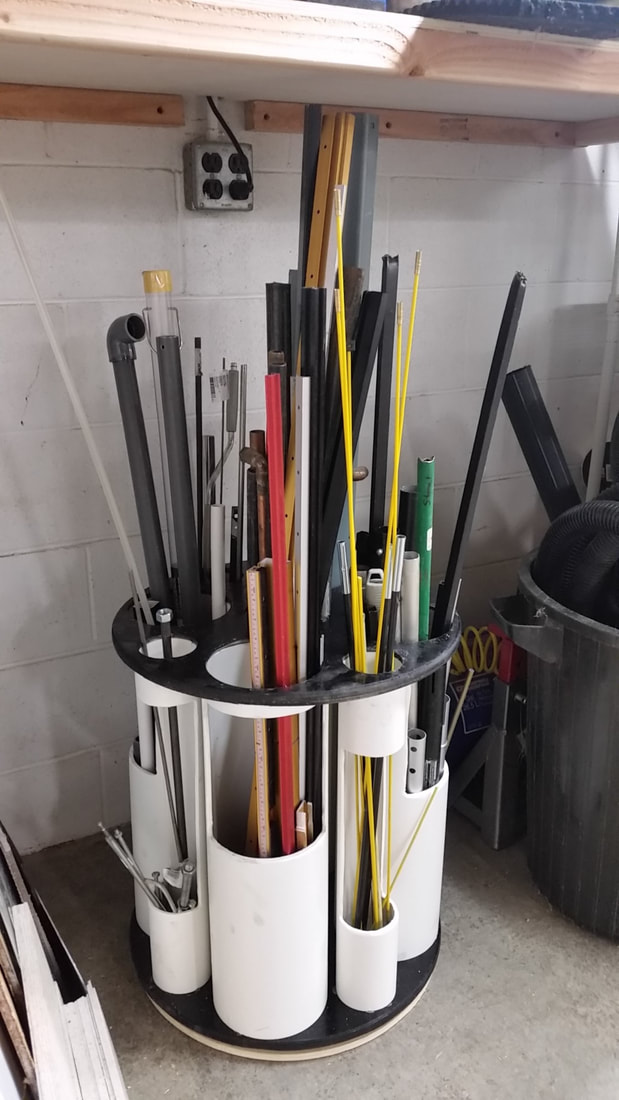  I have quite a few other organizing systems in place but this should get you started with plenty of ideas. Start with one small set of hardware and work your way out. I can guarantee you that you will enjoy working in your shop more than ever once you follow the simple methods that I've laid out in this article as well as in the How to Organize Your Tools Without Feeling Overwhelmed article.
If you enjoyed this article and want to receive weekly tips like this via email, you can subscribe to the the Shop Hacks Newsletter . If you want to see new shop hacks every day then join the Shop Hacks Facebook group! Please post comments and questions in the comments section at the bottom of this article. I would love to help you out and to hear about what you care about the most. Opt-in to the weekly Shop Hacks tips that will help you Build Your Space Upcoming issues...
In this article, you will learn how to build a shop vac system that...
Shop Hacks articles are designed to empower you to Build Your Space so they are longer than most but, if you prefer to skim... Use this index to go straight to the parts you care about ...
1. What if I told you that you never have to clean your shop vac filter again?
2. Cleaning a shop vac filter exposes you to the dust you want to avoid.
3. How do I know this system is safe?
Do I have your attention? Keep reading and I'll show you how you can do the same thing with just a few components. 4. Why don't manufacturers make all shop vacs this way?
So, how can you beat the system and save some $$ in the process? 5. What's the secret to NEVER having to clean your shop vac filter? You will need 5 components to build a maintenance free vacuum system . If you don't include all 5 components you will continue to have to clean your shop vac filters. With all 5 working as a system you will never have to change the bag or clean the cartridge filter. That opens up some very interesting possibilities that you might not consider otherwise. Since the vac, bag and filter are all in one unit and will never need to be accessed, you can mount the vac in a remote location such as up in the rafters, in a ventilated cabinet or closet, or even outside in a weather resistant enclosure. 6. Benefits of never having to touch your shop vac The most obvious benefits to never having to clean your shop vac filter again are...
For instance, you can mount your shop vac...
Simply plumb 2.5" or 3" PVC pipe from the vac to wherever you mount your cyclone separator and waste bin. If you have a run over 20' then use 3" DWV PVC. Otherwise, 2.5" will work without affecting the flow rate noticeably. The waste bin may be mounted on a wall so that it is convenient to access when it needs to be emptied. Since the waste bin is independent of the vac, you can use anything from a 5 gallon bucket to a 55 gallon drum. More about that later. Caution... Shop vacs create as much heat as portable heaters so always make sure you mount your vac in a well ventilated space to allow prevent overheating. If you build your own creative combination then be sure to share a picture of your setup in the Shop Hacks Facebook group so everyone else can see it too! The Shop Hacks Facebook group is a great place to share and to see other's solutions too. 7. How to build your own maintenance free shop vac system The figure below illustrates the 5 components needed to build a maintenance free system. If some of this is new to you, don't feel intimidated. Putting this system together is very easy. You just purchase any of these components that you don't already have and connect your shop vac hose to the cyclone separator, connect a new hose to the inlet of the cyclone separator, install a bag filter, and you are finished! 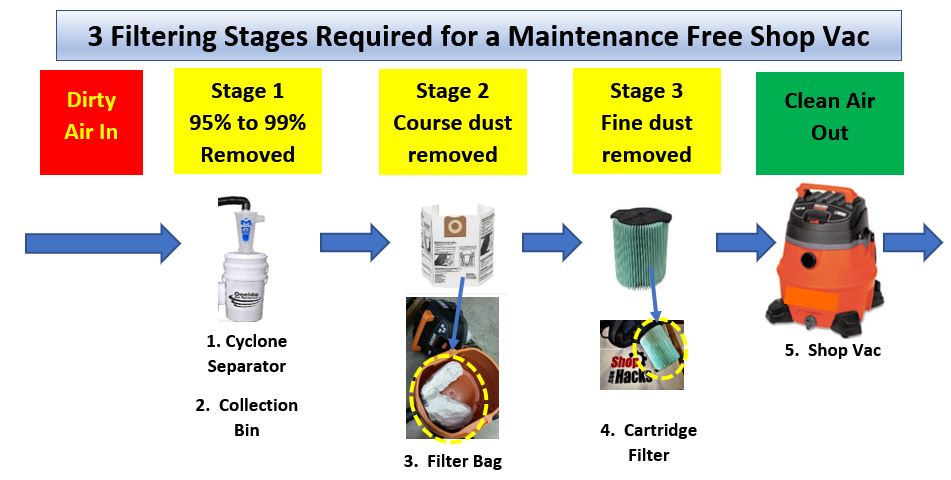 There are many ways to configure the system but this is what the full system may look like. 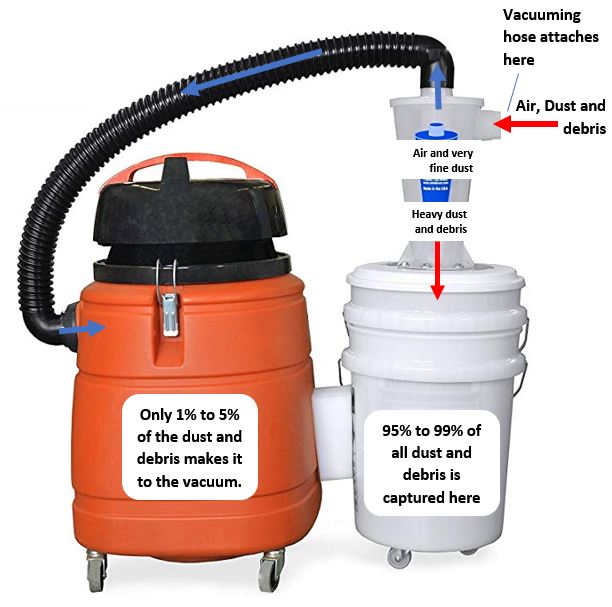 Some people mount everything on a rolling cart with the dust bin and cyclone at the top. I recommend placing the shop vac in the rafters or in a utility room then running 2.5" to 3" PVC pipe from the vacuum to the cyclone separator which may be mounted on the wall. That will allow quiet operation of the vacuum while still having a convenient way to empty the collection bin. Using the remote power switch I linked to earlier means you never have to touch the vac again. I attached the power switch remote fob near the end of my vacuum hose so anytime I want to use the vacuum I just press the power button near the end of the hose and I'm ready to roll. The following overview below describes each component in more detail. If you would like to see several options for the various components and learn more about how they work then be sure to read the Deep Dive section later in this article. 1. A cyclone separator that is designed for a shop vac system The cyclone separator is where most of the magic happens. A cyclone separator that is properly matched to the vacuum it is connected to will remove 95% to 99% of the dust from the air stream. That means the bag and filter only have to remove the fine and very fine dust particles. However, a cyclone alone is not enough to prevent clogged filters. Most of these cyclone separators will connect to a standard 2" ID shop vac hose. Some come with an extra hose to connect to the inlet of the cyclone (the hose you use to clean up messes) and some do not so check the details to see if you will need to buy the extra hose or not. 2. A collection bin 95+% of the dust and debris that enters the cyclone will fall into the collection bin below it. You can use anything from a 5 gallon bucket to a 55 gallon drum for this. It has to be able to withstand the vacuum pressure of the vac and it must be sealed air tight. It needs to be sealed air tight and it has to withstand the vacuum pressure a blocked vac hose can produce (up to 500 lbs per square foot). If you are careful to not block the hose to your shop vac then just about any 5 gallon bucket will work. Just mount the cyclone separator to the sealed bucket lid per the instructions, or just put it on the bucket in the case of the Dustopper, and you are ready to go. If you have a powerful shop vac it can cause the bucket to buckle if the hose gets blocked off more than a second or two. To prevent this you can cut out a 3/4" thick by 1" deep plywood ring using a jigsaw or a bandsaw and then press it inside of a 5 gallon bucket to prevent it from collapsing under the vacuum pressure of a strong shop vac. 3. A filter bag The shop vac filter bag is the key component that most people aren't aware exists or don't think to use. Normally it would be quite expensive to use bag filters on a shop vac because the bags would fill up very quickly. However, if you use a cyclone separator upstream of the bag, the bag only gets 1% to 5% of the debris which means it will last the full life of the vacuum without requiring replacement and it prevents your cartridge filter from clogging. The filter bag captures small particles that would eventually fill the cartridge filter downstream. With a bag in place the cartridge filter only has to capture the very fine particles that pass through the bag. That extends the life of the cartridge filter for the life of the shop vac. I suggest using a relatively cheap filter bag since you will be depending on the cartridge filter to capture the finest particles downstream. A cheaper filter bag is less likely to clog over time since it it passes the finest particles. 4. A quality cartridge filter Cheap filter bags don't capture the finest and most dangerous dust and that is fine because we want to depend on a quality cartridge filter to do that job. Many shop vacs come with quality cartridge filters but some do not. Make sure your vac has a quality filter so that it doesn't pass harmful fine dust into your workspace. The most dangerous dust is too small to see with the naked eye so you have to rely on the performance of your filter. 5. A vacuum that flows between 100 and 200 CFM. Choose a vacuum fits your budget and preferences and that has at least 100 CFM of airflow. I recommend not using anything with less than 150 cfm for general shop cleanup. If the manufacturer doesn't say how many CFMs the vac flows just look at the amp rating for the motor. Anything over 12 Amps should work fine. Disclosure I am not sponsored by any company so you can be sure that all of the recommendations in this article are unbiased. I base my recommendations on systems that I use myself and that I've tested and proven to work. The links in this article are affiliate links. If you buy products with these links you will pay the same price that you would pay without using the links and Shop Hacks will receive a small commission. I hope you benefit from these articles and I thank you for supporting more content like this by using these links for any product that you are interested in purchasing. Thank you! Advertisement ... Build The Ultimate Flip Top Workbench CLICK HERE --->>> for Plans and Hardware options Compare features. You won't find plans for a better flip top workbench assembly anywhere! 8. Shop Hacks maintenance-free shop vac system recommendations If you want a tried and tested system without reading the rest of this article then you can click images below for the products I personally use and recommend. I have tested these products and I can assure you that my setup is very effective. This is not the cheapest nor the most expensive system you can buy but it will move more air than most $700 vacuum systems and I've verified that it does a great job of removing harmful dust from the air. I have used this system for more than 700 hours (a lifetime of operation for many users) and it still works like new with the original cyclone, vac, bag and filter. The bag is still less than 1/4 full. The components I use and recommend:
If you prefer to research more options to make a more informed decision based on your personal preferences vs. mine, I will go over each product in detail the Deep Dive section. The Shop Hacks recommended system consists of the five components previously mentioned.
9. Deep Dive - More options and more insights for the curious... If you want to understand how each component works as well as more of the options available then you are in the right place. In this section we will discuss each component in more detail and I'll list several popular options for each. How do cyclone separators work? Using a cyclone separator is essential to never having to clean your filter again. At 99% efficiency you will have to vacuum 1400 gallons of dust before you fill a 14 gallon shop vac bag. Trust me, the vac will die long before you reach that mark. Cyclone separators come in a huge variety of shapes and sizes. They range from as small as your finger to larger than a house. They are always used to separate heavier than air materials from an air stream. To understand how a cyclone separator works, picture a marble entering at high speed into the cyclone inlet shown in the figure below. As you can imagine, the marble will stay pressed against the outer wall of the cyclone and gravity will pull it down the wall until it falls into the receptacle below. As it moves down the cone it naturally starts spinning faster which increases the g-forces which pulls it even harder against the wall. Now picture that marble traveling with a flow of air into the cyclone inlet. The air will also swirl around the cyclone but it is pushed out through the cyclone outlet as new air is pushed into the cyclone inlet. So, the marbles, which are heavy, follow the wall down into the receptacle below and the air flows out the cyclone outlet. 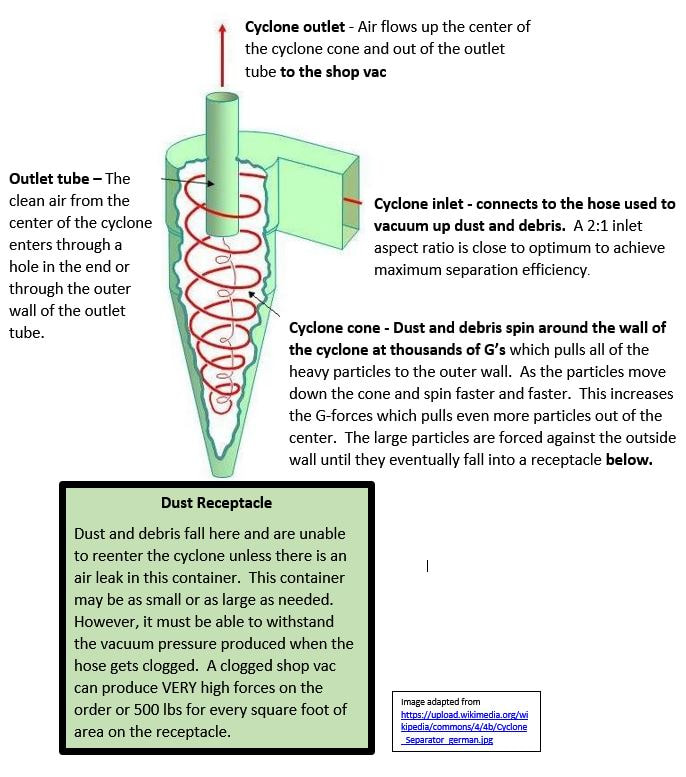 This configuration separates particles from the air stream remarkably well. I've designed and tested many cyclone separators over the last few years. The Dust Deputy cone type cyclone is similar to the one shown above. In my tests the Dust Deputy removed around 95% of fine corn starch powder, 98% of most sawdust particles and 100% of all chips. I developed several variations of a Thien Baffle design, similar to the Dustopper, and the best of those designs performed within the experiment margin of error compared to the Dust Deputy. Based on my experiment results from similar systems I would expect the Dustopper to capture slightly less than the Dust Deputy for very fine dust but it should perform equally well for larger particles. In any case, unless you are vacuuming drywall dust or some other super fine dust, either of these two systems should suffice. Do you still need to use a filter with a cyclone separator? Several years ago I designed a cyclone separator that worked so well I could vacuum sawdust without a filter and I could not see or smell any dust coming out of the vacuum. I was pretty excited about that design. After I bought a Dylos DC1100 Pro laser particle counter to see how well my dust collection systems were working I was shocked to find that when I used that vacuum the dust concentration in my workshop air increased over 20x to levels 4x maximum safe limits. I was shocked but it was a great lesson that using an air quality meter is essential if you really want to know if your air is safe or not. ALWAYS use a high quality filter downstream of any cyclone separator. The figure below illustrates how cyclones work well to remove particles over 10 microns but they pass most of the particles under 2.5 microns which are the particles that travel the deepest into your lungs and into your bloodstream.  Shop vac cyclone separators options? Shown below are 5 common models of cyclone separators designed for use with shop vacs (flow rates between 100 and 200 CFM of air). You can click on any of the photos to be take to a page with more details about each cyclone. They are all basically the same conical cyclone design except for the Home Depot Dustopper. The Dustopper is a Thien Baffle design which is slightly less efficient and is about 8" shorter than the others which makes it much better for any type of mobile or height restricted application where the cyclone and dust bin are not attached to a stable structure. With the conical cyclone separators, you pull on the hose which is attached 12" above the dust receptacle which will easily tip many designs over. The hose for the Dustopper mounts about 2" above the dust receptacle making it more stable. All of these products will have similar performance characteristics except the Dustopper will be less efficient at separating fine dust. If you are planning on collecting drywall dust or a lot of sanding dust then it may not be the best option.
Click on any of the images above to go to the associated product page. For proper performance you must use a cyclone designed for the flow rate of your vacuum Always match the cyclone to a vacuum or blower that falls within the design parameters of the cyclone. Since few of the cyclone separator manufacturers list the CFM range their products are designed for this isn't always possible. In any case, you should be able to use any of the cyclone separators listed in this article with any vacuum that flows 100 to 200 CFM. If you connect a cyclone designed for a shop vac to a dust collector it will reduce the flow to almost zero and the cyclone won't separate the dust efficiently. If you use a very small vacuum with less than 100 CFM of airflow with a shop vac cyclone separator you will find that it still works well for chips and large dust particles but it will pass a higher percentage of very fine dust. An option that may be useful in some situations is to connect the outlets of multiple cyclones to a single manifold. For instance, you could connect 5 of these smaller shop vac cyclones via a manifold to a 600 CFM dust collector. I can't think of any situations where that would be worth the trouble but I bring it up in case it spurs some ideas in any of the creative types reading this article. Oneida offers the system shown below. It allows the use of two vacuums connected to three cyclones via a manifold. 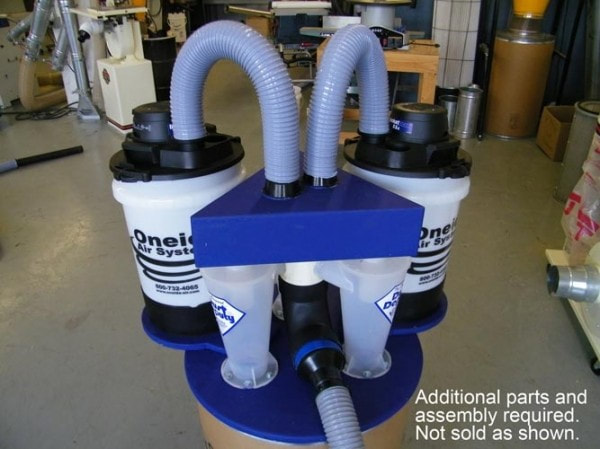 How to make your own cyclone separator It is not difficult to fabricate your own conical cyclone or Thien baffle cyclone system. You can click on the hyperlinks to find out more about each. Choosing a collection bin The most important things about your collection bin... 1. It needs to be strong enough to withstand the maximum pressure created when your vac hose is blocked. 2. It must be air tight or the cyclone will pass more dust than it would otherwise. Most full size shop vacs can produce a vacuum pressure of around 3.5 psi which is about 500 lbs per square foot. That means that if you have a 12"x12" top on your collection bin, it will have to be able to support a 500 lb weight evenly distributed across the top without collapsing. The forces produced are huge and they are proportional to the area that they act on. That means that the walls of a large collection bin will experiences forces much higher than those of a small collection bin.
It is very important that the collection bin does not leak any air. Any air that leaks into the collection bin will flow from the bin and up through the center of the cyclone and out the top of the cyclone. That air will carry dust that is circulating in the collection bin which will greatly reduce the efficiency of the cyclone separator. Choosing a shop vac -Most shop vacs flow within the 100 to 200 CFM range. Manufactures often do not say how many CFMs their vacs flow, but if you look at the amp rating for the motor you can estimate flow rate using the following formula: Flow rate = Max Motor Amps x 16 (for a rough estimate) I.E. a motor rated for 11 amps will flow about 11x16 = 176 CFM. A motor rated for 6 amps will about to 6x16 = 96 CFM. This calculation will not be accurate for every shop vac but it will get you close if the manufacturer of your shop vac doesn't list the flow rate in their marketing materials. Most vacs have the motor amps listed somewhere on the vacuum itself. Typical full size shop vacs pull around 11 amps which equates to between 150 to 200 CFM depending on the overall efficiency of the vac system. A small shop vac may pull closer to 6 amps which equates closer to 100 CFM. Many shop vacs come with quality filters. However, some come with very cheap filters that catch visible dust but pass almost all of the most harmful very fine dust. Very fine dust can travel the full extents of your lungs and reach your bloodstream where it can cause inflammation which is the trigger for many types of diseases over time. I've only tested the Ridgid brand shop vac filters and I can recommend their top two tier filters because I didn't see any increase in particles 0.5 microns and larger in my workshop while vacuuming fine dust with either of those filters installed. To protect your long-term health, only use filters that are rated to capture sub micron particles with high efficiency. If you use the advice offered in this article you can spend more money on your filter because it will now last the entire life of your vacuum. Shop vacs vs. Dust extractors - is there a difference? There are endless debates about the value of expensive "dust extractors" compared to the common shop vacuum. There are reviews that extol the wonderful magic powers of dust extractors and they lead you to believe that anything less is taking a chance on your health. Fein and the Festool are two of the most common dust extractors on the market. 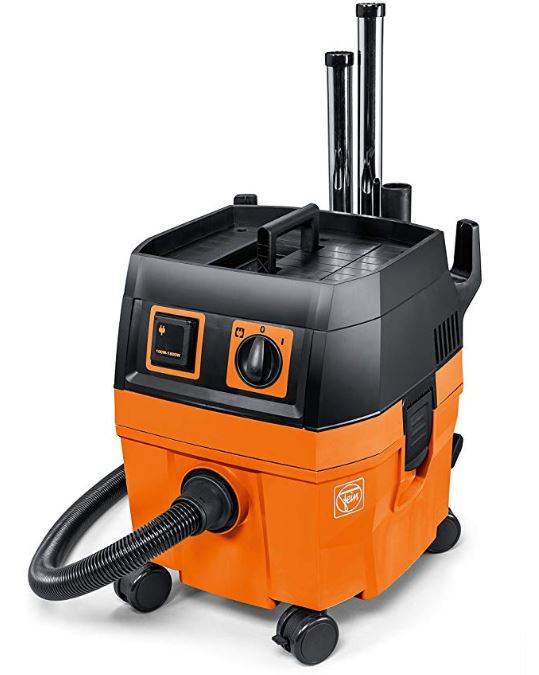 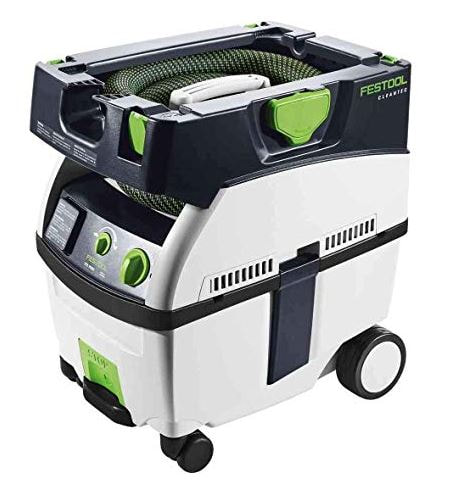 What's the difference? Is a dust extractor worth double to 5x the cost? If you take a shop vac, a dust extractor or even a common house vacuum apart you will find that they all use very similar components. They all have the following major components...
What a dust extractor will not do better than a quality shop vac:
As you can see, there is a reason that the market supports both types of vacuum systems. The one that works best for you may not work best for me. Now you know the differences and won't have to believe that extractors have magic powder sprinkled on them to make them and their owners superior to all others ;-) I would love to hear from you. Please don't be shy. Post questions or comments in the comments section below. Leave a comment to let me know what topics you would like to see covered in future articles. If you aren't already a part of the Shop Hacks Facebook group then join us there to share your shop hacks and to get help building your space! Please comment in the area below this article if you find something that you like, have a tip to share, or if you have any questions. Comments are a great way to share knowledge and they let me know what you care about the most for future content. 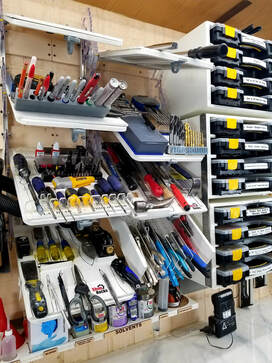 Do you love to spend time in your shop, garage, or work space? We value every second that we get to spend in "our space" even if it is a mess. It's a place where we can just relax and enjoy time away from everything else with no expectations other than our own. Would you like to have someone show you a way to organize your tools that is easy to understand and implement? Would you like to get 25 extra hours to work on your projects every year without taking time from anything else? Would you like to enjoy working in your shop even more than you do now? In this article I'll show you how do just that. Next week's article will cover organizing your hardware and materials. If you have missed previous Shop Hacks articles, you can find them through the links below. If you aren't already subscribed to the Shop Hacks Newsletter, just click the button below to get weekly Shop Hacks sent to your email. You can opt out at any time. Do you feel frustrated that your shop is a mess and you are always walking around things and have to sift through piles of tools and materials on every horizontal surface? Have you ever tried to tackle tool organization in your workshop only to give up in short order because you felt overwhelmed just trying to decide what to organize, where to put it and how to hold it? You certainly aren't alone. The photo below shows the chaos that was my shop when I finally reached my breaking point and made the decision to put my head down and get it organized, do or die. I was tired of walking around things and wasting so much time hunting for tools and materials and seeing every horizontal surface stacked with piles of "stuff". I had a may false starts and several failed attempts. In this article I hope to save you a lot of time and avoid the headaches that almost made me give up before I finally succeeded. Using the 10 step method in this article, you can complete the process without feeling overwhelmed. I'll show you how to estimate how much time you can buy back through organization as well as how to implement the plan. Your solutions will be completely different than mine but this process will work with any work flow and with any organization system that you choose to use. 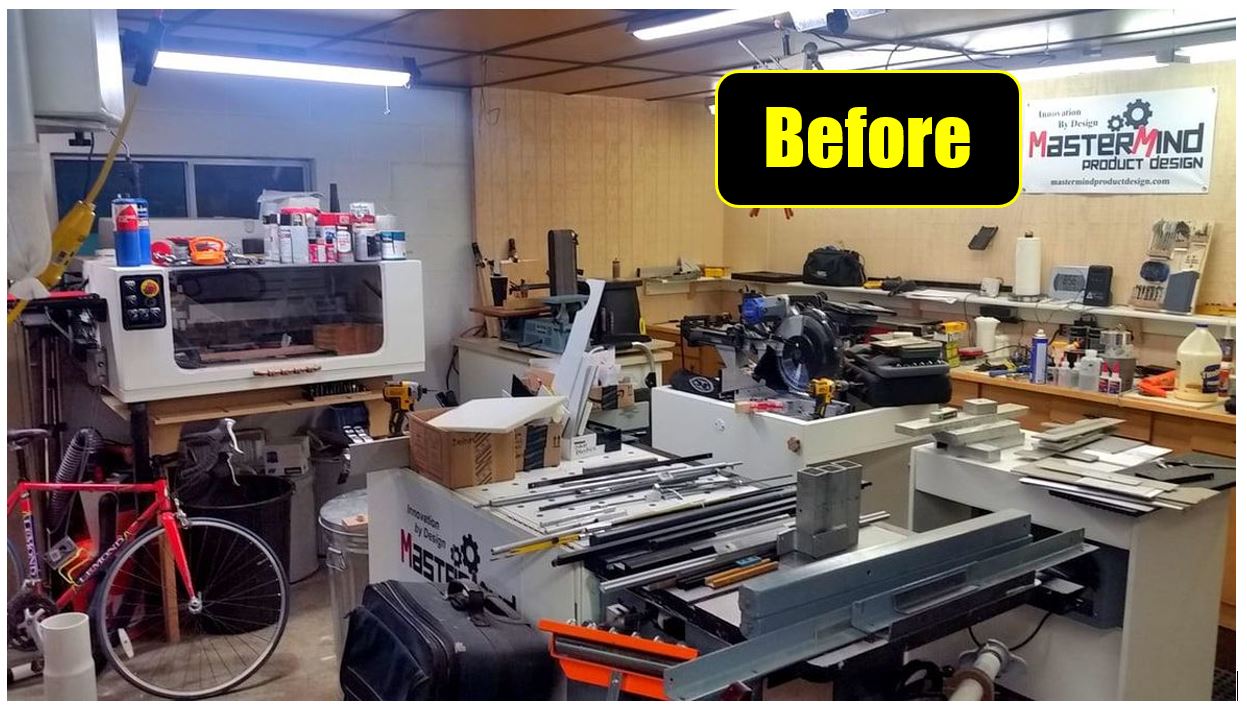 An Important Note I think it may have been Adam Savage who said, "drawers and cabinets are where tools go to die". There's truth in that statement because what is out of sight is often out of mind. I chose to use an open storage system for my tools. This saves the time of opening a drawer or door every time I want to use a tool and put it away. This works in my shop because I have modified my dust collection systems to the point that the air in my shop stays cleaner than the air outside. That allows open storage without dust building up on everything. If you don't have effective dust collection and air filtration in your shop then you may want to consider using cabinets and tool boxes to keep the dust at bay until you get a chance to get your dust under control. I'll shared how I did so in my shop in future articles. The Shop Hacks 10 step system will work regardless of how you plan to store your tools. The principles and method are the same regardless of how you implement them. I worked on organizing my tools and materials one group at a time until all of my active work areas were well organized and every tool in each of those areas had a marked location. The secret to establishing order was to pair down the tools and materials to those that I touch on a regular basis and to put everything else out of my work areas and into storage. LESS is MORE in this case. The key maintaining this order for almost two years now is that every tool and all materials have marked locations. 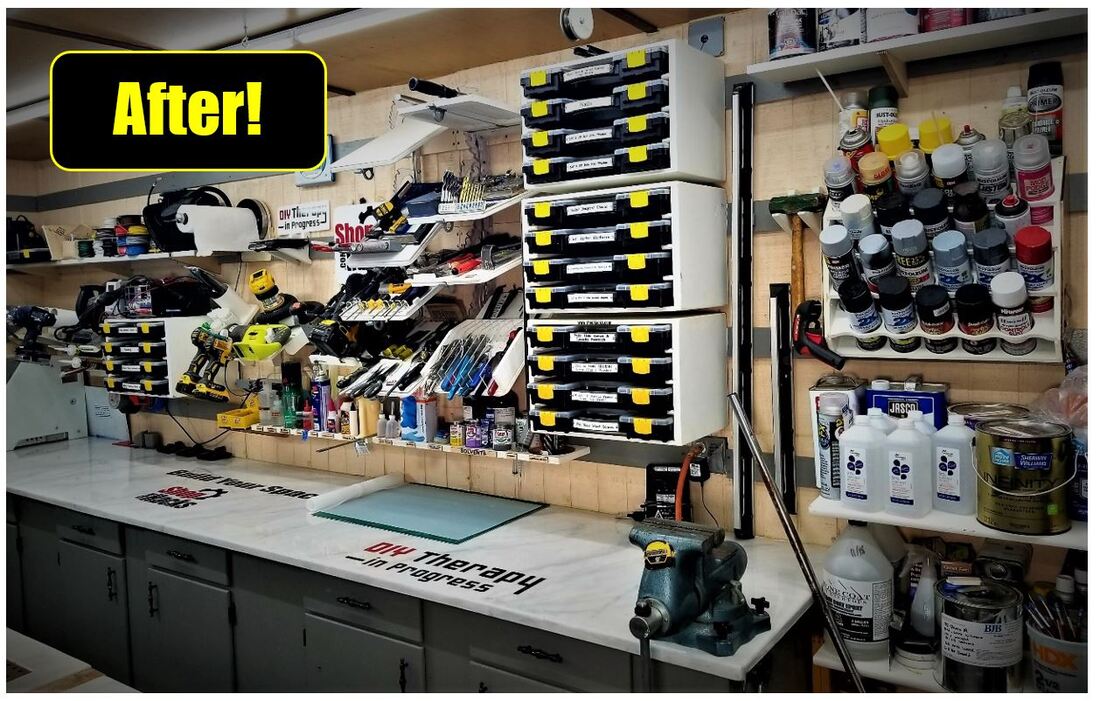 I could not have imagined how much more I was going to enjoy working in my shop after I made these changes. The difference is tremendous. I work more efficiently but, more importantly, I enjoy using my shop more now. It's like the difference between using an old worn out tool that you have to stop and fix all the time and using a quality new tool that does the job just the way you want every time. We love our shop time because it's our time, so why not make the most of it? I have everything I need for each task close at hand. I can grab most tools now without even having to look at them. It is also much easier to keep my work spaces clear of piles of tools and materials now that a simple lap around the shop with an arm load of tools at the end of the day, filling in open tool slots, is all it takes to put everything back like it was when I started. That's something I could never do before. Moving from chaos to order is not easy, but it is extremely rewarding. It is worth the work and it pays dividends for life. Try to work on one area at a time so you can build small victories that you will need to carry momentum through this process. This is a big job. Look at it as a process that takes time and iteration. To prevent burnout, expect changes and don't aim for perfection right away. The following quote by Mark Twain sums this up very well... "Continuous improvement is better than delayed perfection" Mark TwainHere is a summary of 10 steps that will allow you to organize your tools and transform your workspace without feeling overwhelmed. I'll cover each step in more detail in the following sections. I encourage you to print out several copies of the checklist below and place one in each work area that you frequently use. When you are ready to start organizing that work area fill in the start date and start working through the list one step at a time, not skipping any steps. When you finish one of your work areas, fill in the finish date and post a copy in the Shop Hacks Facebook group with before and after pictures. We would all be so encouraged to see hundreds of these posted over the next year!! Tool Organization - The Shop Hacks 10-Step Program (details provided in each of the following sections) Work Area _____________________ Start date: __________ Finish date:_________
Step 1: Clear off a horizontal surface large enough to hold every portable tool that you will use in the next 10 sessions in one of your work areas. Make sure this area is separated from adjacent areas and make sure it is a space that you won't need for anything else. Consider this your tool box over the next 10 work sessions. It helped me to mark this area off with masking tape to designate the area exclusively for this purpose. Ideally you will block this area off for at least 10 work sessions so pick an area that you can spare for that long and make sure it is large enough to hold a pile of all of the portable tools that you will use during this time. 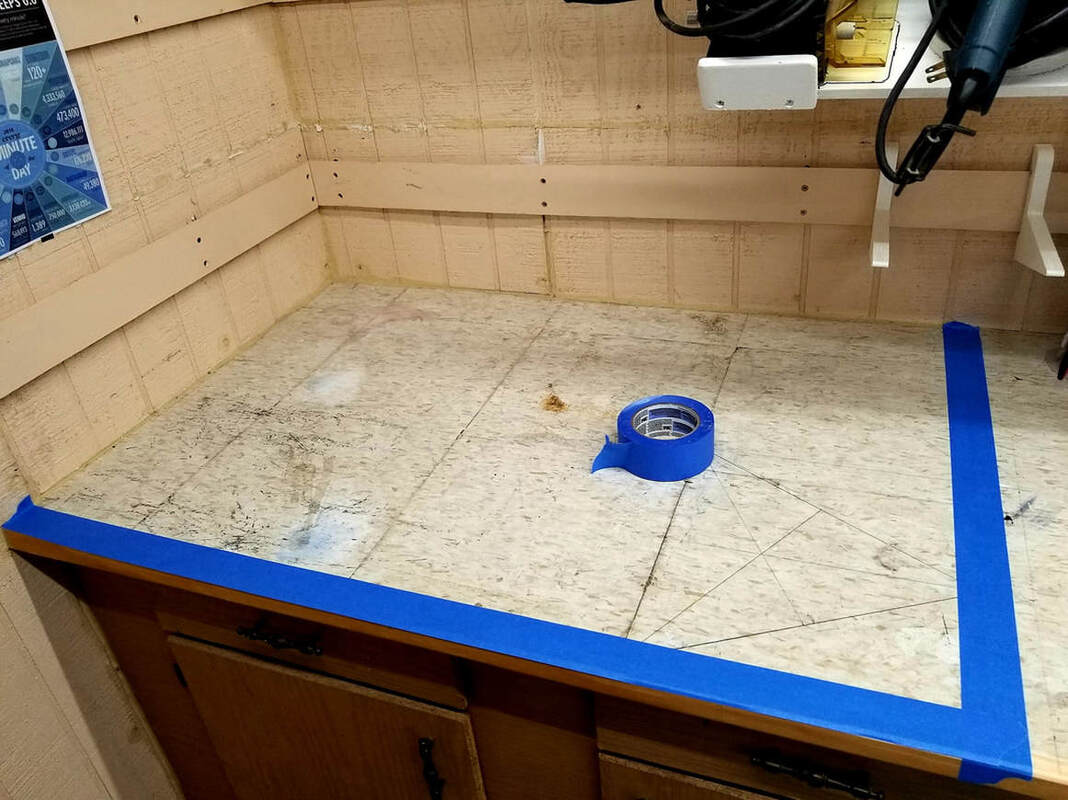 Step 2: Store EVERY portable tool that you use over a period of 10 work sessions (and nothing else) in this designated area. The ultimate goal for each active work area is to place ONLY the tools that you use 80% of the time within arms reach and put EVERY other tool that was in that area outside of that area in a storage location. I use a utility room, shelves and a large toolbox to store the items that don't make the cut. This buys back days of work time per year. I can't emphasis enough how much better it is to store as few tools as possible in your active work areas. This frees up your tool wall as well as your mind. Less is more. It's okay to store the remaining 20% away from your active work areas. Walking 15' to retrieve them doesn't cost much time overall because you don't have to do so very often. 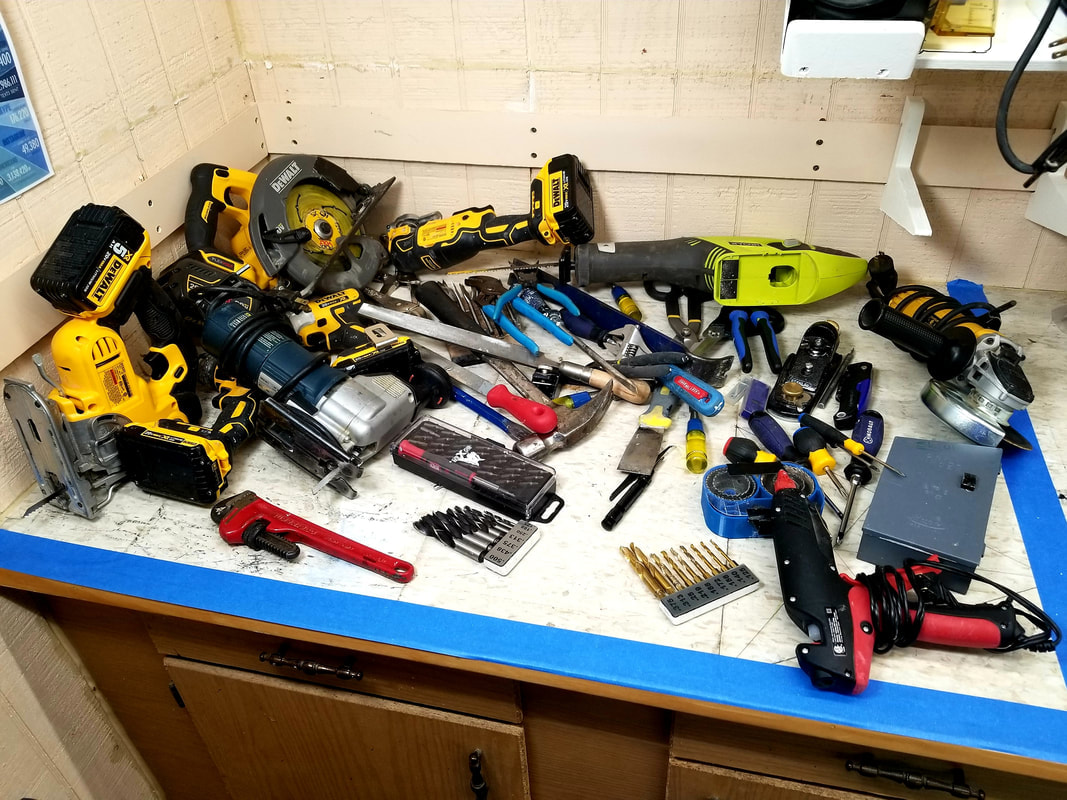 Here's an example to objectively demonstrate how simple, organized, open storage can buy 25 more hours per year doing what you love: Let's say you use 5 different sets of pliers 80% of the time and 10 other types of pliers the other 20% of the time.j Scenario 1 = organized open tool storage of those 5 sets (ONLY) at arms reach Scenario 2 = Toolbox or drawer storage 10' away from where you are working Time to retrieve = Scenario 1: 1 second if they are at arms reach Scenario 2: 10 seconds if you have to walk to a toolbox, open a drawer and walk back. Use the pliers 500 uses over 50 work sessions Time wasted in each scenario: Scenario 1: (500 uses * 1 sec/use) = 500 seconds or 8.3 minutes of wasted time Scenario 2: 50 sessions * 20 seconds (retrieve and put back) + 500 uses * 1 sec/use) = 1500 seconds or 25 minutes of wasted time. You can save over 15 minutes per year for every tool that you place within arms reach vs. walking to a toolbox to retrieve it. Multiply this by 100 tools and you gain around 25 hours/year doing what you love vs. walking and hunting in your shop every decade with one simple change.  Let's get started and buy some time!! During your next 10 sessions in a work area place every tool or set of tools that you physically touch into the area that you designated in Step 1. It doesn't matter what kind of tool, if you touch it then put it in this area. Consider this your toolbox for the next 10 sessions in your shop. The picture above shows the tools I used during that time. The type and number of tools will be completely different for everyone so your pile will most likely look nothing like mine. Do NOT put any tools there unless you actually used them. This objective approach will make it easier to separate what you "feel" like you need to organize and what you really "need" to organize to save time which is our primary goal. Don't worry about missing something during this step. You will have a chance to evolve and adjust this system in later steps before you spend a lot of time making or buying tool holders. In general, don't store ANY tools (or sets of tools) in an active work area that you don't physically touch at least once in every 10 work sessions. Trust what you actually touch and use and not what you think you will use. This step is essential to objectively decide vs. making subjective decisions which inevitably lead to wasted time. Start small so you can get a feel for this process and build up some confidence. Do not try to organize your biggest work area or you will probably get frustrated and give up. Small victories will build momentum. Maybe you just try this for a sanding area to start with to get the hang then try an assembly area next and then work your way around the shop applying the 10-steps to each area. What is an active work area? An active work area is any place that you spend a significant amount of time performing any activity. The following are just a few examples...
Don't worry that you may leave something essential out. The following steps leave plenty of opportunities to add more tools as you work through a variety of projects. Your goal here is to build a pile of tools that represent what you actually use 80% of the time in your shop without being subject to your subconscious tricking you into believing you need more. Don't put a tool in this pile if you did not actually use it. Trust me. Step 3: (this is probably the hardest step to do, but it is one of the the most important) Put ALL of the tools that you did NOT use in a storage area separated from your main work area This step may go against every fiber of your being. We are hardwired to put every tool we own on display. But if you want to spend more time creating, building and fixing and less time hunting and sorting then don't give into the lie that having more tools on your tool wall is better. Less is more! Now that you have a pile of tools that you used in a particular active work area, put every other tool away in storage or give it away or throw it away if it isn't useful to anyone. If you can't bring yourself to do this then you aren't ready for the Shop Hacks 10-Step Program and we will be forced to exercise tough love and let you suffer in your disorganized mess until you are truly ready to change ;-) Seriously though, trust me and give this whole process a shot. If you don't like it you can always add more at the end. Your tools will still be seconds away. Step 4: Sort the tools that you used into functional groups This step was difficult for me. There are so many ways to group tools and I ended up trying several layouts before I was comfortable with what I had. Don't feel like you have to get this right the first time. In later steps I'll show you how you can try many different layouts without wasting much time. For instance, over a 1-year period I ended up sorting my tools into the following groups:
 The group names and which tools go into each group will be completely custom to the way you use your tools and which tools you have at each active work area. You will get a chance to try out and adjust your tool groupings later so don't worry about getting them perfect on the first try. Pursuing perfection will cause paralysis, so just move forward and adjust anything that you don't care for in a later step. I'll cover how to sort your hardware and supplies in next week's article. You can see most of the tool groups that I ended up choosing in the picture below. This photo also shows the Shop Hacks Ultimate Flip Top Workbench which serves as a workbench, downdraft table and assembly table 95% of the time and flips to transform into a miter saw station with the Chop Stop fenceless miter stop system 5% of the time. This flip top workbench has been a great addition that adds convenience and efficiency to my workflow. The wings fold down and it has a electro-hydraulic lifting mobile base which makes it super easy to move around with just push of a button. Click on the link above to see options for plans, hardware and the Build With Confidence Support group.
The photo below shows my CNC router work area. I have everything I use 80% of the time within arms reach and the rest is in a drawer under the base of the router (drawer added after I took this picture).  I also made holders for the handheld power tools that I use the most as shown below. Everything on my tool wall is hung on a French cleat. 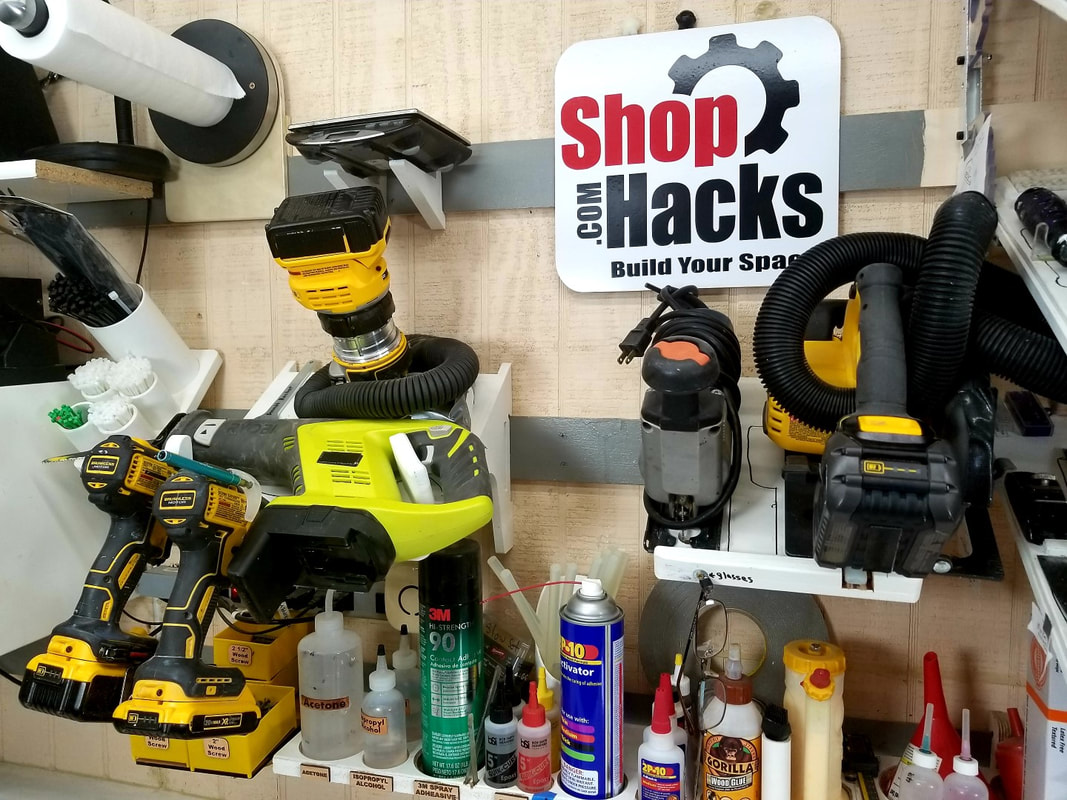 These are just a few examples. The key is pairing down to the tools you will actually touch frequently and sorting them into groups based on how you use them so you can keep tools as close to your active work areas as possible. Step 5: Cut multiple pieces of cardboard to serve as mock tool panels. This is the easiest step of the process. Determine how large you want each tool panel to be and cut pieces of cardboard to those sizes. I chose to make all of my panels 11"x17" because that allowed multiple tool panels to fit into any of my toolbox drawers. As it turns out, using this system I was able to mount ALL of them on my tool wall and I very rarely have to get anything from my toolbox anymore. Step 6: 1. Organize your tools on each mock tool panel. Use them for a while like this then iterate until you are happy with the layouts. This step is also very simple but may take some time. The idea is to try out your layouts before you commit a lot of time to building tool panels to mount your tools. 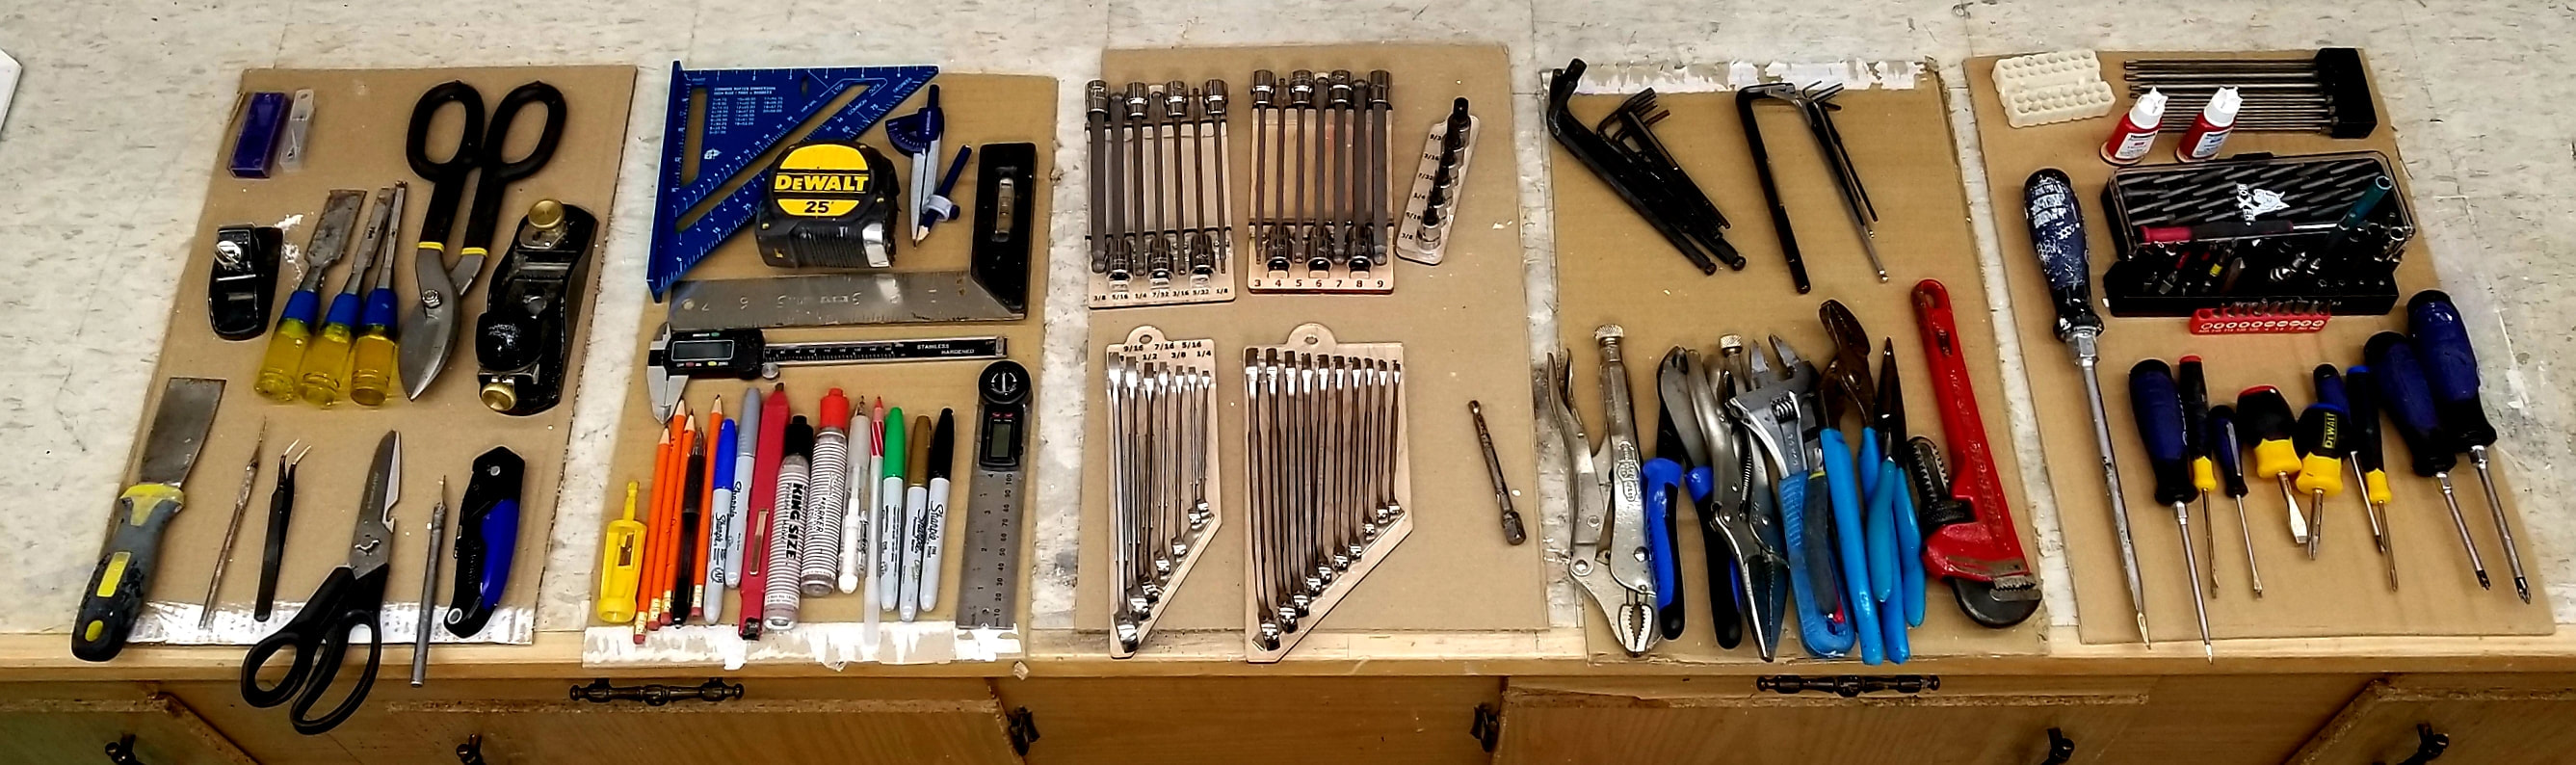 I kept my tools laying on these cardboard panels like this for a couple of months as I used them. I put the tools back on their designated panel after I finished using them each day. If I didn't like where or how a tool was placed I simply rearranged and regrouped them as I went. This let me test out my layout before spending a lot of time building the tool panels. I found that I had to add some tools that didn't make the cut during earlier steps and I also removed some tools that were not getting used. Once I was comfortable that I had my tools paired down to ONLY the ones I use 80% of the time, I moved on to the next step. I should note, even though I went through all of these steps I still ended up making some changes later on. However, the changes were minimal and didn't take nearly as much time as they would if I would have had I not tested my layouts before building the tool boards. Step 7 Buy or build permanent tool panels and mount your tools These are a couple of the tool holders that I made to hold my tools. These were built using 1/4" Baltic birch plywood panels and 3/4" cleats to connect to French cleat rails on my tool wall.
There are several very nice premade tool organizations systems available if you want to save some time by using a ready-made system. I'll include some options to consider below. The following products are affiliate links. When you use these links you pay the exact same price that you would otherwise pay but Shop Hacks receives a small commission for the purchase. Using these links is a great way to support more content like this in the future. Thank you for your support!
Step 8 Mark EVERY tool location. You may be tempted to skip this step but don't... It is a game changer. This is another very simple but very important step. I tried several methods. The easiest one was to simply mark an outline of each tool using a permanent marker. I intended to come back and make something more refined but this worked so well I never felt compelled to change it. These tools are held in place with neodymium magnets. Some of the larger items use mini stop blocks too.
Another unique way to mark tool locations is to take a photograph of the tool board and glue the photos onto each tool location using a spray adhesive. This works great but it is time consuming.
Using marked locations for tools is great at the end of the day when you just scoop up a handful of tools and take a lap around the shop filling in empty marked locations. There's something very satisfying about doing this. I rarely end a day anymore without putting all my tools away. Before I had a specific marked location for every tool I rarely put tools away and I ended up having to shuffle tools and materials around for 10 minutes just to get started the next morning. Not to mention the time wasted trying to remember where I put things. Neodynium magnets are great to have around anytime you want to build a tool organizer. Step 9 Store your tool panels near the locations the tools will be used. 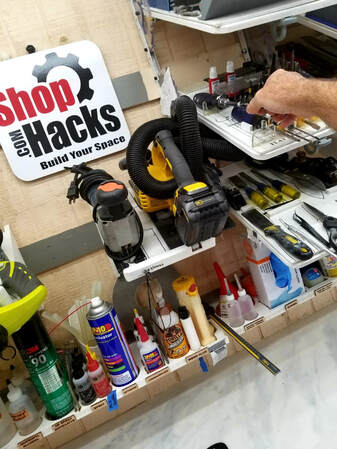 I can't overstate how important it is to keep 80% of the tools you use in any active work area within arms reach of where you use them most of the time. It saves a lot of time but another benefit is that it makes your work more enjoyable. You may be used to walking back and forth across your shop to get tools to make or fix something but once you get used to being able to reach almost everything you need without moving you will wonder how you ever worked any other way. Step 10 Repeat this process as needed until you've worked through all of your active work areas. Start with small organization tasks to build momentum. then work your way to the active work areas that you use the most and get those worked out. Keep going until you've organized all of the areas that you frequently use. After that you can keep going but you have diminishing returns. I still have quite a few areas of my shop that need to be organized but just having the areas I use 80% of the time worked out has made all the difference.
Have fun, enjoy the process and eat this elephant one bite at a time. Please leave comments below. I encourage you to ask questions, share your own organizing tips and share what you would like to see in future articles. Affiliate links may be used on this page. As an Amazon Associate I earn from qualifying purchases. Shop Hacks exists to help you Build YOUR Space! Copyright 2019, Shop Hacks, all rights reserved 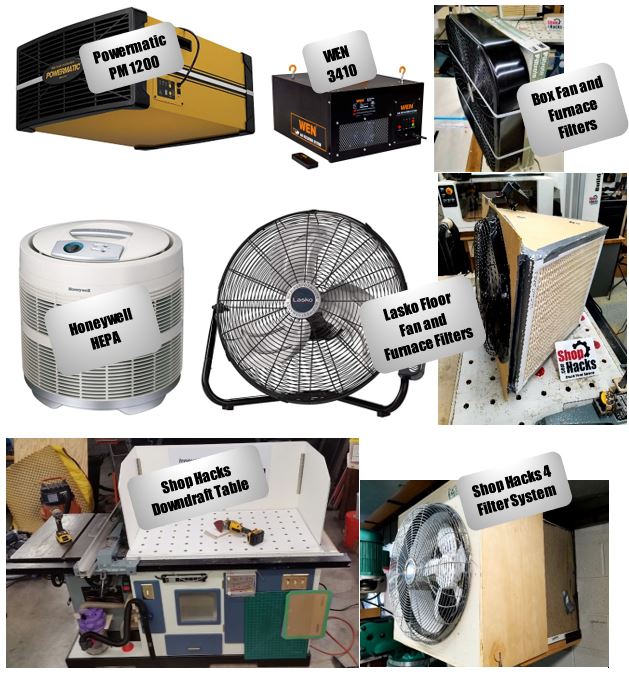  Dust is like a bully… you don’t know how to avoid him so you just give him your lunch money. Then one day you learn how defend yourself. Once you learn how to beat the bully, you are free and you never have to be bothered by him again… Do you enjoy cleaning, wearing and breathing dust in your home or workshop? This is the first in a series of articles that will empower you with the knowledge you need to beat dust in your workshop without spending a fortune on dust collection and air filtration systems. We tested 8 different air filtration systems to determine which ones worked best and how you can can have cleaner air in your home or workshop without spending a small fortune. We tested and compared several commercial air cleaners, a household HEPA air filtration system and several DIY air filtration solutions including a super cheap and simple box fan with a furnace filter. We used a laser particle counter to measure dust removal and air filtration performance so you can have confidence that the results presented in this article are objective and reliable. You no longer have to rely on Internet opinions. For more Shop Hacks tips to help you Build Your Space and check out the following pages... I am not sponsored or compensated by any company so you can rest assured that all of the results in this test are unbiased. I spent several hundred dollars of my own money and a week and a half of my time to bring this to we can all see which systems may work best for your shop. My hope is that many of you will use this information to build an even better filtration system and then share it with the community. I hope the information presented in this article empowers you to create your own air filtration system. Shop Hacks exists to help you Build Your Space and clean, healthy air is certainly a foundational component of getting the most out of your shop time! I encourage you to interact in the comments section of this blog and to share the link with friend and groups that may benefit from this information. Link to this article HERE. Is dust really a problem? That's a great question that doesn't get much attention. Everyone knows an old-timer who brags about breathing 10 gallons of dust a day for 30 years without a problem. So, is dust really a problem or is it just something that we can ignore so we can focus on getting projects out the door? Let's start with a couple obvious benefits of having a nearly dust free workshop... 1. You will spend more time making, building and fixing and less time cleaning if you capture the dust before it settles on your tools and floor. Did you enjoy cleaning your room when you were a kid? We all know the answer to that question. Then why do you not mind having to clean up your shop after every project? I spent 3 hours cleaning all the dust off of everything after this test. If I would have used my dust collection and air filtration systems there wouldn't have been any dust to clean up at all and I would have spent those 3 hours working on something I enjoy.
2. Using open tool storage can save hundreds of hours per year if you work in your shop every day. If you can capture the dust before it lands on your tools and materials you can use open tool storage which is much more time efficient than storing tools in boxes or cabinets.
You don't have to look for tools, you can grab them and put them back without having to open a drawer or door. However, if you don't have good dust collection open tool storage isn't feasible because dust would cover them in no time. However, if you modify your tool dust ports and install an effective air filtration system then you won't have to worry about dust on anything. I've had the open storage system shown in the picture above for over 2 years now and I never have to clean any dust off. It is a joy to be able to reach for and put away most of the tools I use every day without having to walk to a cabinet or open a door or drawer. 3. Dust is an invisible enemy to your long-term health. The dust that does the most damage in your body is the dust that you can't even see. You can see dust particles as small as 100 microns. Dust that is 100 microns or larger is very likely to get trapped in your nose, throat or upper respiratory system and coughed back out so it doesn't pose as much risk as the very fine particles. However, larger particles can still lead to allergies or nasal cancer due to the chemicals that are in wood products. Dust from some exotic wood species also expose you to a higher risk for allergies and nasal cancer. You can find a table listing the relative toxicity of different wood species HERE.  An even larger problem lies with dust that is so small that you can't see it. Dust consisting of particles that are 5 microns and smaller can travel the to the full extents of your lungs and enter your bloodstream. Think about what is in the dust you breathe. MDF, plywood and treated woods are full of chemicals from glues, binders, formaldehyde, and other chemical agents. You would never consider allowing someone to inject even trace amounts of these into your blood with a needle but that's essentially what you are doing every time you breath these particles. They enter the blood which leads to inflammation which is at the root of many diseases. I started taking dust collection and air filtration seriously after leading a NASA research project that studied the effects of recycling plastics in space. Part of that project included researching the long term effects of airborne particulates on human health. That research convinced me to start taking dust collection much more seriously. I didn't want my hobby to negatively impact my long-term health. I purchased a laser particle counter so I could see the dust that was previously invisible to me. Once I could see what tools were the worst offenders and how bad the air quality really was in my shop most of the time, I redesigned the dust ports of the worst offending tools then I worked my way to the rest one by one. In future articles, I'll show you how to modify your tool dust ports to make them MUCH more effective at capturing dust. A little hint though, if you can capture the dust before it gets more than 1" away from the source you don't need an expensive dust collection system to do a very effective job. You can't always capture 100% of the dust so I developed air filtration systems to reduce the time that any dust that escaped my dust collection systems stayed in the air. Those systems are included in the testing performed here. Now I enjoy a nearly dust free shop with air that is typically 10x cleaner than the air outside the shop. I now go into my shop to get a breath of fresh air. Clean and safe air was my initial goal but saving time and not having to wear, breathe or clean up the dust were wonderful side benefits that I would never want to do without now that I've become accustomed to them. I never knew how much I would come to love being able to make a cut without wearing or breathing any dust. In the early part of the 20th century people scoffed at the idea of indoor plumbing. Who needs that in their house? Once they realized the benefits it was obvious that the old way was outdated. Some people still have an outdated view regarding dust collection and air filtration. We are getting close to a major shift in attitudes regarding dust collection in the workshop. This article should help further the knowledge that can save your health and buy you more time doing what you love to do. In this article you will learn...
modification)
Air Filtration System Features, Testing, and Results Air Filtration System Features Retail air filtration systems include a couple features that you may find helpful. Remote control: Remote controls are nice if you want to turn the air filtration system on/off without having to reach it. I keep my remote next to the door so as I leave the shop I can set a timer to run the air filtration system for a couple hours to clear any remaining dust from the air. The remotes allow powering on/off, changing air speed and setting the countdown timer. There are two types of remotes, 1) radio frequency(RF) and 2) infrared (IR). RF remotes work even if there is not a clear line of sight between the transmitter and receiver. Infrared (IR) remotes require a direct line of sight to work so they will not work if there's anything between the remote and the receiver. Think of an IR remote as a flashlight. If you can't hit the receiver with a beam of light from the transmitter it won't work. I recommend buying units that come with RF remotes. Timers: Timers allow you to set the air filtration system to run 1 to 9 hours after you leave the shop. The WEN unit has settings for 1,2 and 4 hours. The Powermatic unit allows up to 9 hours. Timers are handy because you can make your last cut just before leaving your shop then set the air filter to run for a couple of hours to clean the air without having to stick around. That reduces the fine layer of dust that coats everything. Systems Tested Table 1 summarizes, in no particular order, the systems tested as well as their various performance characteristics and features. The best of each category is highlighted in green. You will also find the results of the following tests summarized in Table 1.
 Table 1 – Air filtration systems specifications and features We also tested and documented the following ...
Lessons Learned...
Test Results Summary For those of you who just want the facts without the commentary then Figures 1 and 2 and Table 2 summarize, at a glance, the performance of all of the systems tested. You can read about specific nuances of each system and several of the important lessons learned in the Systems Performance Summary section. You can go straight to the Recommendations section if you don't care to know how it works and just want to get started right away. 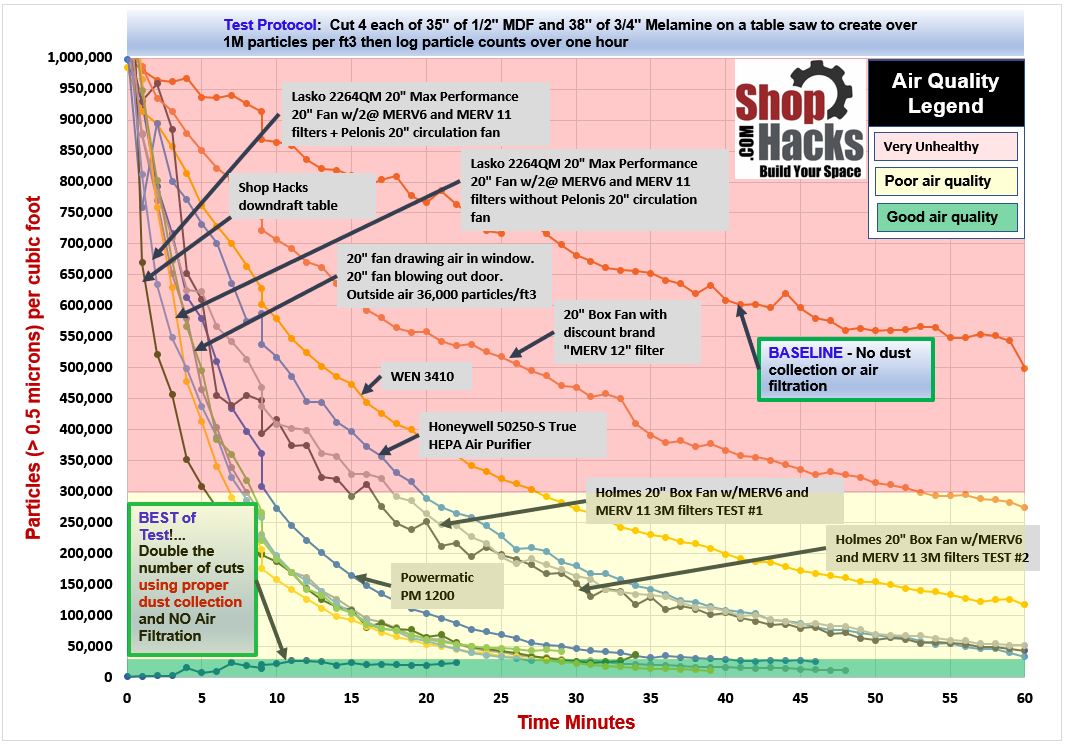 Figure 1 – This Chart Summarizes the Performance of all the Systems Tested  Figure 2 – Time required to clear the air in a 24’x32’x8’ workshop (Clear from 1 million particles per cubic foot to 30,000. Particles > 0.5 microns) 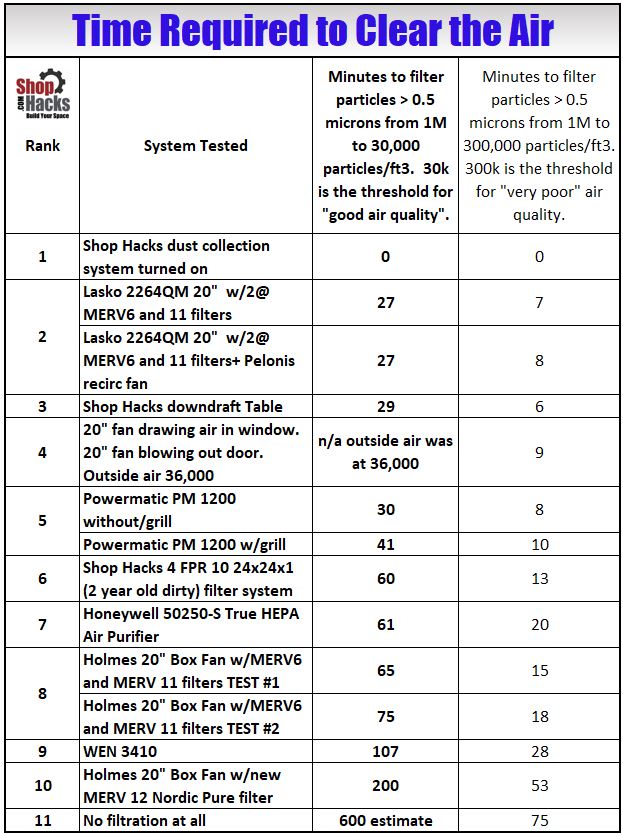 Table 2 – Time required to clean the air from 1M to 30,000 particles/ft3 (particles > 0.5 microns) >300,000 = "Very Unhealthy" <30,000 = "good" air quality Shop Hacks Promotion... Click to Build The Ultimate Flip Top Workbench (Plans and Hardware)
Shop Hacks Recommendations
One caveat to furnace filter and axial fan type systems... for a one or two filter system, the flow rate will decrease faster using an axial fan (box fan) than with a cage (furnace) blower system as the filters load with dust. This means that you will need to clean the filters regularly to maintain performance or use a 4 filter configuration (each filter handling 1/4th of the airflow) to outperform the squirrel cage blower systems even with dirty filters. Axial fans deliver 1/10th to 1/5th as much static pressure as cage blowers so you will need at least 3x as much filter area to match a cage blower system performance as the filters start to clog. A 4-filter system should have approximately 1/16th as much pressure drop for any given flow rate compared to a 1-filter system. The Shop Hacks Ultimate Air Filtration System uses 5 filters so CFM is maintained even as the filters become caked with dust.
Deep Dive - Continue reading if you are the type that wants to understand more about this topic including how these tests were performed. Will a clogged filter on a box fan cause a fire? We might as well discuss this first since it is bound to come up in any discussion. Are box fan filtration systems a safety hazard? It is definitely worth asking the question.
You will see many people claim that a box fan will overheat if the filter becomes clogged. I put it to the test. I placed a thermocouple on the metal motor housing of two different box fan models and COMPLETELY blocked the airflow by duct taping a piece of cardboard completely covering the rear of the fan so that no air could pass. I ran the fans for 30 minutes which was long enough for them to reach their maximum temperatures. In each case the motor housings stabilized at around 82F in a shop air temperature of 70F. Fans create a lot of flow in and out of the front grate even if the rear is blocked. Apparently, for the two fans I tested, that was enough circulation to keep the motors cool. The fact that the filter keeps dust from accumulating on the fan motor housing and coils probably offers more protection than danger in most cases. A box fan filtration system will work with the filter on the front or the rear. However, you should mount the filter on the inlet side to protect the motor and blades from dust and lint accumulation. While this is not a definitive test by any means, I believe it is enough to calm any fears I have that a clogged filter will cause either of these two fan models to start a fire. If you are worried you should to run the same test with the model fan that you choose to use. Conclusion: I don't believe a clogged filter could start a fire in the two fan models that I tested. However, that doesn't mean that every fan model is safe or that these fans couldn't change over time so you should assume that your fan can catch fire if you don't keep the filters clean enough to flow plenty of air unless you test it yourself. I have heard two first-hand accounts from friends who said that they have had a box fan catch fire or almost catch fire.
Filtration Performance Test protocol Each test consisted of cutting about 12 ft of ½” MDF and 12 ft of ¾” melamine on a table saw with the blade elevated 2” above the stock (to create even more dust). This raised the dust concentration levels in the shop to over 1,000,000 particles per cubic foot for particles > 0.5 microns. After the cuts were completed and the particle count reached the limit, the air filtration system was turned on and particle counts were logged from 1M particles/ft3 (very unhealthy air quality) until the level reached 30,000 particles/ft3 ("good" air quality).
For reference, according to the laser particle meter manufacturer, particle counts over 300,000 particles per cubic foot is "Very Poor" air quality. Particle counts under 30,000 particles per cubic foot are considered "Good " air quality. The graphs below show how quickly the various systems tested lower the particle counts over time. Typical particle counts for the outside air where I live (in the Ohio Valley) average between 50,000 and 100,000 particles per cubic foot for particles > 0.5 microns. The air quality here is not very good but it is excellent inside my workshop. System Sizing Considerations This is a good place to include this information since the test results presented in this article are affected by the volume of my workshop. If you run the same test in a smaller shop the particle concentration will go much higher and will drop much faster. In a larger shop the particle counts won't rise as high and it will take longer to bring them down to safe levels. My workshop is 24'x32'x8' 2 1/2 car garage which is 6144 cubic feet. To determine the volume of your workshop just multiply the length x width x height. If you don't have a flat ceiling then the volume will be less. Unfortunately you won't be able to simply compare your shop volume to mine to determine what size system you need. The general rule of thumb is to choose a system that will move enough air to pass the full volume of your shop at least 6x per hour. So, if your shop has 6000 cubic feet of air volume then aim for a unit, or multiple units that can flow at least 600 CFM combined. (I.E. 6 air exchanges per hour x 6000 cubic feet = 36,000 cubic feet per hour. Divide that by 60 minutes per hour and you get 600 CFM minimum flow rate target. However, any air filtration is better than no air filtration as long as the system uses decent filters. REMEMBER... effective dust collection should ALWAYS be a first priority. No air filtration system can protect you from harmful concentrations of dust unless you have effective dust collection. An important note about flow and filter ratings and flow rate When I started the tests for this article I noticed that the MERV 6 filter that I was using as a prefilter had nearly as much pressure drop as the MERV 11 main filter. I assumed that a higher rated filter would be much more restrictive. However, I looked into it some more and found several references that showed that MERV ratings and flow restriction are not always related. As you can see in Figure 3 below, a higher filter rating doesn't always mean the filter will be more restrictive. I haven't verified these results myself but they indicate that the Filtrete 1900 filter is superior in both filtration efficiency and flow rate compared to several other filters, including filters with lower MERV ratings.  Figure 3 – A higher MERV rating doesn't always mean a filter will be more restrictive As a result of this finding, I recommend that you use the Filtrete MPR 1900 20x24x1 filter or the 20x20x1 size for any filtration system you make yourself. It provides a slightly higher efficiency an a lower pressure drop that the filters I used in this test. Using a cheap fiberglass prefilter in front of the MPR 1900 filter will help extend the life of the high grade filter and prevent it from damage when you sweep the lint off the prefilter. Figure 3 shows that a MERV 13 filter can have a lower flow resistance than a MERV 11 filter but that is not to say that it will ever have less flow restriction than a cheap fiberglass filter. That's certainly not the case. However, cheap fiberglass filters are simply lint filters and do nothing to protect your health. Side Note... Will a high grade pleated filter shorten the life of your furnace blower motor? I won't go into great detail here but this is a good time to talk about filters verses fan motor life. I tested several of the systems used in this test with no filters, with filters and with the inlet or outlet completely blocked. In every case the squirrel cage blower motors drew much less power when completely blocked compared to without any filters. The axial fans drew about 10% more power when the air flow was completely blocked. There are some furnace motor types that this doesn't apply to but, even with those, the difference in power used will be very small. You will hear almost every HVAC tech you talk to say, "high grade filters will kill your furnace blower motor!". That is true if you allow the filter to completely clog to the point that it doesn't flow enough air to cool your blower motor. It is not true otherwise. In many cases, the motor will draw less power with a high grade filter. My testing has shown that some MERV 13 filters have a lower air flow resistance than most lower rated filters. The only exceptions are the very cheap fiberglass filters that only remove lint and very large dust particles. Conclusion: You should... 1. Use the Filtrete MPR 1900 filter which has a LOWER flow resistance and a HIGHER filtration efficiency than any other 1" filter I've tested if you can be sure to clean or change this filter before the flow rate gets too low. ---OR---- 2. Use an ultra cheap fiberglass filter that can get very dirty before it starts restricting airflow much at all. These are unlikely to ever restrict airflow enough to overheat your furnace blower motor. Don't use a filter in between because filters in between these two will restrict air flow more that the cheap fiberglass filters and the Filtrete MPR 1900 filter AND they will filter fewer particles than the Filtrete MPR 1900 filter Who should use high grade furnace filters?
Systems Performance Detailed Summary Let's start the countdown starting with the worst and working our way to the best...
#11 Of course, the least effective method was to use no dust collection and no air filtration. However, the takeaway from this baseline test is to understand how unhealthy your workshop air can become after just a few cuts if you don't have effective dust collection and no air filtration. Don't ignore this warning. If you spend enough time breathing high concentrations of dust it certainly will affect your health one way or another. Most often people never connect the symptoms with the cause.
To #10 In almost every video I've watched showing how to build "the ultimate box fan filtration system" they use cheap fiberglass filters or low grade filters. I cringe when I see this because most of those systems will catch large particles but they do little to nothing to remove fine particles. In some cases these systems may do more to keep very fine dust stirred up than anything else. In this test I used a 20x20x2" discount MERV 12 Filter strapped to a Holmes HBF 2001DP-BM box fan. The discount filter claims to meet the MERV 12 specification. However, as you can see in Figure 4, the discount filter (with a claimed MERV 12 rating) didn't perform much better than using no filter at all! I won't trust my health to to filters rated less than MERV 11 or to brands that I haven't personally tested with satisfactory results. I've tested 3M (Filtrete), Honeywell and discount filters. The 3M and Honeywell filters have always met or exceeded their marketing claims. I ordered the discount filters two separate times several months apart from Amazon just to make sure I didn't receive a defective product the first time. Both filters performed exactly the same. I sent them back. I suggest if you use any brand other than 3M or Honeywell directly from a big box store that you use an air quality meter to check to see if it performs to your expectations. Try comparing different brands to see what it reveals.  Figure 4 – Comparison tests
#9 WEN 3410 - The 3410 is also a very popular model because it is very inexpensive at $126 including shipping. The WEN came in as the quietest option of the test but that is expected because it moved the least amount of air. As with the Powermatic, the advertised 400 CFM flow rating is overstated. I measured 257 CFM with brand new filters and 357 CFM with no filters installed. In terms of filtration performance for the price it is on par with the Powermatic PM 1200 but you would need to buy 4 WEN 3410 systems to equal the performance of one Powermatic PM 1200 system. The WEN 3410 took almost two hours to bring the dust concentrations below 30,000. That means this system would be most appropriate for very small shed shops. Even in a larger shop it is much better than nothing but it is only worth the $$ if you don't want to put together a DIY system yourself. If you already have this system I suggest ditching the stock prefilter and building a custom intake frame so you can use a Filtrete MPR 1900 20x24x1 filter as the prefilter. I didn't test the results but I'm confident that this will improve the performance of this system significantly by lowering pressure drop, increasing the flow rate and increasing the prefilter efficiency.
#8 Holmes HBF 2001DP-BM 20" box fan, 3M MERV 6 filter and one MERV 11 filter (stacked). The 3M MERV 11 filter is not shown in the picture but it was stacked inside of the MERV 6 filter. This setup brought the particle count down to 30,000 in 65 to 75 minutes putting it in 7th place out of the 10 tests. I ran the test twice without cleaning the filters in between and the it took 10 minutes longer to clear the air in the second test. This was likely due to a lower flow rate as the filters clogged with dust. An interesting note about these results is that this system moves about the same CFM as the WEN 3410 and was only slightly more efficient at removing particles > 0.5 microns (outlet concentration/inlet concentration) but it performed about twice as well as the WEN. Looking at these two numbers one would expect them to take about the same amount of time to clear the air. So, why did it clear the air more than 50% faster than the WEN? If you have any theories feel free to discuss them in the comments. Box fans pull a LOT of air into the front as well as blowing air out. This makes it somewhat difficult to obtain reliable air flow rate readings. It is possible that the air flow test readings were underestimating what was really occuring. The efficiency readings are in line with the filter specifications so I believe that number is accurate. Considering the profound difference in how quickly this system pulled particle counts down compared to the WEN it would be interesting to know exactly why. This configuration is certainly the lowest cost and it is the easiest to implement. For this test I used silicone box fan filter grips to secure the filters to the fan. You can also simply use duct tape to save a few dollars and to gain a little bit more performance. As I mentioned earlier, after completing these tests I found a set of flow-curves for furnace filters with various MERV ratings online. To my surprise, some of the higher rated filters had LOWER flow resistance. See Figure 3 for reference. For this reason, if you want to use this setup I recommend using a single Filtrete MPR 1900 20x24x1 filter . It will flow more air and catch even more of the small particles than the filters used in my testing. #7 The Honeywell 50250-S True HEPA Air Purifier is a true HEPA rated air filtration system designed for home use. As the test results indicate this system captures 100% of all of the particles my system can measure. The HEPA standard calls for the capture of 99.97% of all particles > 0.3 microns. I included this unit in the test to see how the performance of a home air filtration system compares to a workshop and DIY air filtration systems. To my surprise it barely surpassed the $37 box fan system. To be fair, this HEPA filtration system will remove some particles that a furnace filter can't such as very small smoke particles as well as some allergens that are too small for furnace filters. However, for most particles of concern the box fan and floor fan setups will outperform this system by a very wide margin. The Honeywell system was slightly quieter than most of the systems tested by not by a noticeable margin.
#6 This system probably would have ranked #1 if I had installed clean filters but I wanted to test the Shop Hacks Downdraft Single Stage 4-filter System to see how a system with 2-year-old, dirty filters compared. They haven't been swept clean in over 6 months and were used "as-is". I designed this system to have ultra low pressure drop so that the flow rate doesn't change much as the filters get dirty. The pressure drop across an air filter is proportional to the square of the speed of the air flowing through it. A system with 2 filters should have 1/4th as much pressure drop at the same flow rate as a single filter system. A system with 4 filters has 1/16th as much pressure drop at the same flow rate as a single filter system! Axial fans produce less than a maximum of 0.2 in-wc of pressure. To compare, a squirrel cage furnace blower produces closer to a maximum of 1.25 in-wc which is approximately 5x as much pressure as an axial fan. For that reason it is possible to use less filter area for a squirrel cage blower and still get the same flow rate as an axial fan. The flow rate of a squirrel cage blower system drops off less than an axial fan system as the filters get dirty. Quadrupling the filter area allows the axial fan to perform better than a squirrel cage blower.
At 60 minutes to bring particle counts below 30,000, this system came in mid pack. I was quite surprised to see that the filters were still operating at 80% efficiency for particles > 0.5 microns after two years on the original filters. I've swept them clean a few times over the two year period but the filters were not cleaned prior to this test. This says a lot for the longevity of furnace filters. With that said, this is by no means a conclusive test for dirty furnace filter performance. However, it is one encouraging data point. As I mentioned earlier, the only way you can be sure what works and what doesn't is to purchase a particle counter and test your shop and home air yourself. Using a particle counter allows you to see the invisible, and with that information you will be able to make rational, verifiable, incremental changes until your air is always clean and safe. If you plan to reproduce this system I recommend using the Lasko 20" High Velocity Fan 2264QM fan and 4 of the 3M Filtrete MPR 1900 filters.
#5 Powermatic PM1200 - This is a very popular model put out by Powermatic, a very reputable company known for quality products. It is also the most expensive model tested, coming in at $500. We wanted to include a top of the line mainstream retail system to serve as a baseline to compare the other systems. The PM 1200 uses a squirrel cage blower that flows around 865 CFM on high with the front grill and diffuser removed. Powermatic claims 1200 CFM . I measured 1200 CFM with both filters removed. It is not uncommon for manufacturers to overstate performance by testing in an off-nominal configuration. The system includes two filters. The outer filter (prefilter) is similar to a pleated furnace filter and is rated to capture particles 5 microns and larger. The inner filter is a bag filter rated to capture particles 1 micron and larger. However, according to the test results it was quite effective at capturing particles down to 0.5 microns, the limit of the laser particle counter used. The unit tested is a 2 year old system. I cleaned both filters thoroughly with compressed air prior to testing. With the diffuser installed the PM 1200 took 41 minutes to clear the air. It was much more effective without the diffuser, taking a mere 30 minutes to clear the air. That's a 30% improvement by simply removing the diffuser! The diffuser does absolutely nothing to filter the air. It only exists to lower the air velocity. The diffuser prevents high velocity air from stirring up more dust in your shop. However, it creates a significant pressure drop that significantly lowers the flow rate. I suggest removing the diffuser if the high velocity exit air stream doesn't negatively impact your workflow. If I had this unit I would ditch the stock prefilter and I would build a frame to allow use of a Filtrete MPR 1900 20x24x1 filter as the prefilter. This will increase the filtration efficiency greatly while also increasing the flow rate by at least another 150 CFM compared to the stock pre filter.
#4 One 20" fan drawing air in a window + a 20" fan blowing air out the door - Simply placing one fan in a window drawing fresh air in from the outside and one fan in an open door blowing dusty air outside worked well. However, surprisingly, this did not outperform some of the air filtration systems. One caveat to note for this test... the condition used to determine the time required to reach "good" air quality is when the particle count drops below 30,000 particles per cubic foot. During the time of testing, the outside air particle count was 36,000 so it was impossible to ever reach the "good" air quality mark using this method. This system was ranked #4 based on the time required to drop the particle concentration below the "very unhealthy" lower limit of 300,000 particles per cubic foot. If you never use heat or air conditioning in your workshop then using a large fan to draw in fresh air and opening a door or window to allow dirty air to escape will be a very effective method of clearing your shop air. This is contingent on the quality of the outside air and the flow rate of the fan(s) you used to accomplish this. If your shop is heated or air conditioned then this method is very impractical. Note: When you draw air in you much provide a way for the air to escape freely or the fan will not move much air into the space. An open window or door to allow air to flow out will suffice for most cases.
#3 The Shop Hacks Downdraft Table 4-Stage Filtration System was the only surpassed by the Lasko 2264QM V-configuration system. I use this system as a multi-function table/workbench, a downdraft table, a dust collection system for my table saw and a shop air filtration system. It uses a 1200 CFM squirrel cage furnace blower and a 4 stage filtration system. The first stage is a cheap 1" fiberglass filter that is used to catch the large dust particles so I can sweep them off when the pressure drop gets beyond a certain limit. The second stage is a 4" MERV 12 filter. The 3rd and 4th stages are two MPR 1900 filters. One of them is at the outlet of the blower to diffuse the airflow so it doesn't stir up dust in the shop. This system moves about 600 CFM in this configuration. It would perform better as a shop air filtration system if I only used 2 stages of filters. However, since it is used as a dust collection and downdraft system it often sees very high concentrations of dust and I wanted to ensure that it would put out clean air even in the worst case conditions, which it does. Using multiple stages of filtration also allows the higher MERV filters to last longer before needing to be cleaned. I've been using this system over two years now and had only cleaned the last 3 stages of filters a couple of times prior to this test. I replaced the second stage filter for this test. It is best to use a squirrel cage blower for multiple stage filtration systems. Squirrel cage blowers produce up to 1.3 in-wc of pressure compared to a max of about 0.12 in-wc for a 20" box fan. The extra available pressure means that a system that uses a squirrel cage blower will lose less air flow as the filters get dirty than a system that uses axial fans and the same filter area.
#2 Lasko 20" High Velocity Fan 2264QM with 2 sets of one 3M MERV 6 filter and one MERV 11 filter (stacked). This setup performed better than any other air filtration system in the test. It was only topped by the test using my dust collection system.
At $85 this system is a no brainer for anyone who has the space to fit the V-filter configuration and who doesn't mind a little bit of fabrication. I simply cut three cardboard panels and duct taped everything together for this test. That is all you need for a completely function system. However, in a future article I'll expand on this idea to show you how to build a high quality system that looks and performs even better than this one. Based on the information I noted in Figure 3 regarding the superior flow and filtration performance of the Filtrete MPR 1900 20x24x1 filter , I recommend building this system with that filter rather than the filters I used in this test. The performance should improve measurably and the system will drop another $20 also.
This system brought the particle count down to 30,000 in 27 minutes with and without the recirculation fan. I expected this would be the case because the very fine dust particles disperse more like gasses than particles so they pretty much fill the space evenly regardless of how air is circulated. This is not a definitive test since I only tested one recirculation configuration and the recirculation fan was used on the second test in which the filters had been loaded slightly from the first test. However, considering the curves overlapped almost exactly with and without a recirculation fan, I doubt that any recirculation pattern will make a significant difference. The BEST and the WORST performers of the tests... Best of Test - Dust Collection -ON- Air Filtration Systems -OFF- ---AND--- Worst of Test - Dust Collection -OFF- Air Filtration Systems -OFF- The best results of all of the testing came from running my dust collection system. Even after cutting twice as many boards as with any other test and with NO air filtration systems running the particle counts never moved out of the "good" air quality range. The results are illustrated in Figure 5 below. I ran tests on two other setups to serve as baselines. They are... 1. With dust collection only 2. With no dust collection or air filtration
Figure 5 – Effective Dust Collection is Imperative As you can see, using effective dust collection worked so well that I didn't even need to turn the air filtration systems on for this test even though I ran 2x as much material through the saw. That's not to say that you should not use dust collection and air filtration systems in your workshop. There are times when you just can't capture all of the dust at the source. In those times the particle concentrations can rise quite high and having an air filtration system will bring them down quicker which means you breath less dust in between cuts. With no dust collection and no air filtration the shop air particle concentration remained in the dangerously high range for many hours. Imagine making cuts one after another without dust collection or air filtration. When I first bought my Dylos DC1100 Pro laser particle counter I routinely saw particle counts rise over the 6-million mark! That's 6x higher than the highest level shown in any of the graphs for these tests. There's no telling what I was doing to my lungs and body during all of those years. Hopefully the effects can reverse, similar to the way smokers negative symptoms often cease after they quit smoking. Either way I know that I'm breathing healthy air now and I rarely have to clean up dust in my shop which is a great side benefit. All that to say, don't count on an air filtration system to replace effective dust collection. In future articles I'll show you how to get nearly 100% effective dust collection on just about any tool in your shop with a simple and inexpensive shop vac. Be sure to subscribe to the Shop Hacks newsletter HERE if you want to receive those articles. Conclusions and Recommendations Empower Yourself - technical deep dive (you can skip this section if you don't care to understand the "whys")
Figure 6 – Blowers and Fans Have Very Different Flow Curves For those who may be interested, let me explain how to read the graph in Figure 5. The orange line that starts at around 1.3 on the vertical axis and slopes down to 1200 on the horizontal axis represents how the Powermatic PM 1200 blower performs. If you block the inlet or outlet completely off that represents 0 CFM. At 0 CFM you can see that the pressure is around 1.3 in-wc. The dark curve sloping upwards in the middle of the graph represents the PM 1200 2 filter system flow curve. The point where it intersects the orange curve is the operating point of 865 CFM and about 1.0 in-wc. (In-wc stands for "inches of water column". 1 psi = 27.7 in-wc or 1 in-wc = 0.0036 psi.) The upward sloping curve under that one represents the flow curve for a 20x25x1" MERV 11 3M furnace filter. If you were to replace the two filters in the PM 1200 system with that furnace filter it would operate at around 1100 CFM and 0.3 in-wc. The blue downward sloping curve near the bottom of the graph is the flow curve for the Holmes 20" box fan. As you can see its maximum pressure is about 1/10th as much as the PM 1200 but when there is no resistance to flow it flows almost 1200 CFM also. However, adding a 20x25x1" MERV 11 filter will drop the flow down to just under 600 CFM. As the filter gets dirty, its flow curve gets steeper which causes the fan to drop in flow rate faster than the blower. This is why blowers are most often used in air filtration systems. However, one way around this problem is to increase the filter area. Doubling the filter area reduces the resistance to 1/4th. Quadrupling the filter area reduces the resistance to 1/16th! Once you get into that range an axial fan can outperform a squirrel cage blower using 1/10th the pressure and 1/10th the power. For reference A typical 1.5 hp (10 Amp, 110V, 1100W) dust collector can move about 800 cfm with no resistance and produces a maximum static pressure of about 14 in-wc. A typical full size shop vac (12 Amp, 110V, 1300W) can move about 200 cfm with no resistance and produces a maximum static pressure of over 100 in-wc. Products Used In These Tests A Laser particle counter allows you to run your own tests to see where your dust is coming from and to optimize your dust collection and air filtration systems. This particle counter will pay for itself many times over by allowing you to build your own dust collection systems without having to spend hundreds of dollars more for each system. Dylos DC1100 Pro laser particle counter (Highly Recommended, measures down to 0.5 micron particles) Dylos DC100 laser particle counter (Recommended, lower cost but only measures down to 1 micron particles) Holmes HBF2001DP-BM 20-Inch Box Fan (NOT recommended. Although it puts out a little more air than the Pelonis, the cheap quality and rear mounted cord and controls make it more difficult to use) 3M MPR 1550 (MERV 13) filter 6 pack (Highly recommended for single filter box fan air filtration setup. This will probably perform even better than the filters used during testing) Filtrete 20x20x1 MPR 300 filter 6-pack (Used as pre filters in DIY filter tests. Not recommended because they have as much pressure drop as the higher rated filters so they don't add much value. However, they are very inexpensive and you can sweep them off without damaging them) Filtrete 20x20x1, AC Furnace Air Filter, MPR 1200, Allergen Defense Odor Reduction, 2-Pack (these were used in the testing for this article. They worked very well but I would recommend the 3M 1550 MPR filters over these since the 3M filters have less pressure drop) Silicone box fan filter grips (I used these for the box fan filter tests. They are recommended for simplicity of use) Cardboard magnetic filter holder (I didn't use this but it may be worth looking at if you you like a more finished look. It certainly is not required to obtain good performance) Retail air filtration systems and components tested Powermatic PM1200 air filtration system PM1200 Inner Filter PM1200 Pre Filter WEN 3410 air filtration system WEN 90243-027-2 5-Micron Outer Air Filters, 2-Pack WEN 90243-026-2 1-Micron Inner Air Filters, 2-Pack Honeywell 50250-S True HEPA Air Purifier Honeywell 50250-S HEPA filter If you would like to receive helpful workshop articles as they are released then opt-in to the Shop Hacks Newsletter now.
By buying products listed in this article (affiliate links) you don't pay any extra but Shop Hacks receives a small commission from Amazon which helps support the creation of more content to help you Build Your Space. Thank you for your support. Shop Hacks was not sponsored by any companies so you can be sure that all of the results in this article are completely unbiased. |
Categories
All
NewsletterShop Hacks exists to help you Build Your Space! Archives |

- Home
-
Improve your Workspace
-
Dust Collection and Air Filtration
>
- Table Saw Dust Collection
- All About Cyclone Separators
- Dust Deputy and Dustopper Review and Comprehensive Scientific Testing
- Dust Sheriff Cyclone Separator
- Dust Collection System Options
- Air Filtration System Options
- Why clean air matters
- Is your shop air safe???
- How to maintain healthy air in your shop
- Dust Collection Resources and Links
- Why I became obsessed with dust collection and air filtration
- Storage, Organization, Efficiency >
- Improve your workshop floors and lighting >
-
Dust Collection and Air Filtration
>
-
Improve Your Tools
- Shop
- Contact
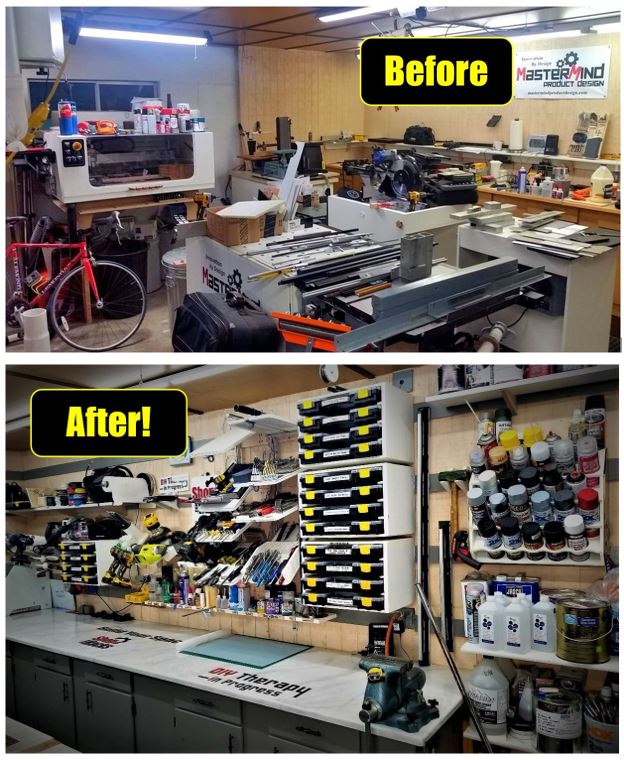

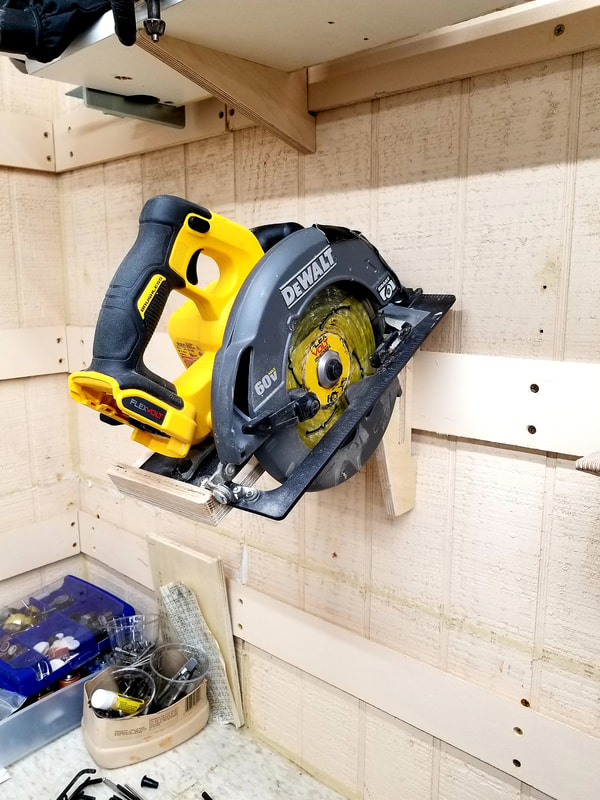


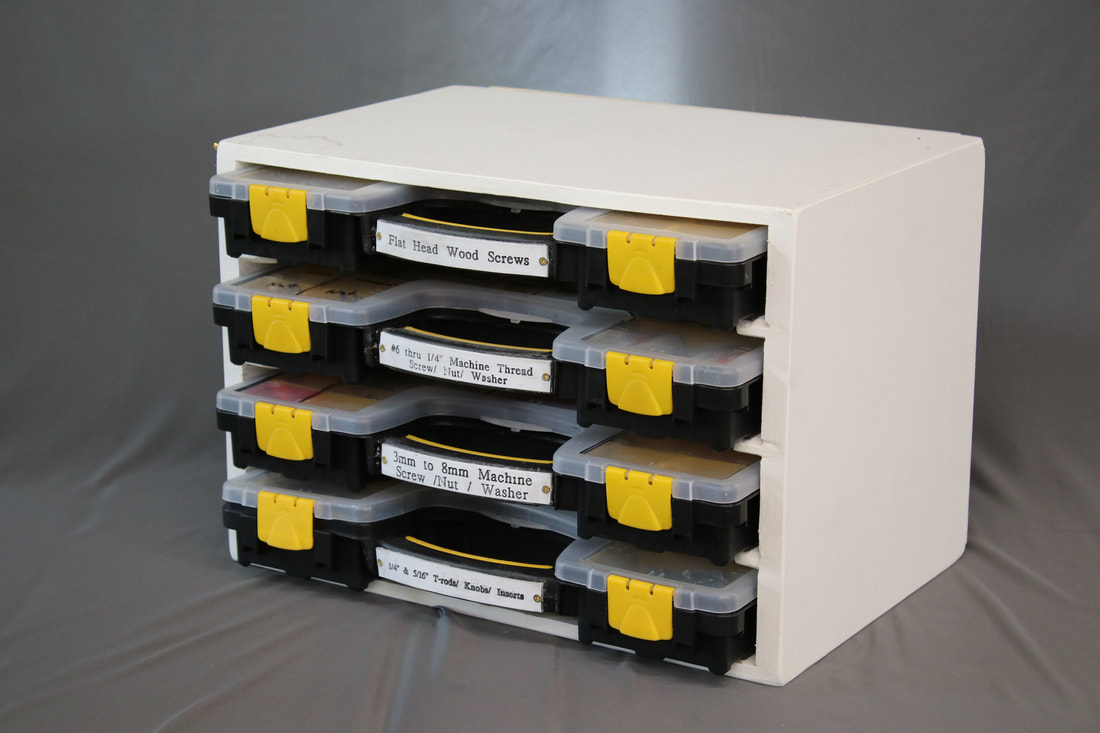

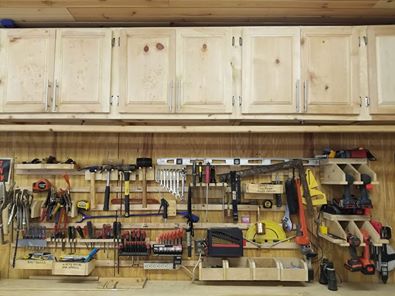
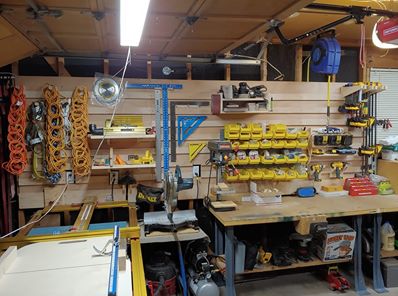

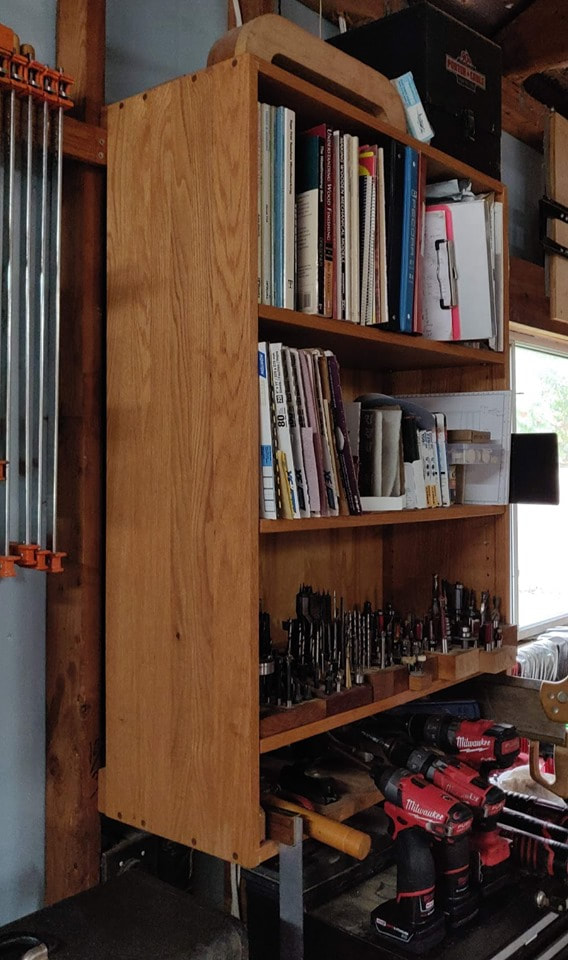
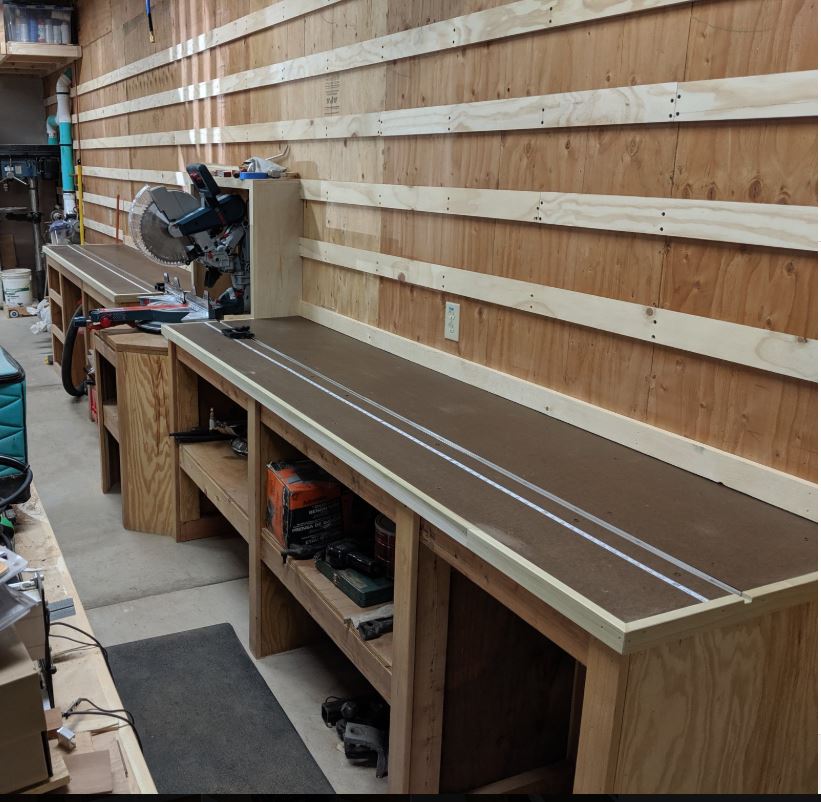
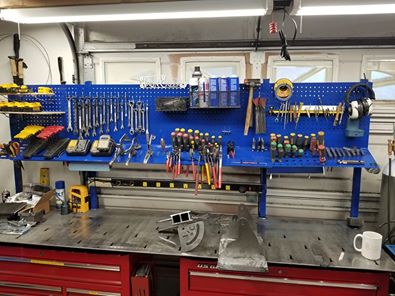

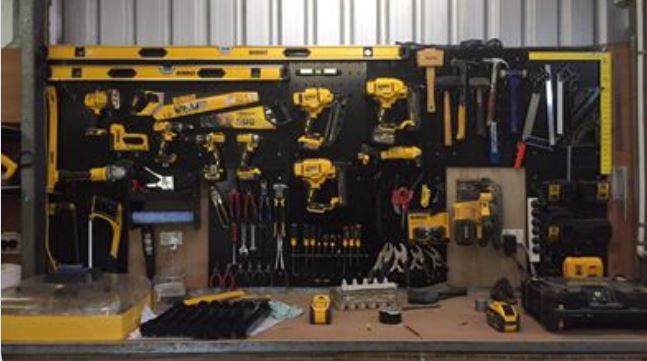
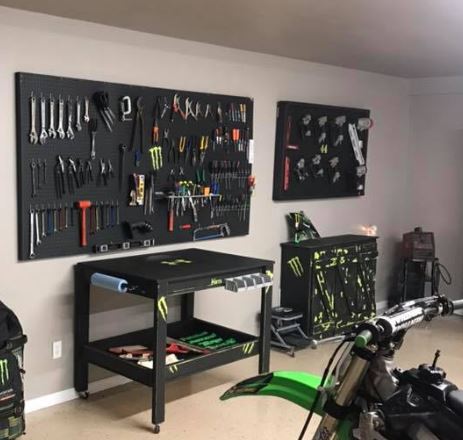
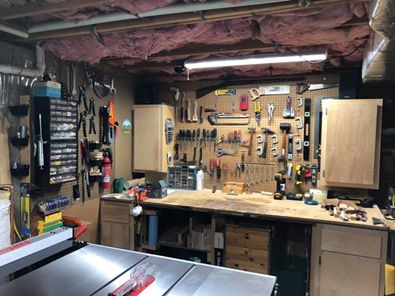
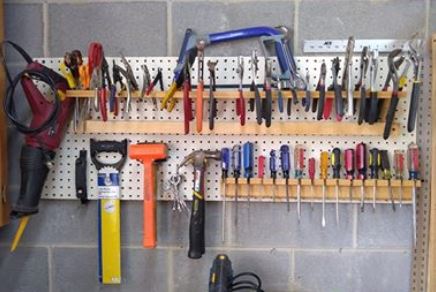

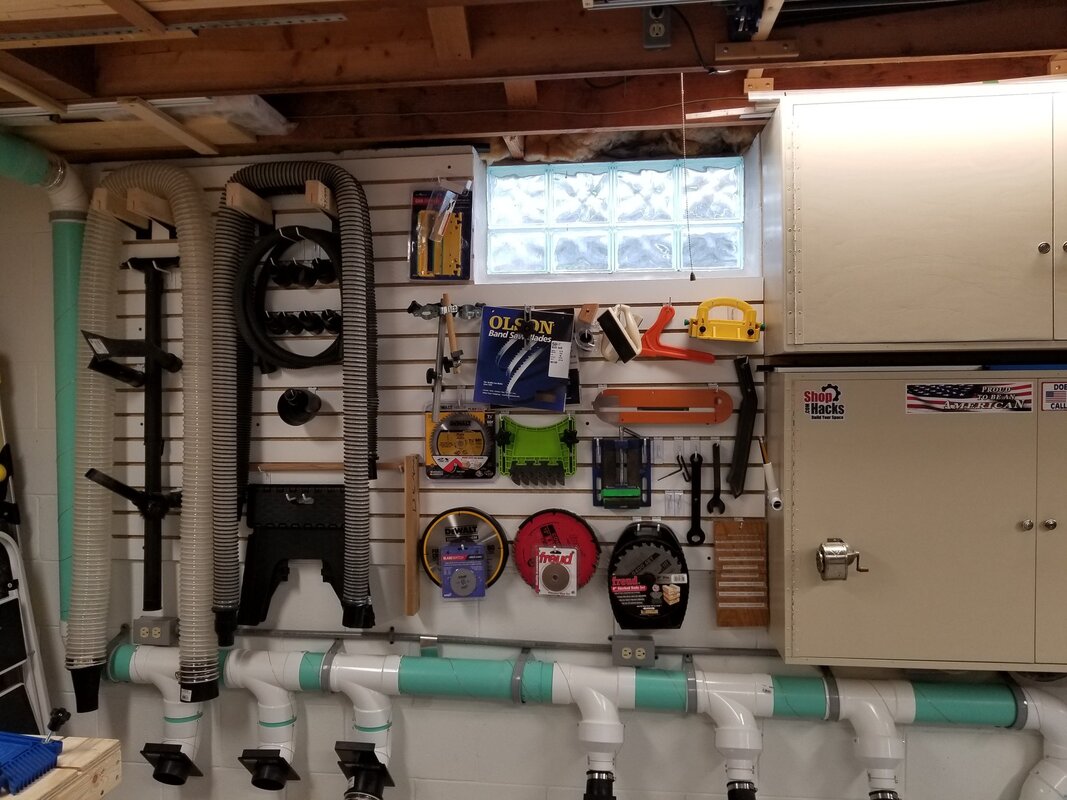
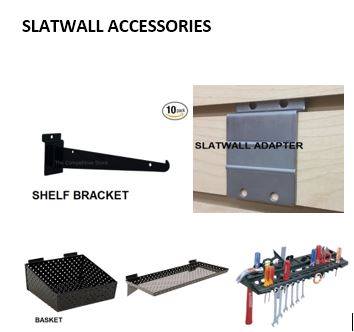

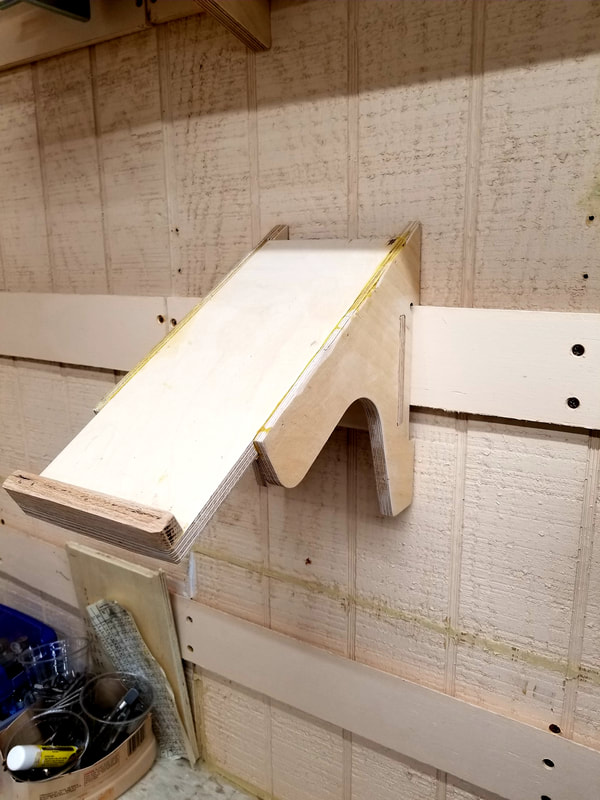
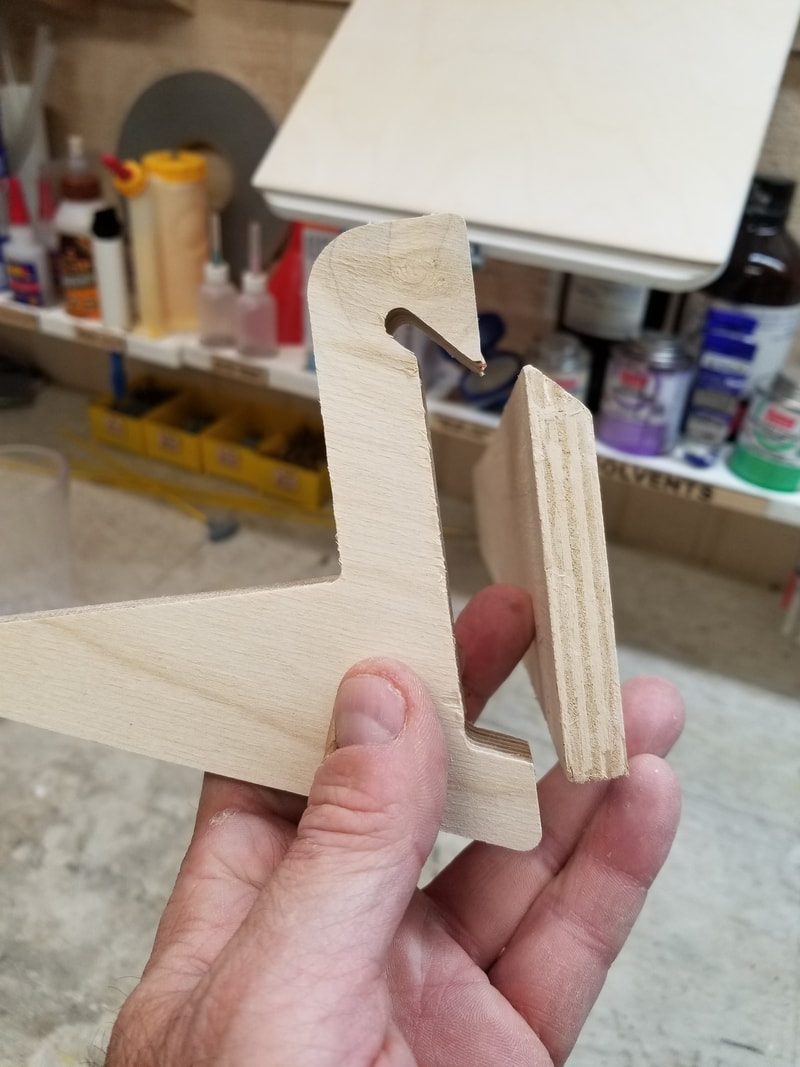


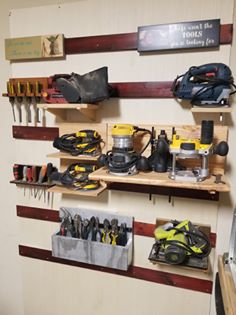
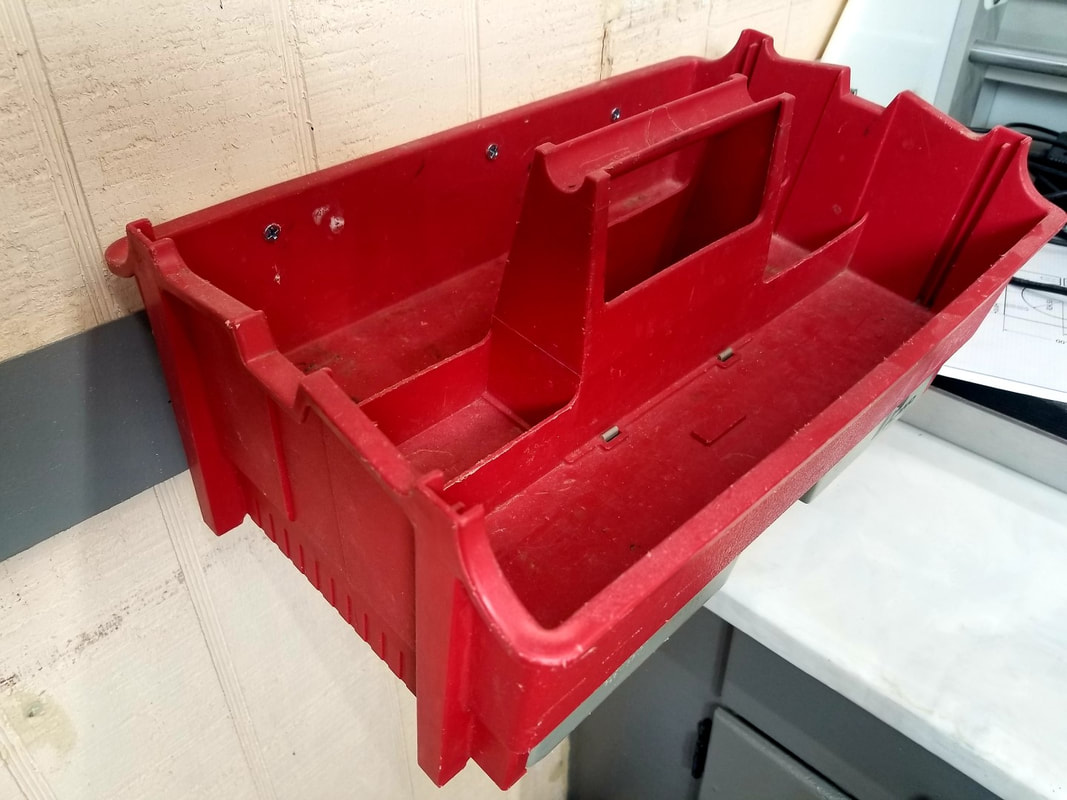
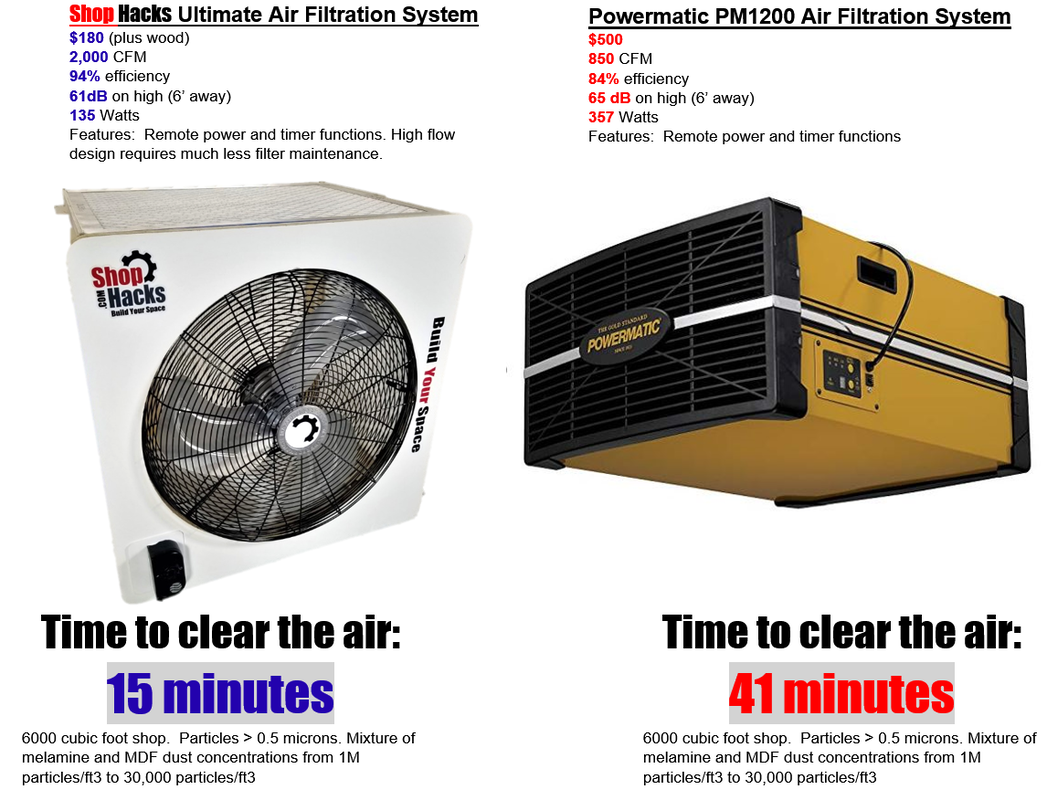


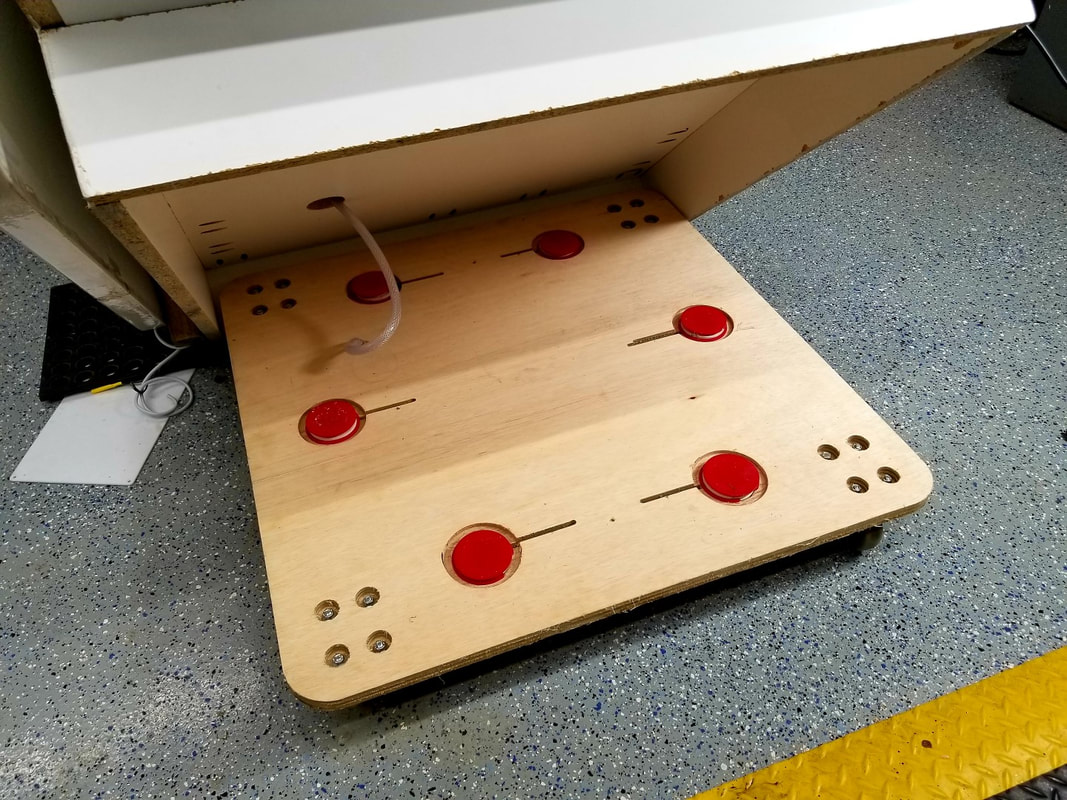


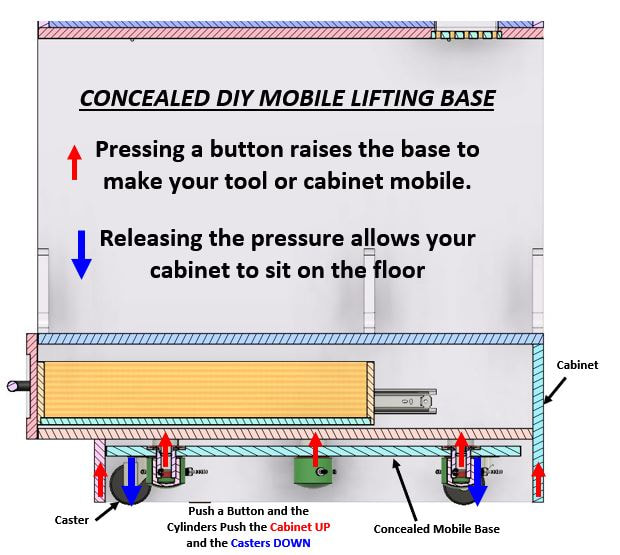


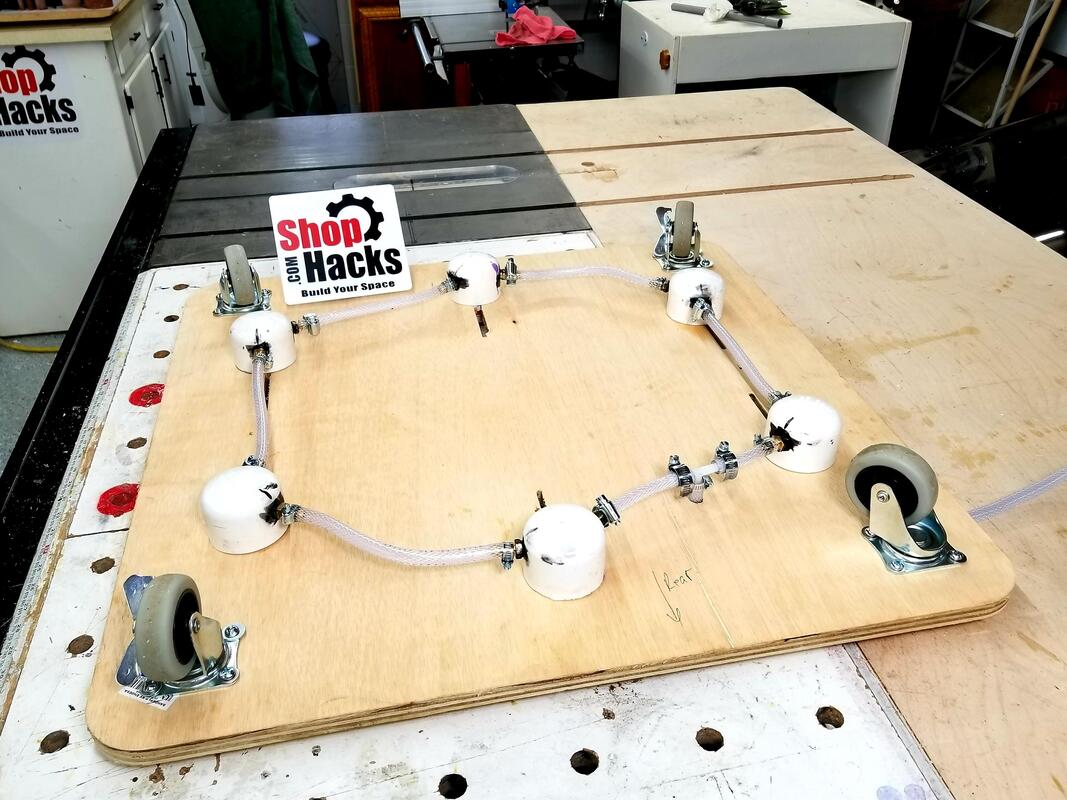

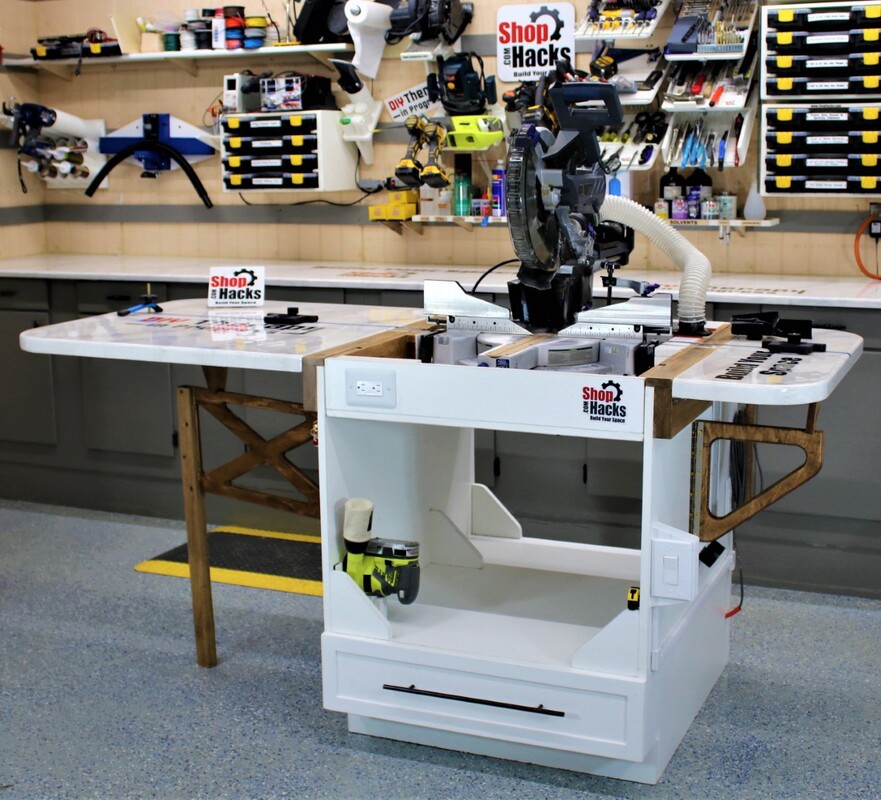


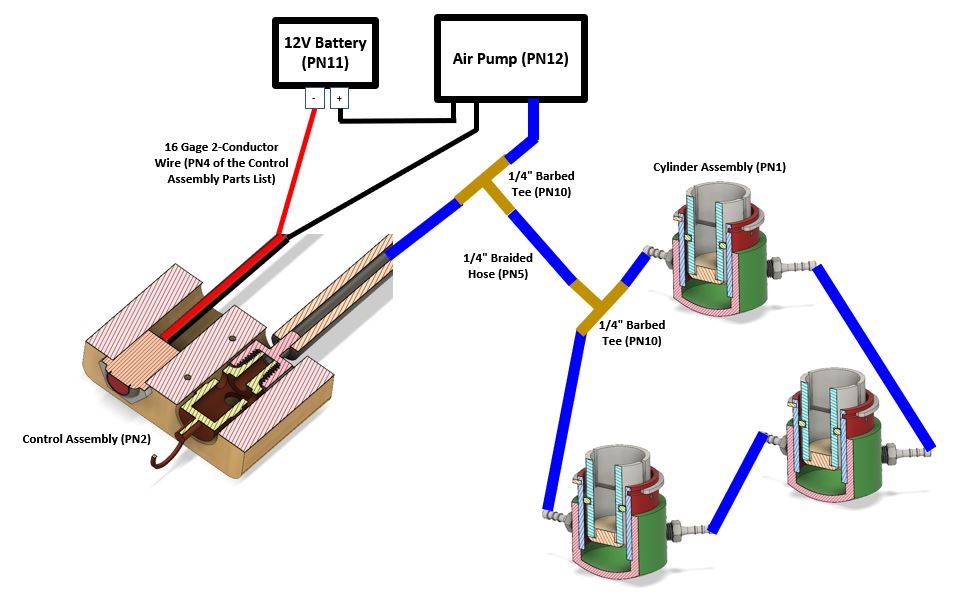
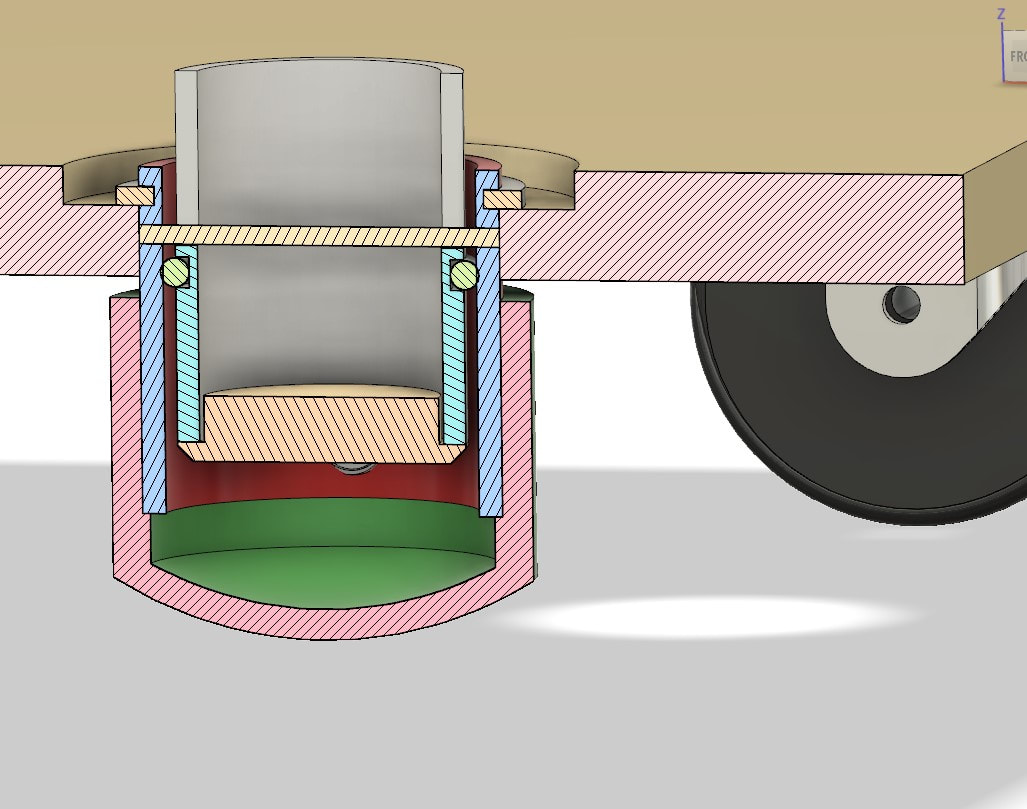

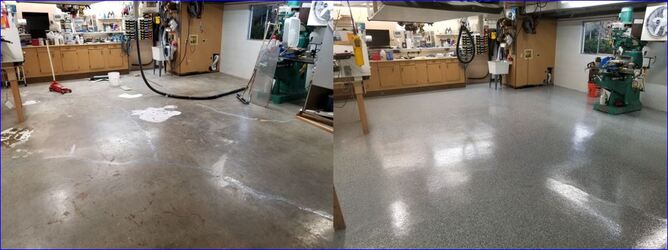
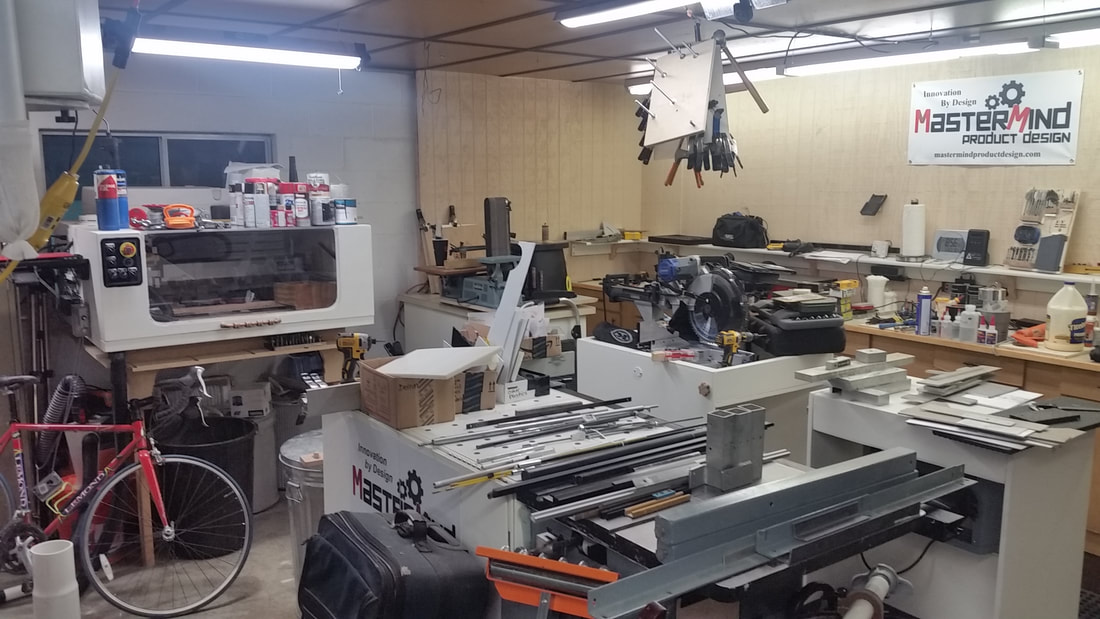
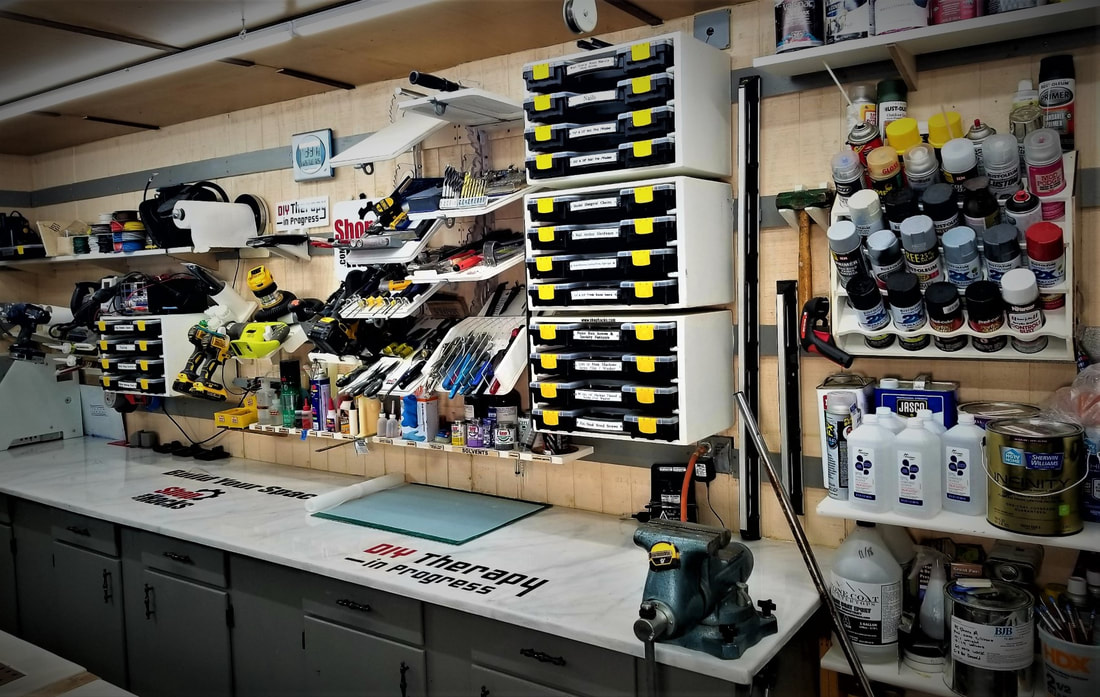
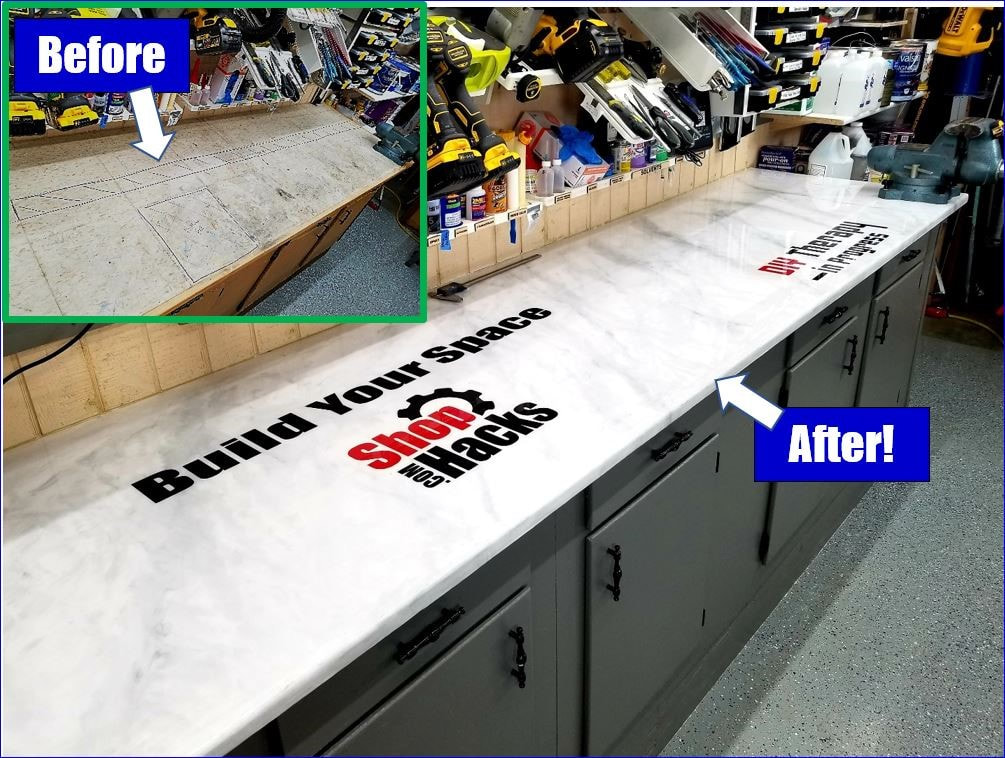

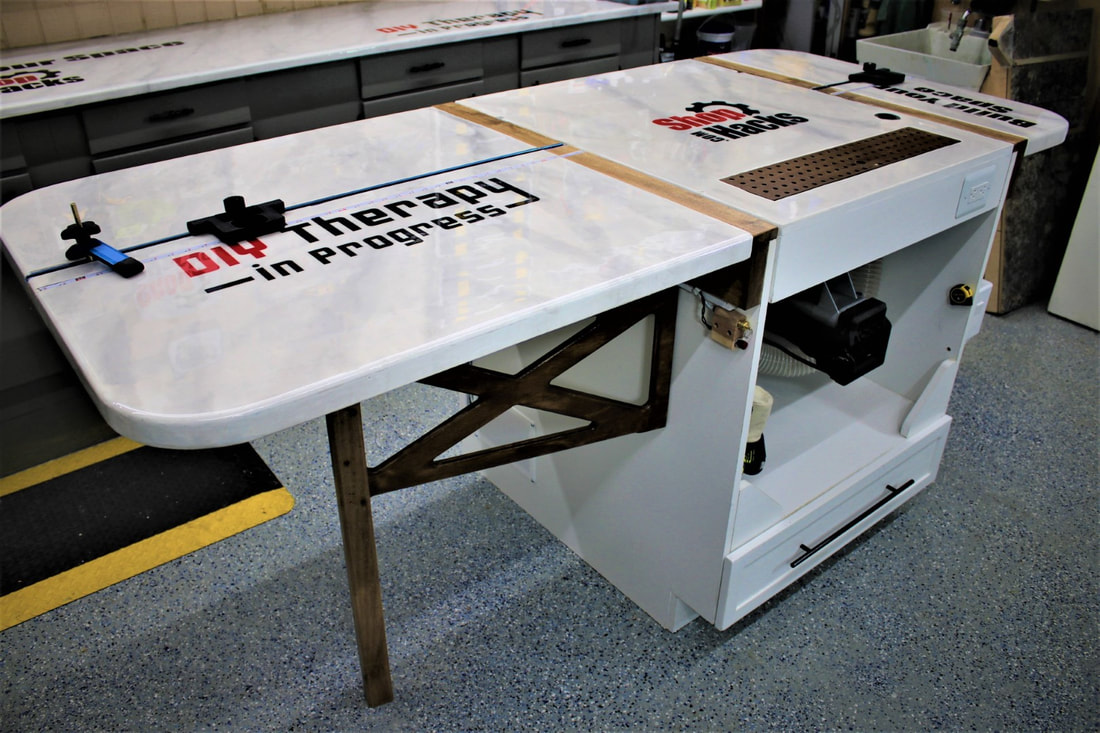


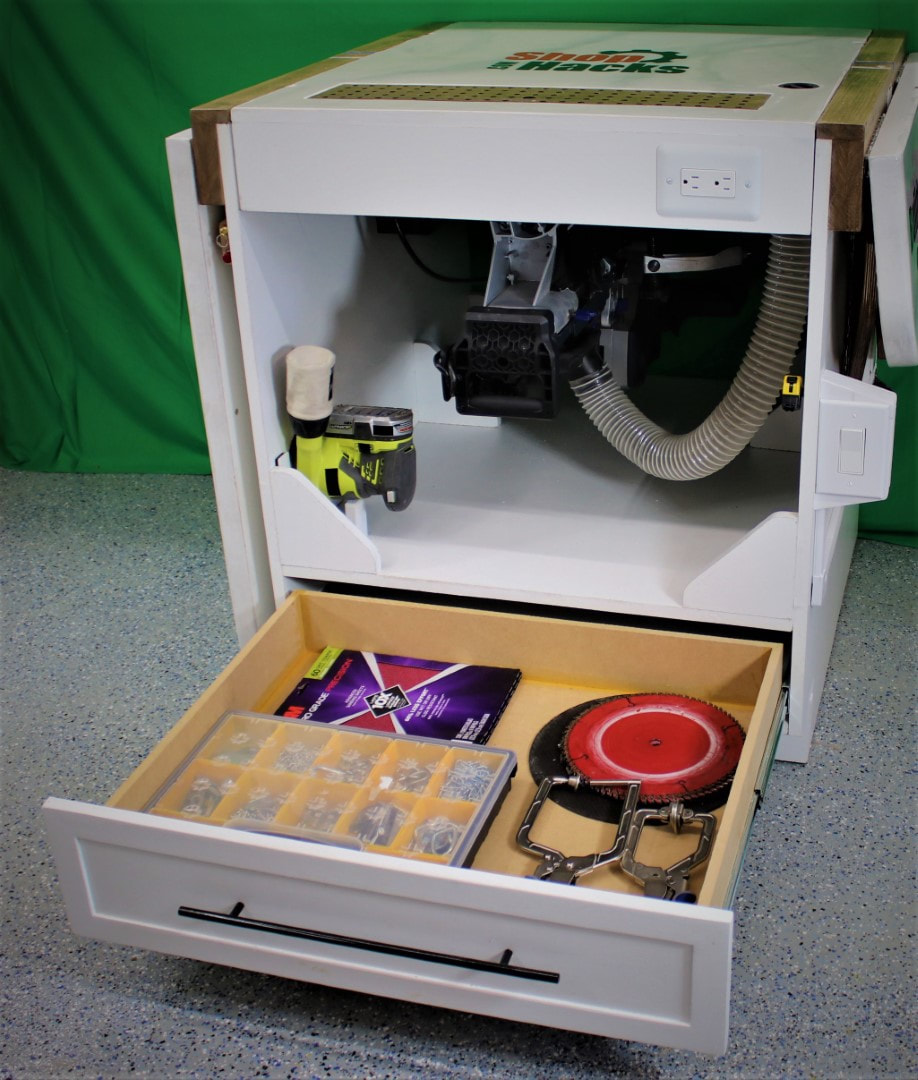

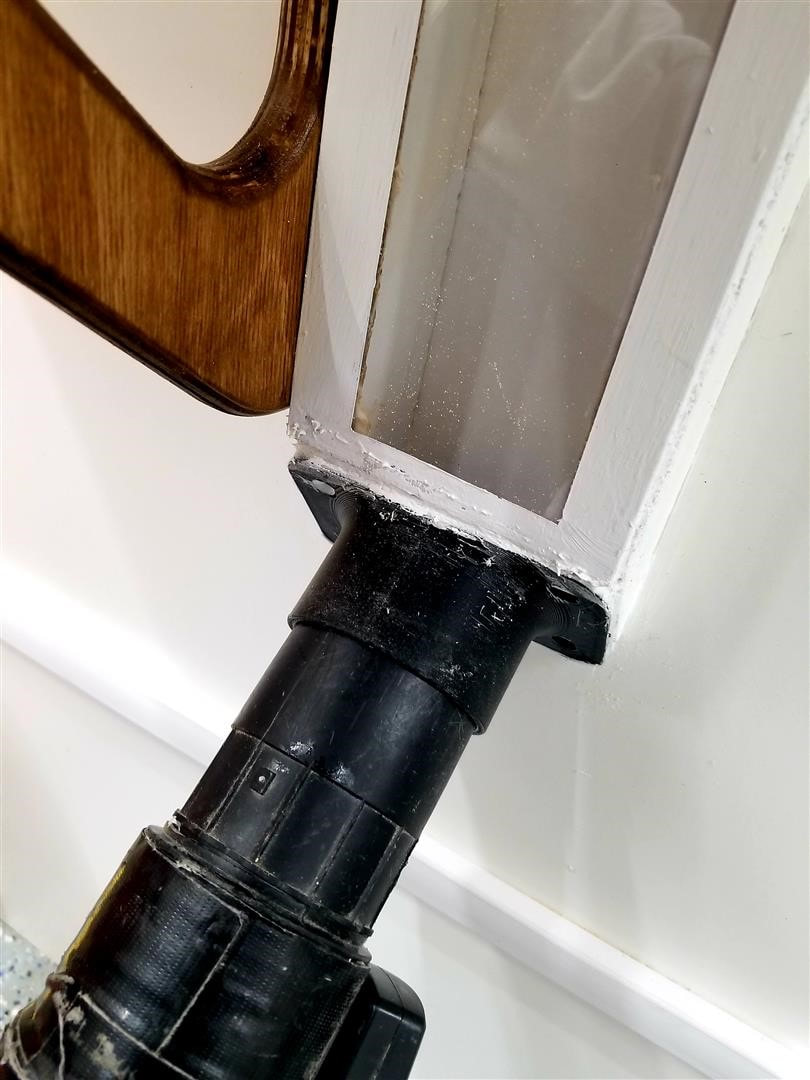
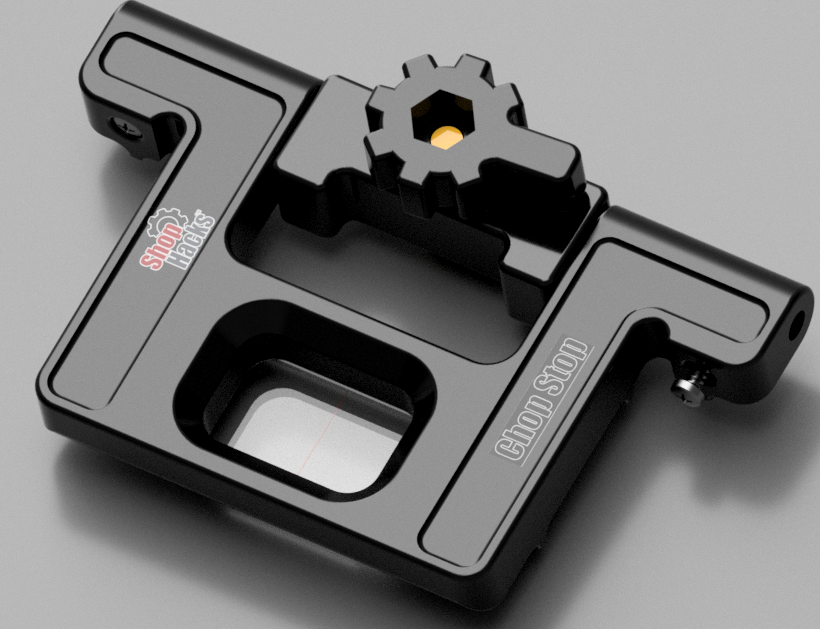
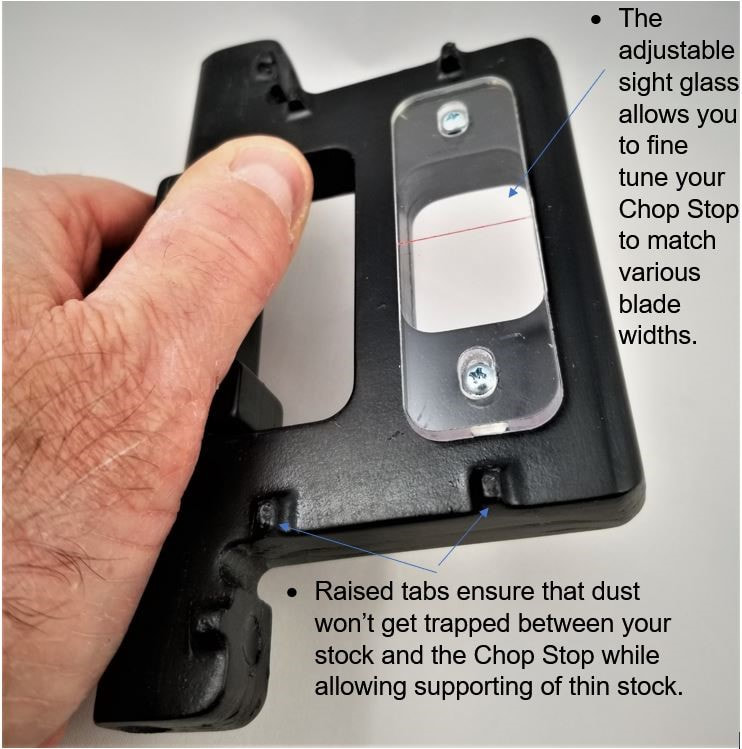


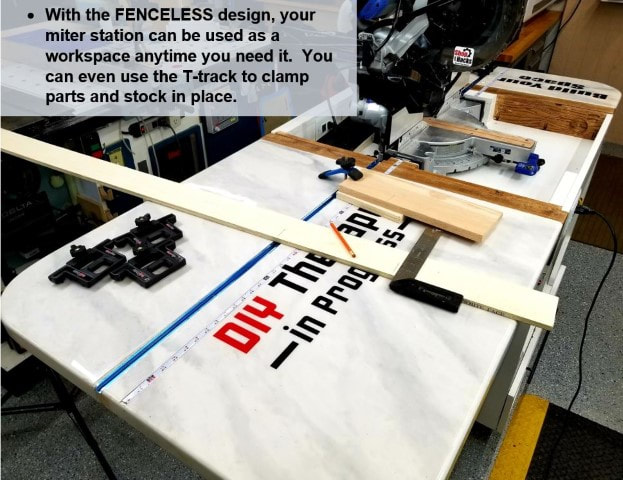
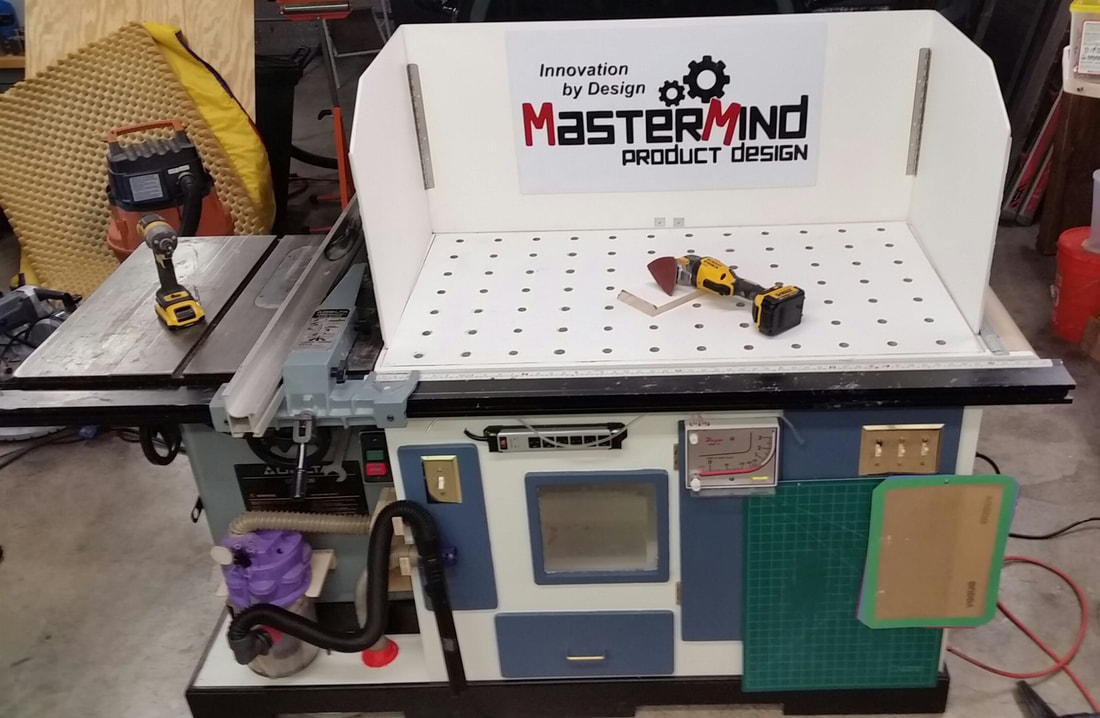

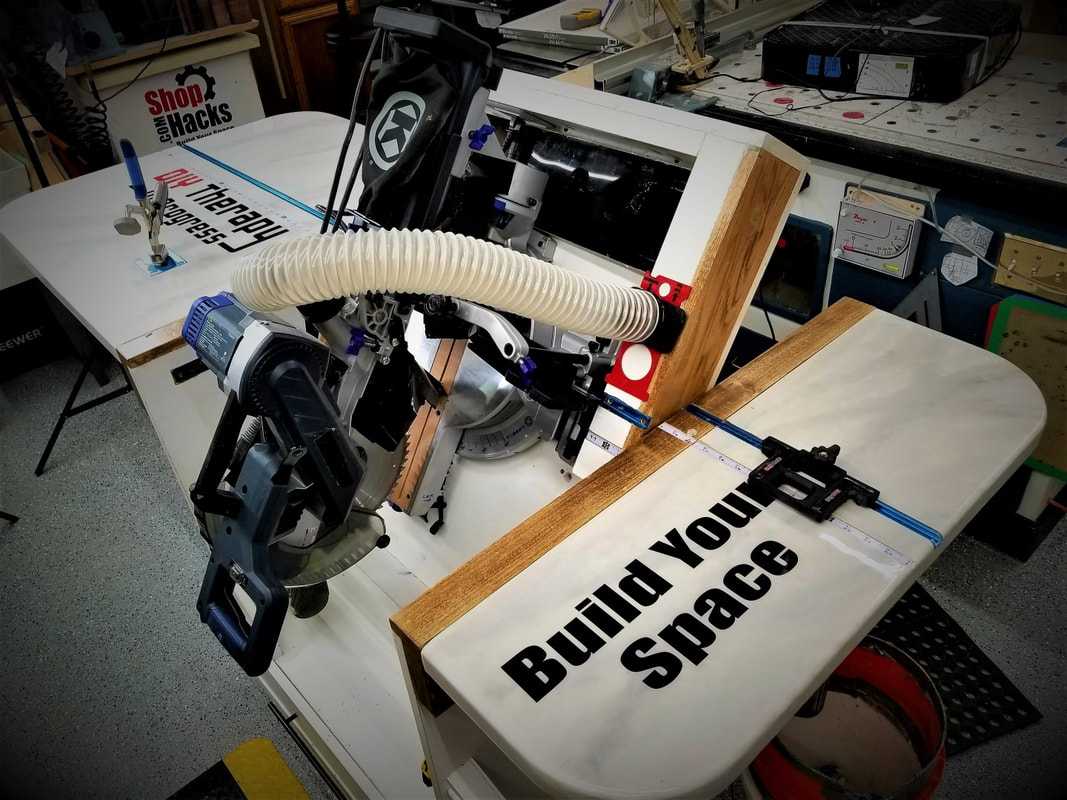


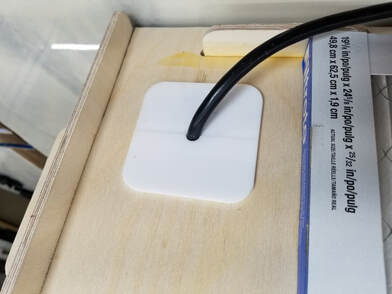
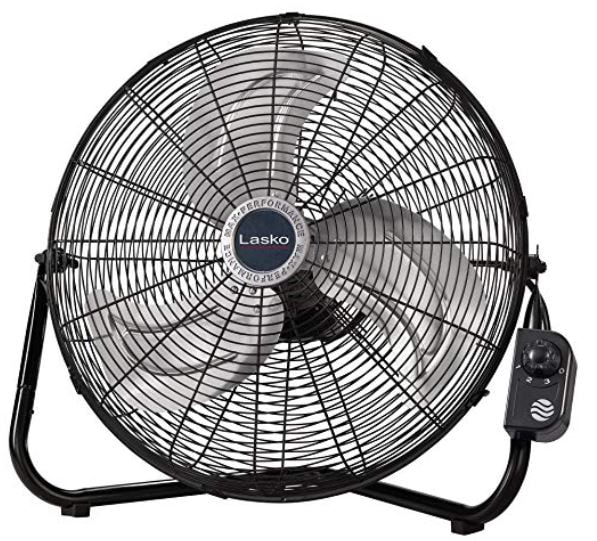

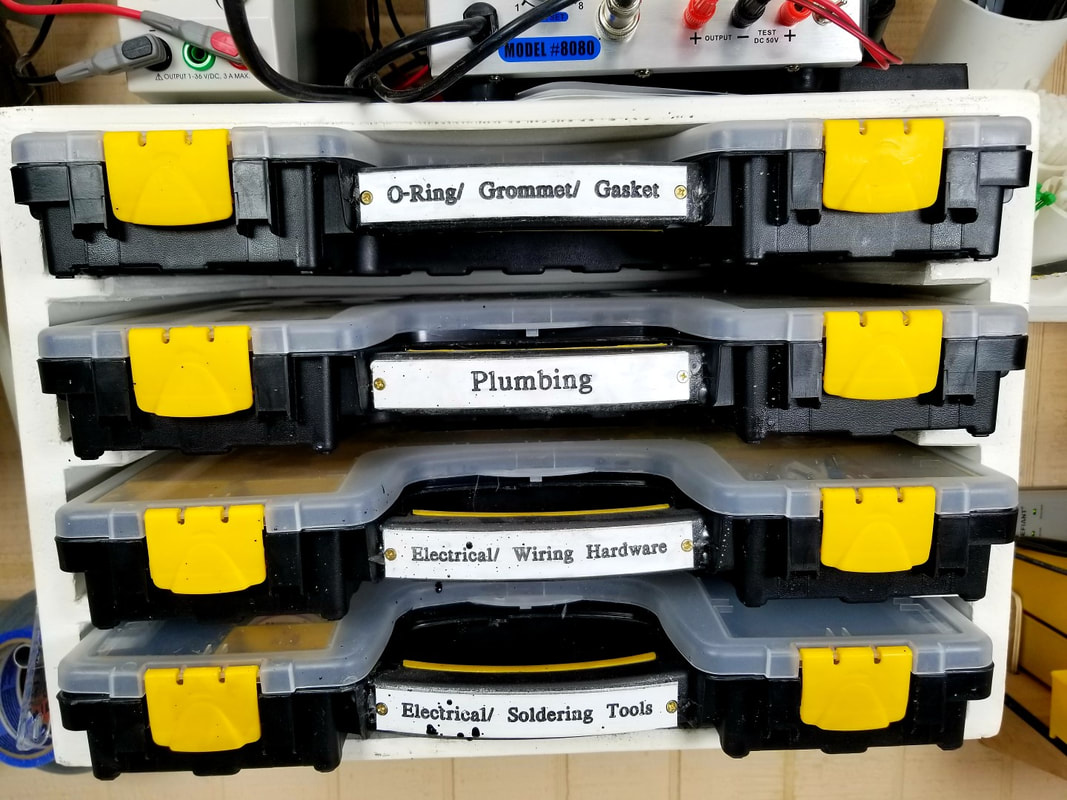
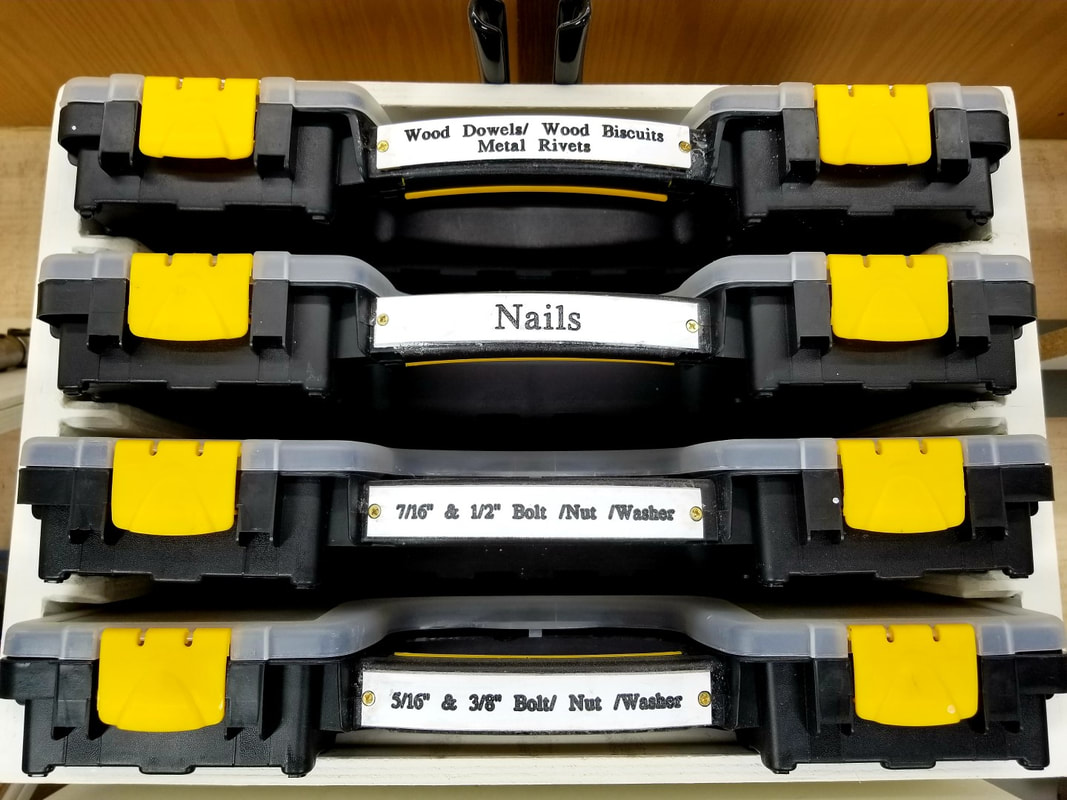

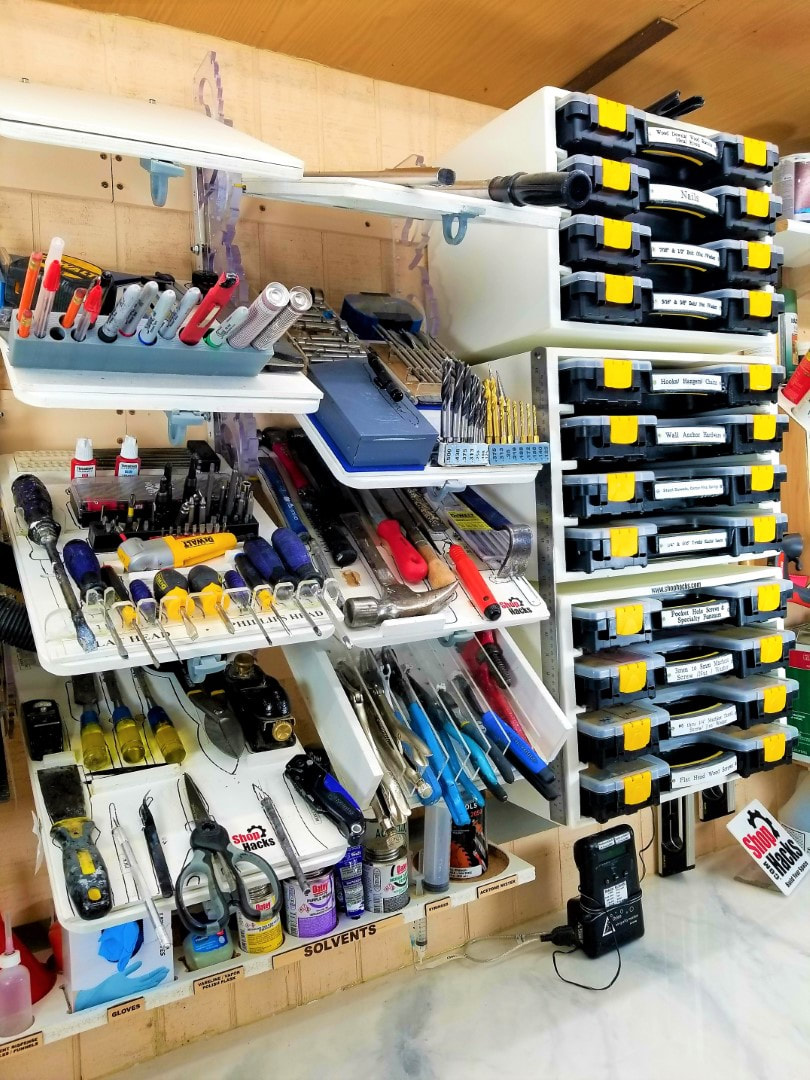
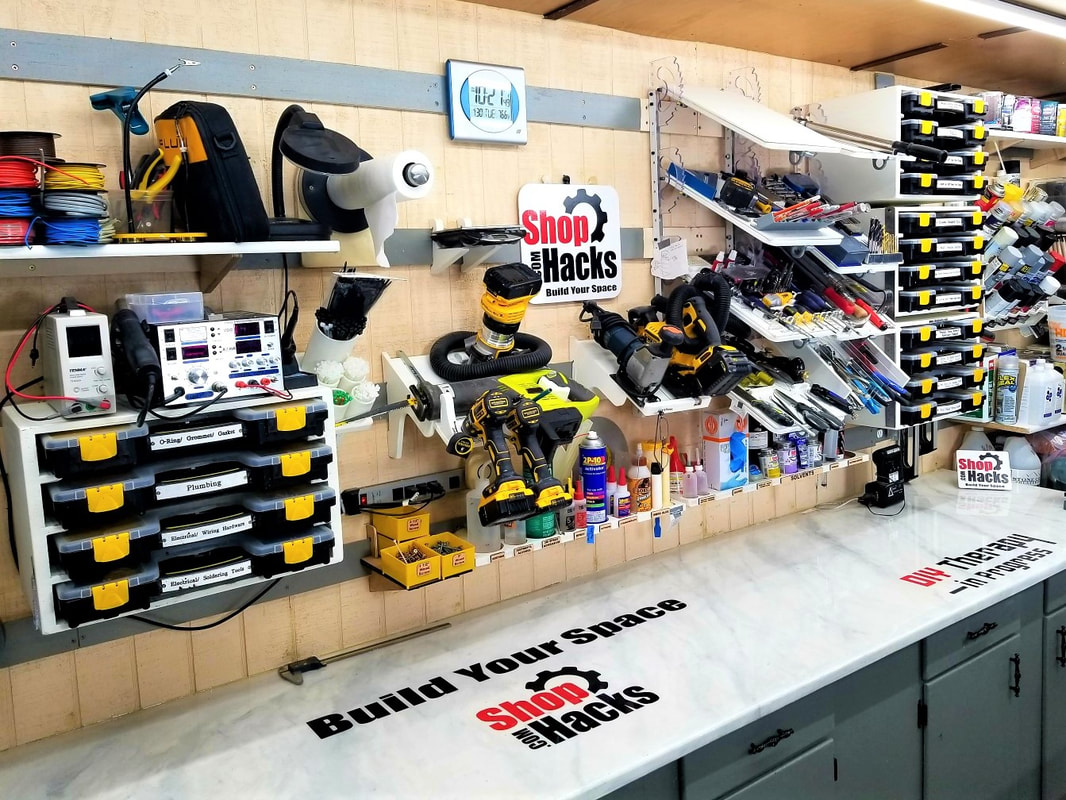
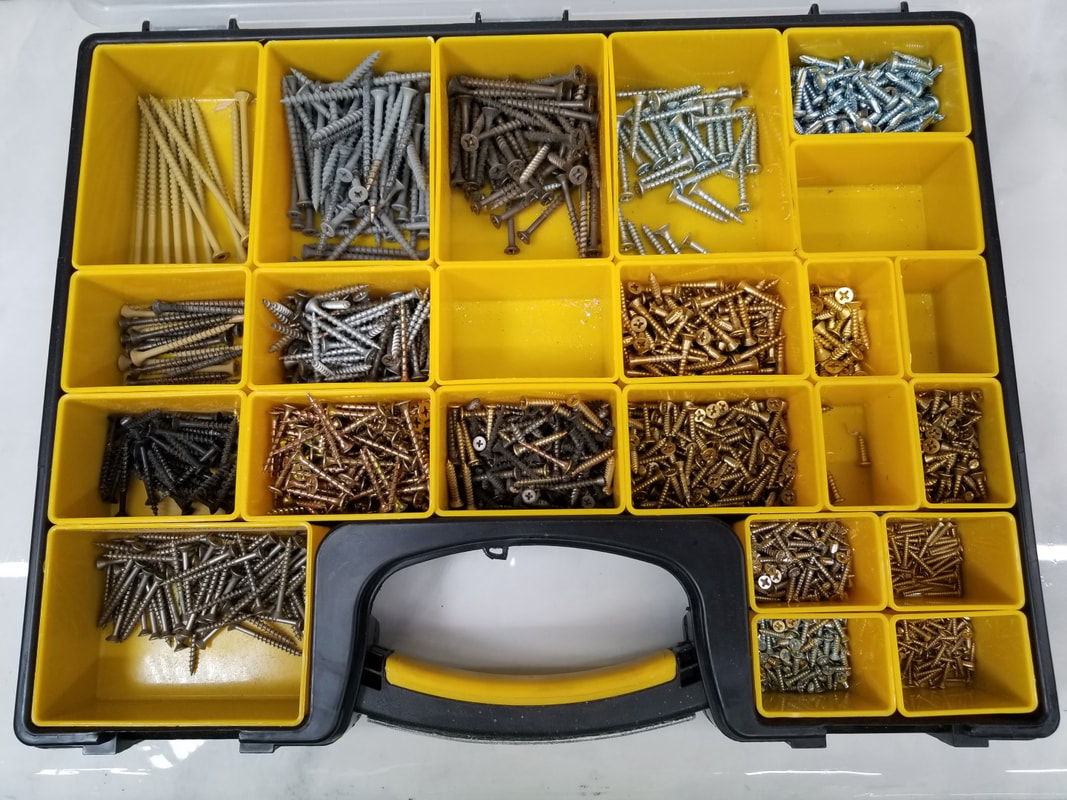


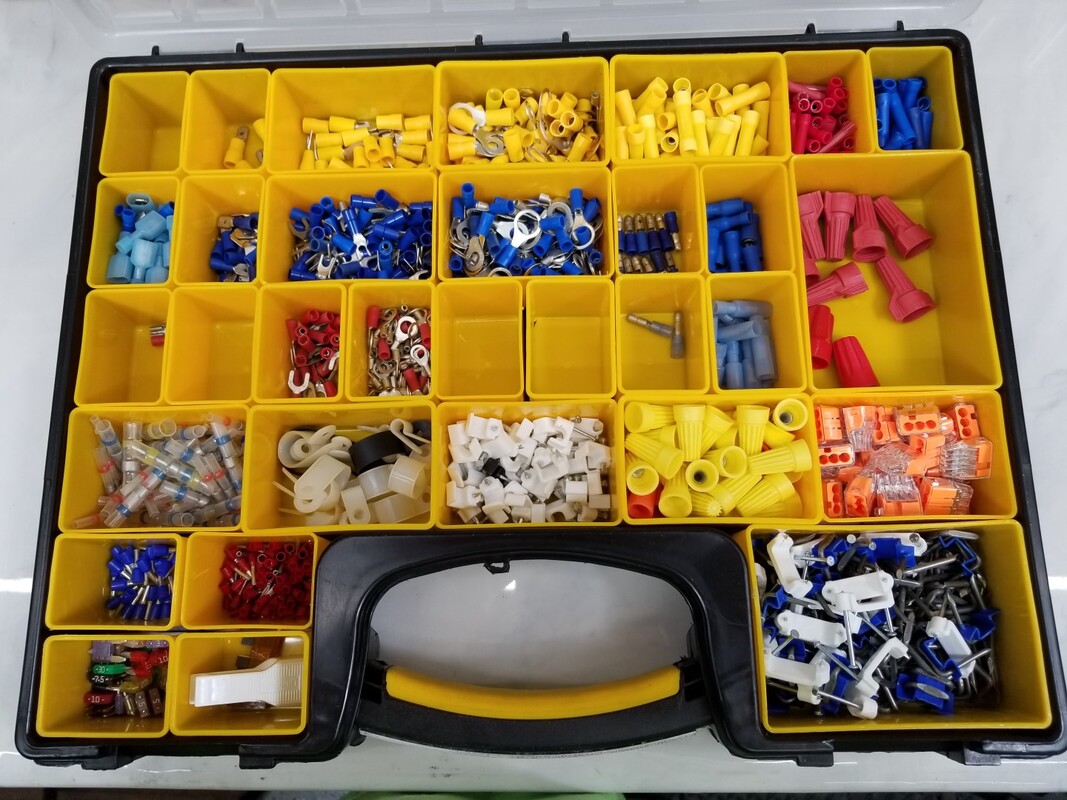
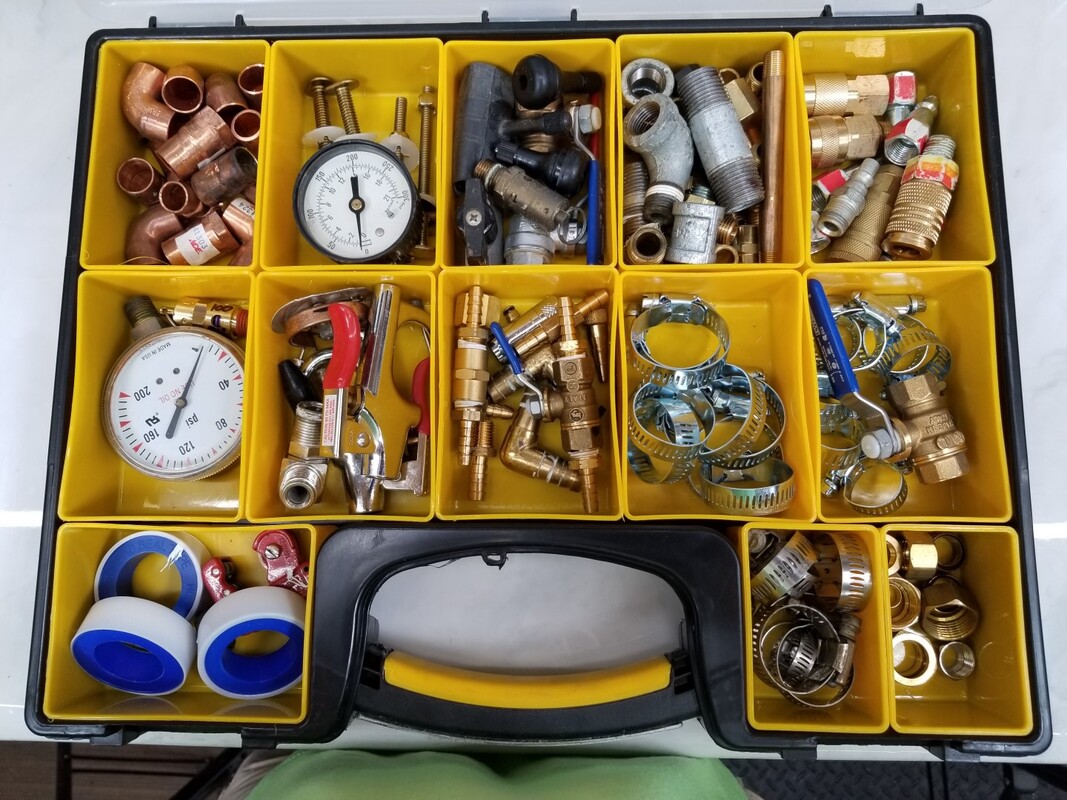
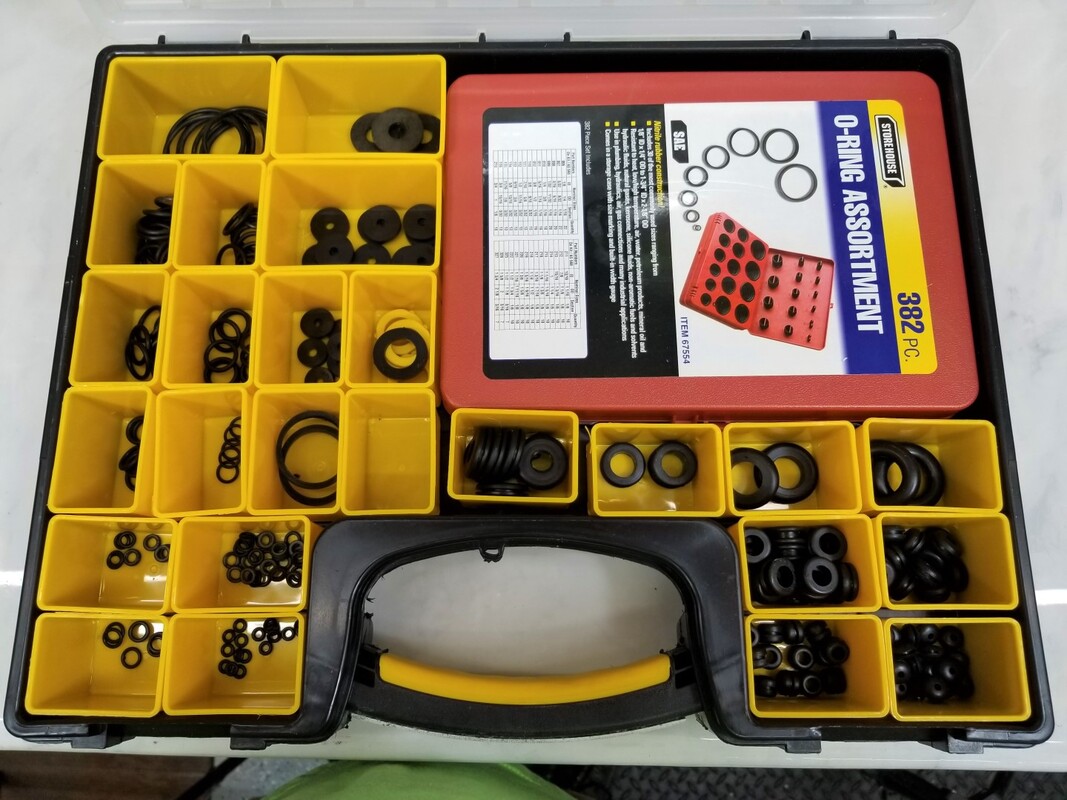
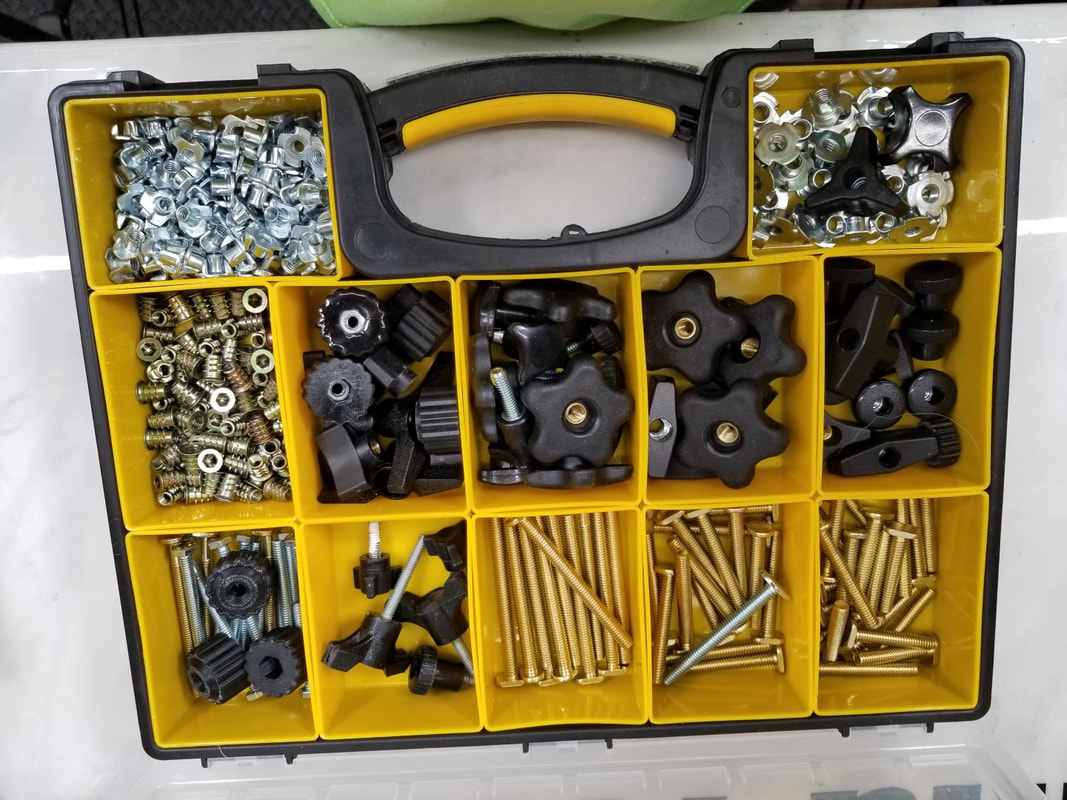

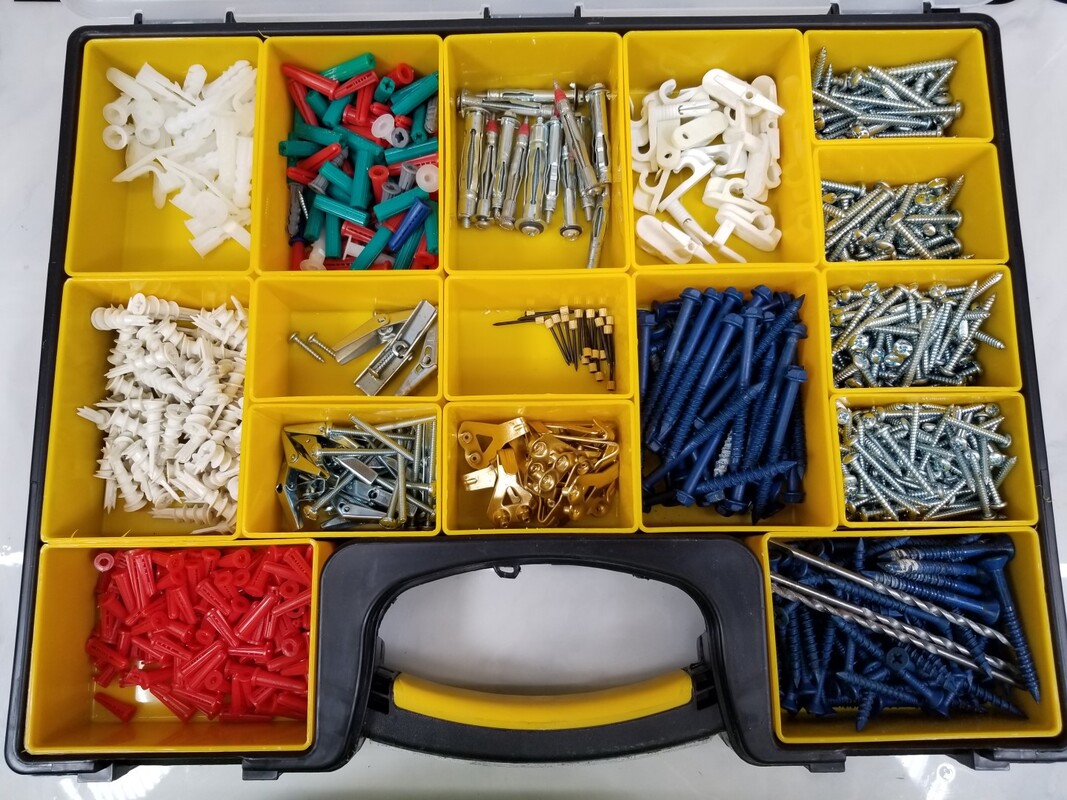

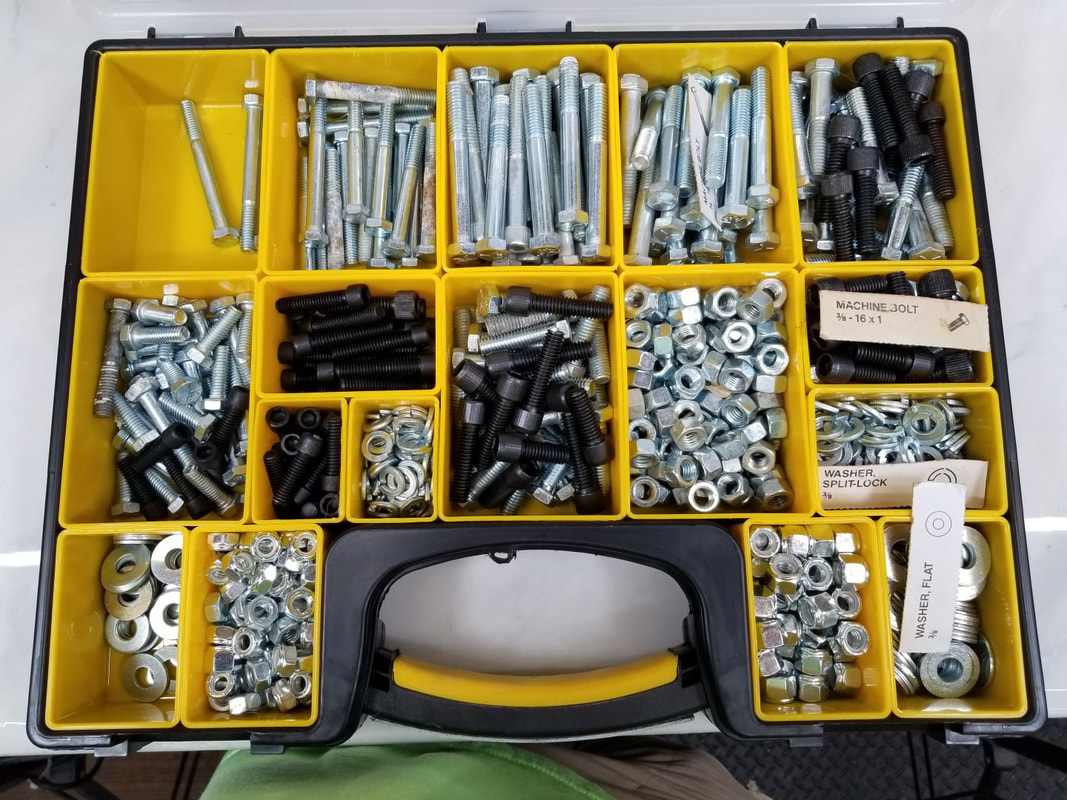

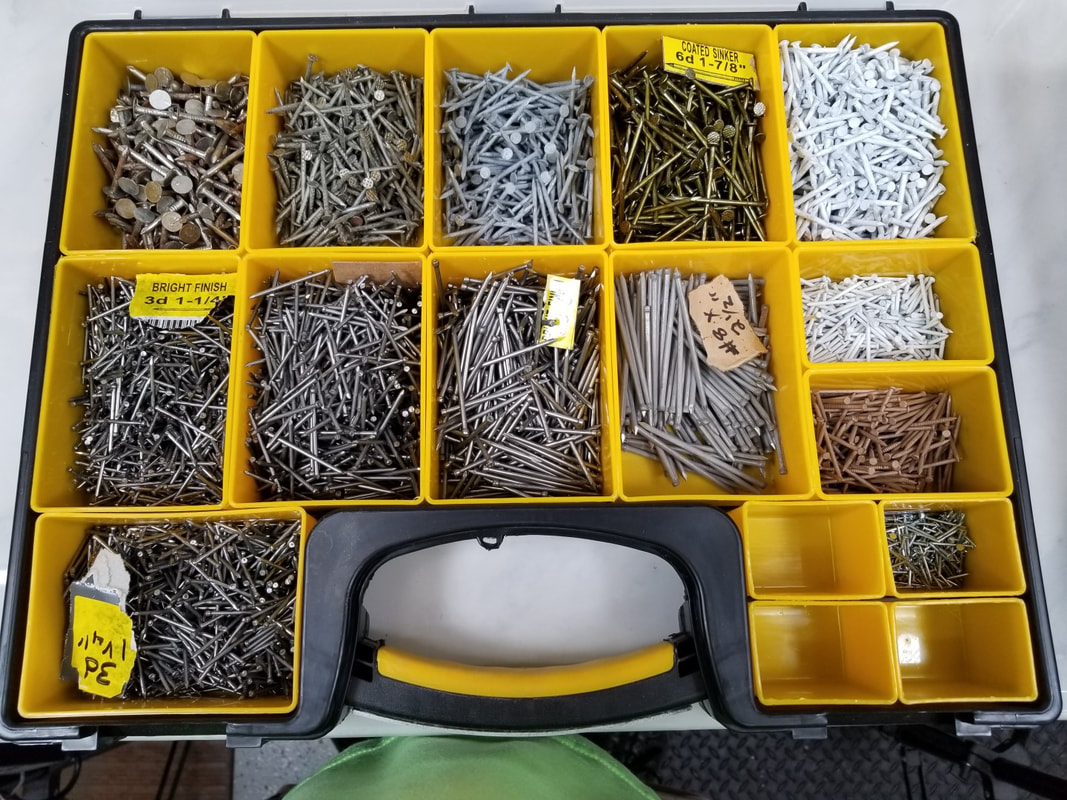
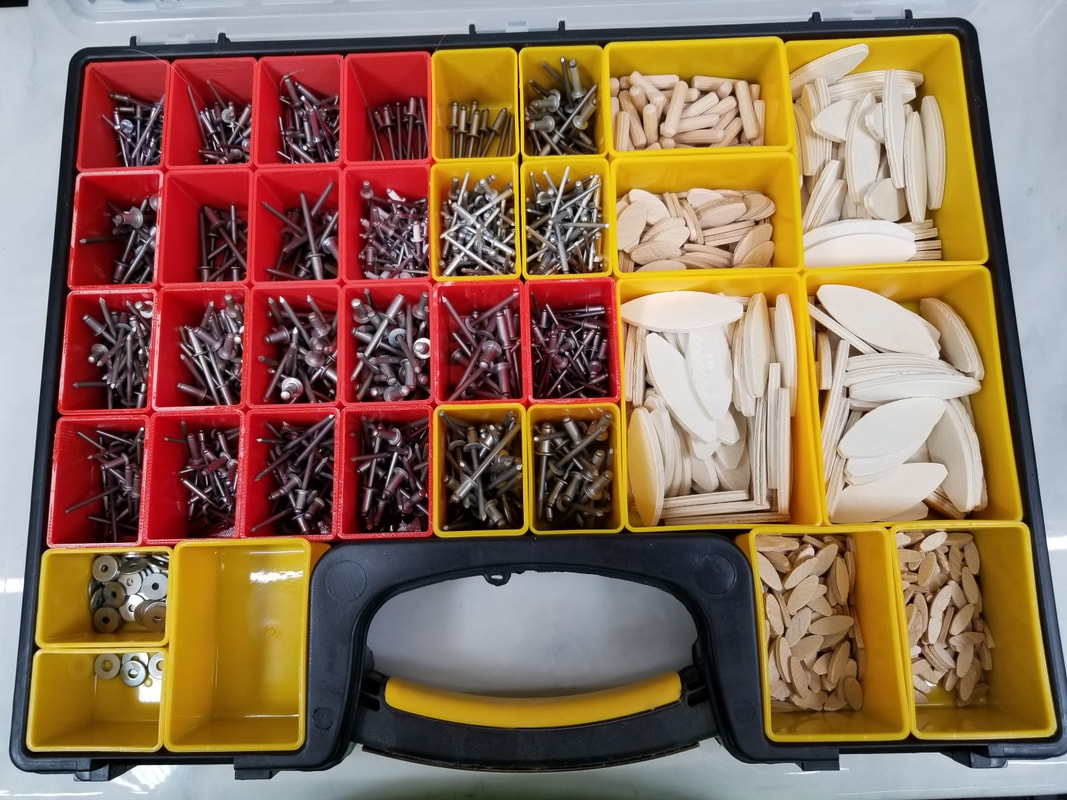
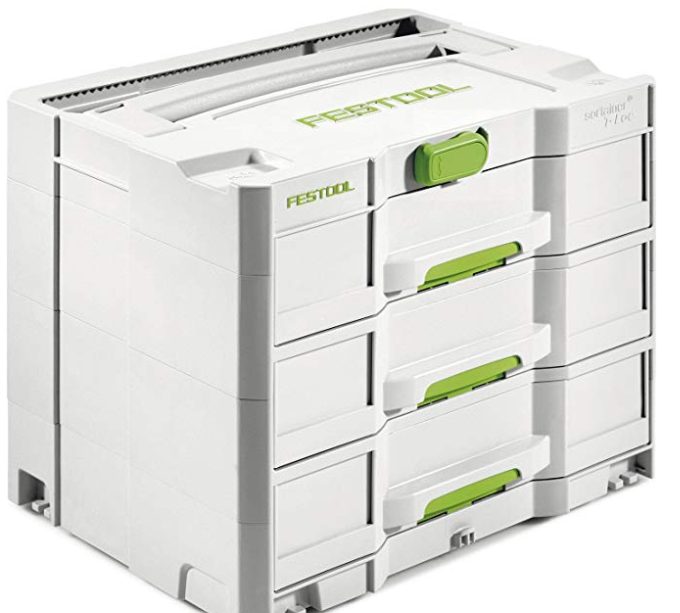
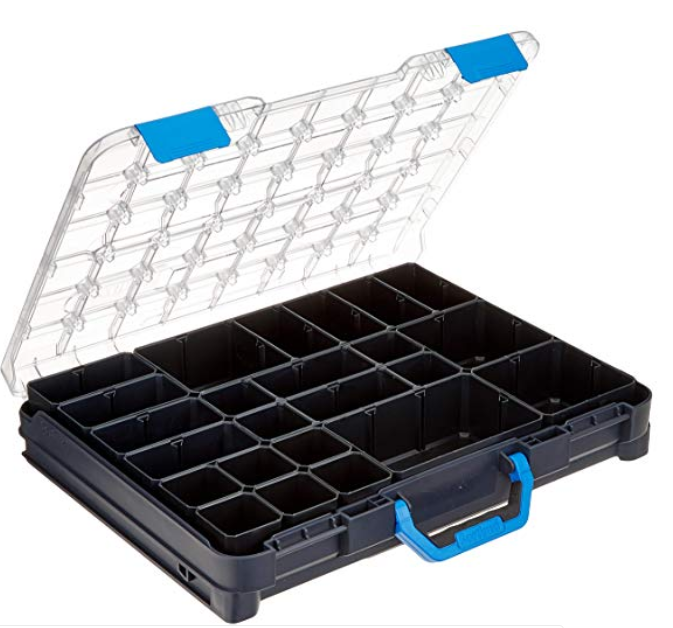
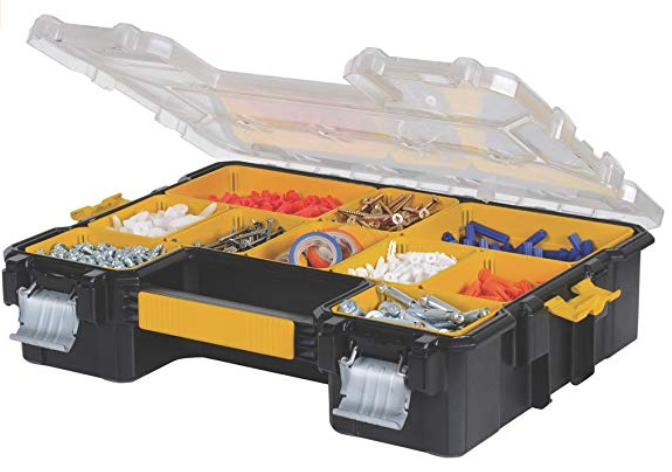
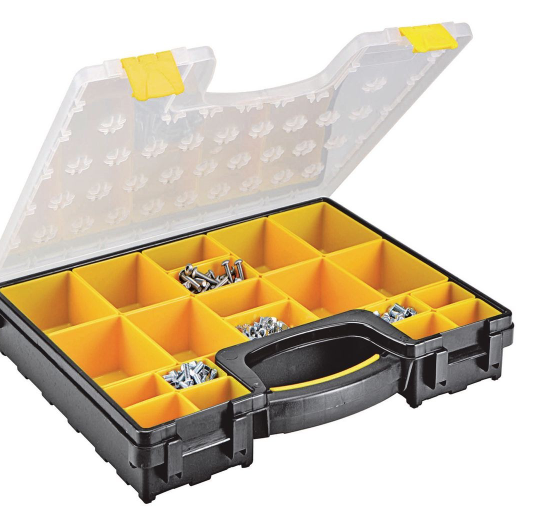
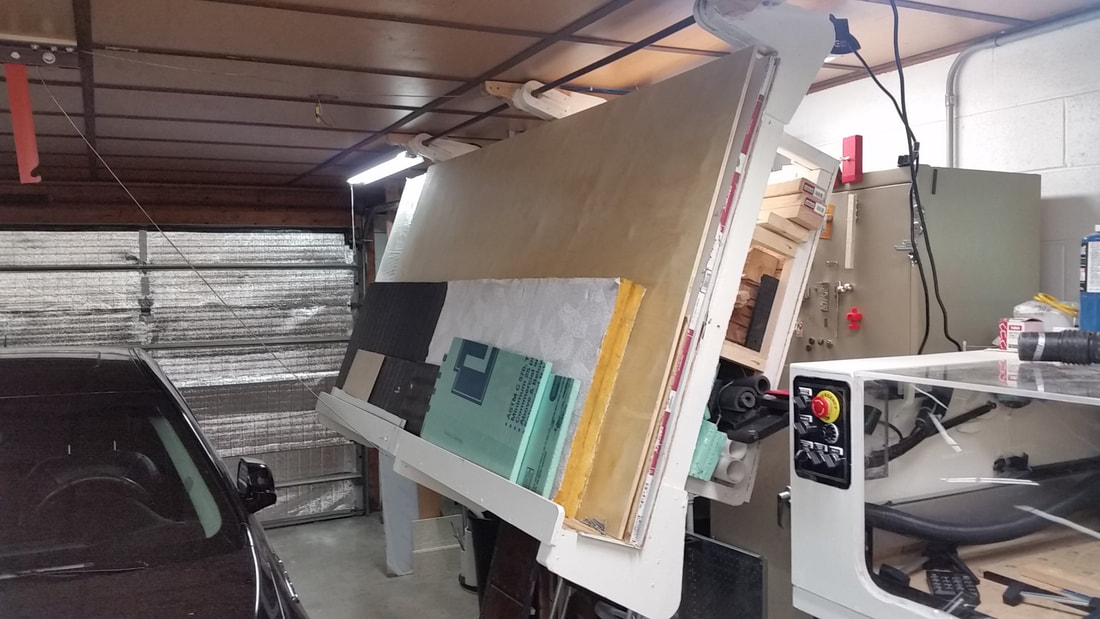

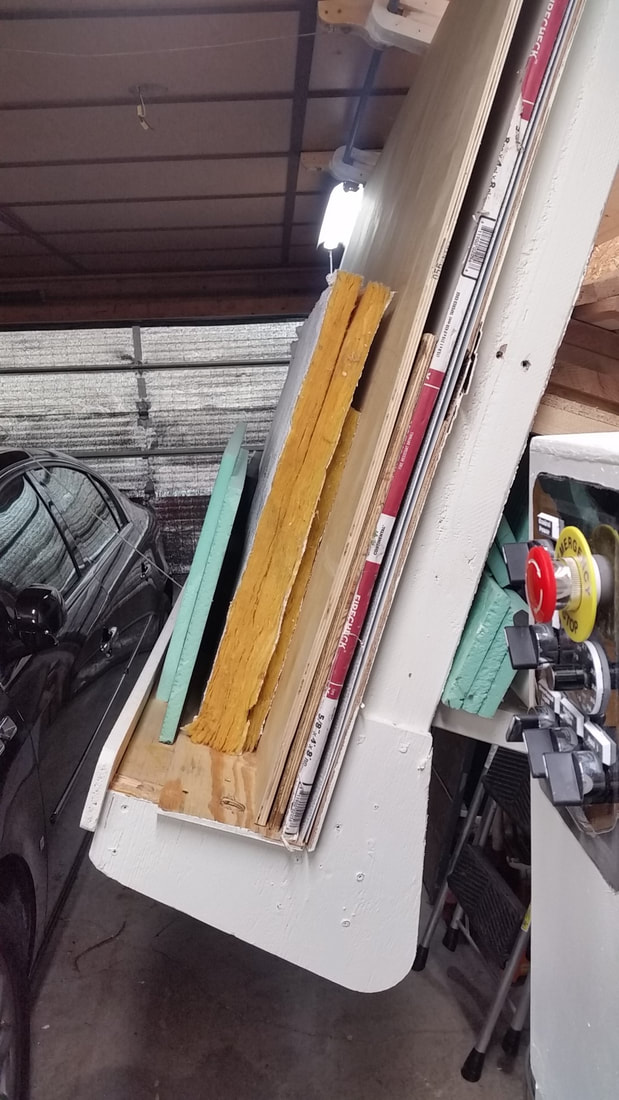

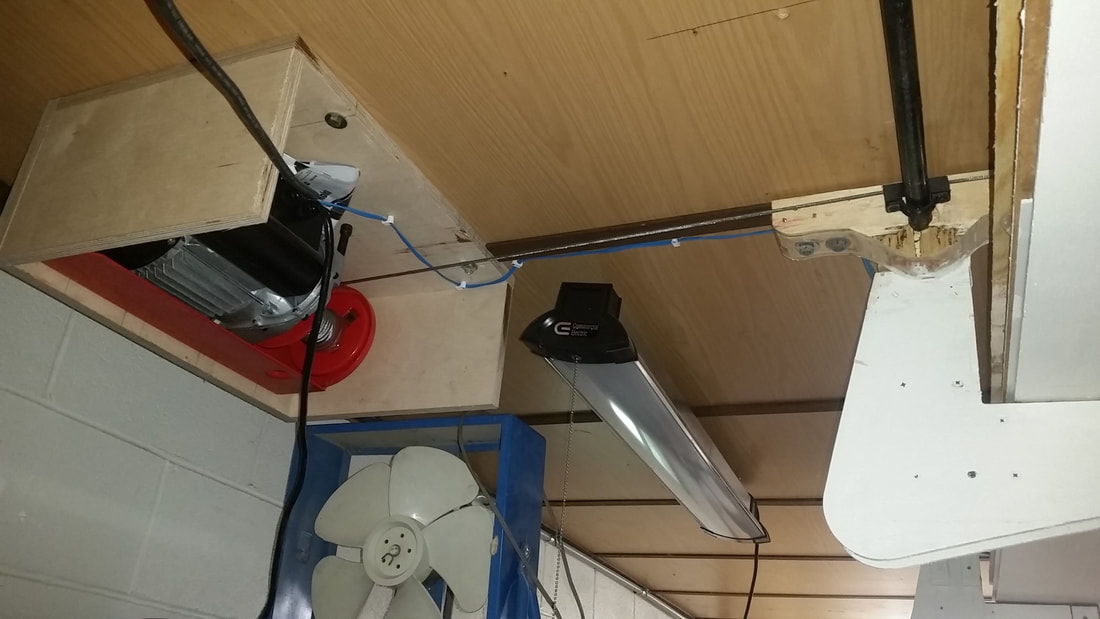

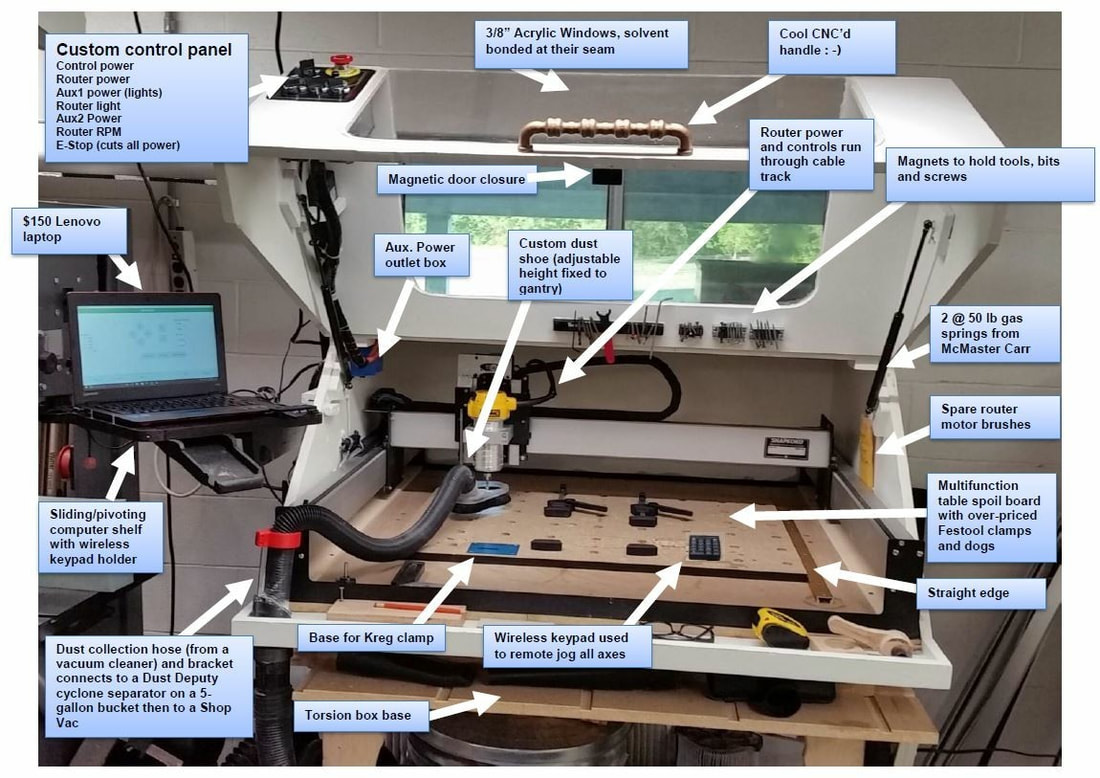


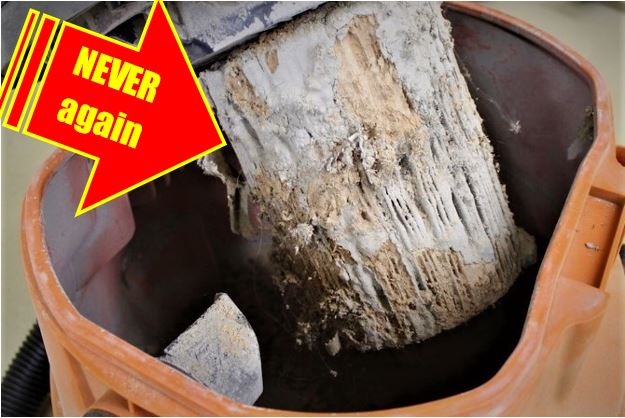
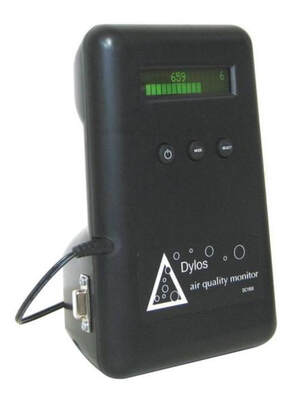


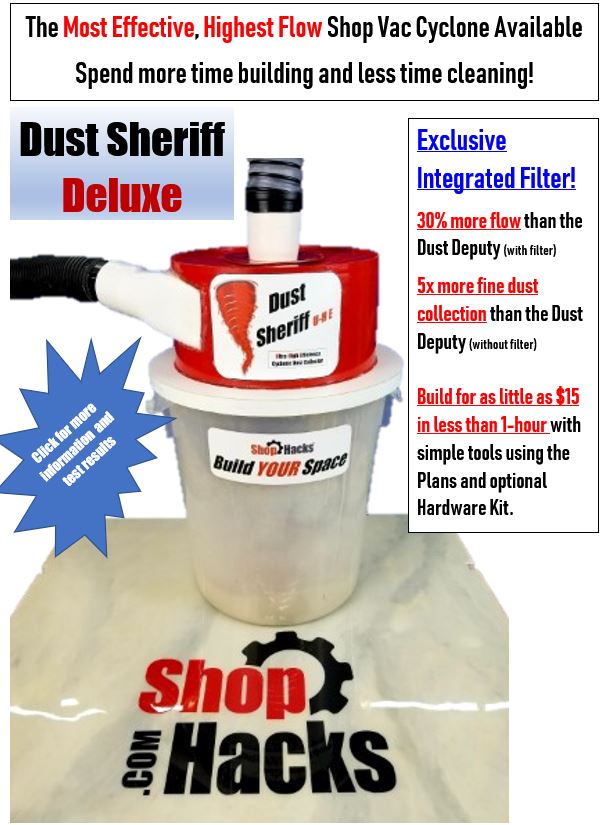

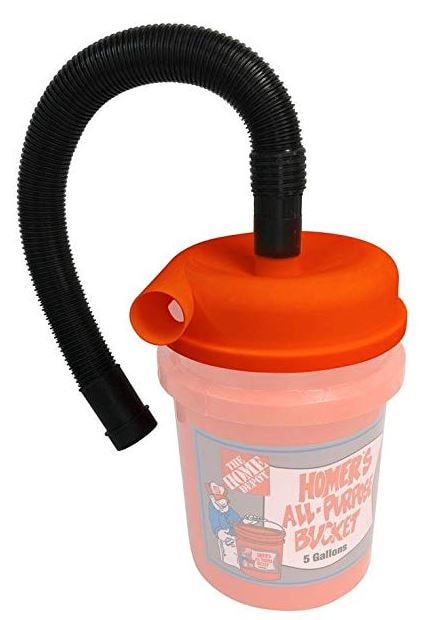
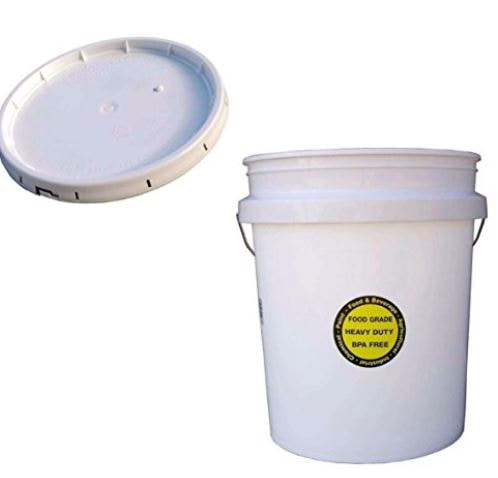
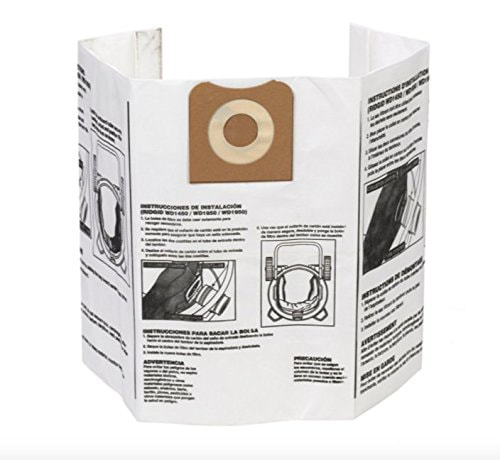
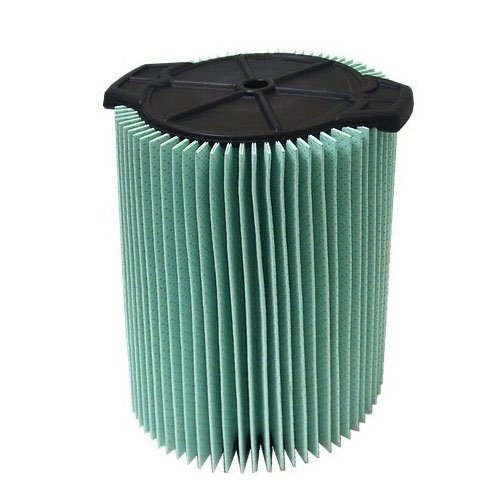
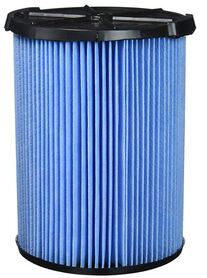
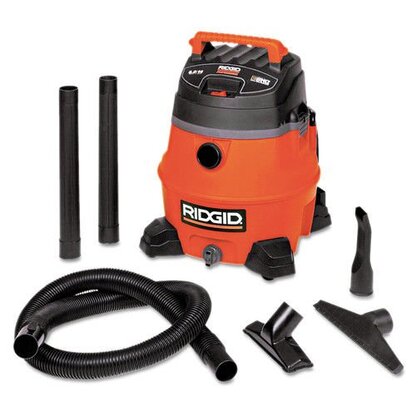
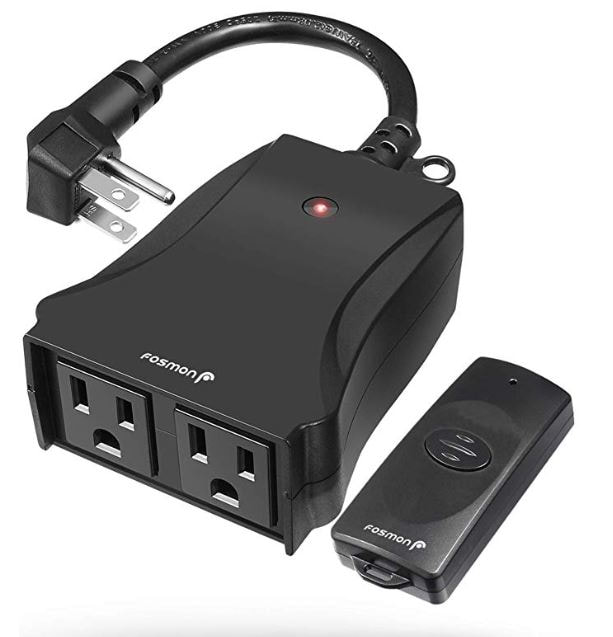


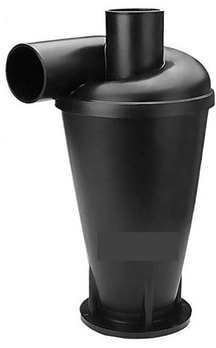
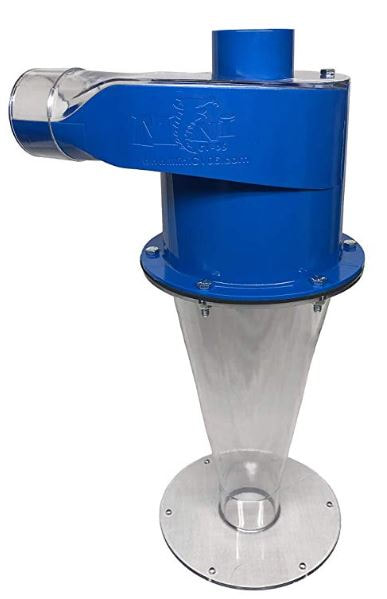
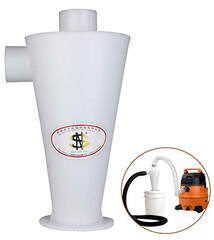
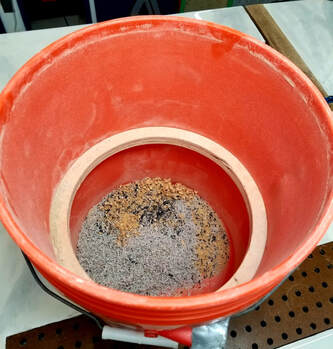
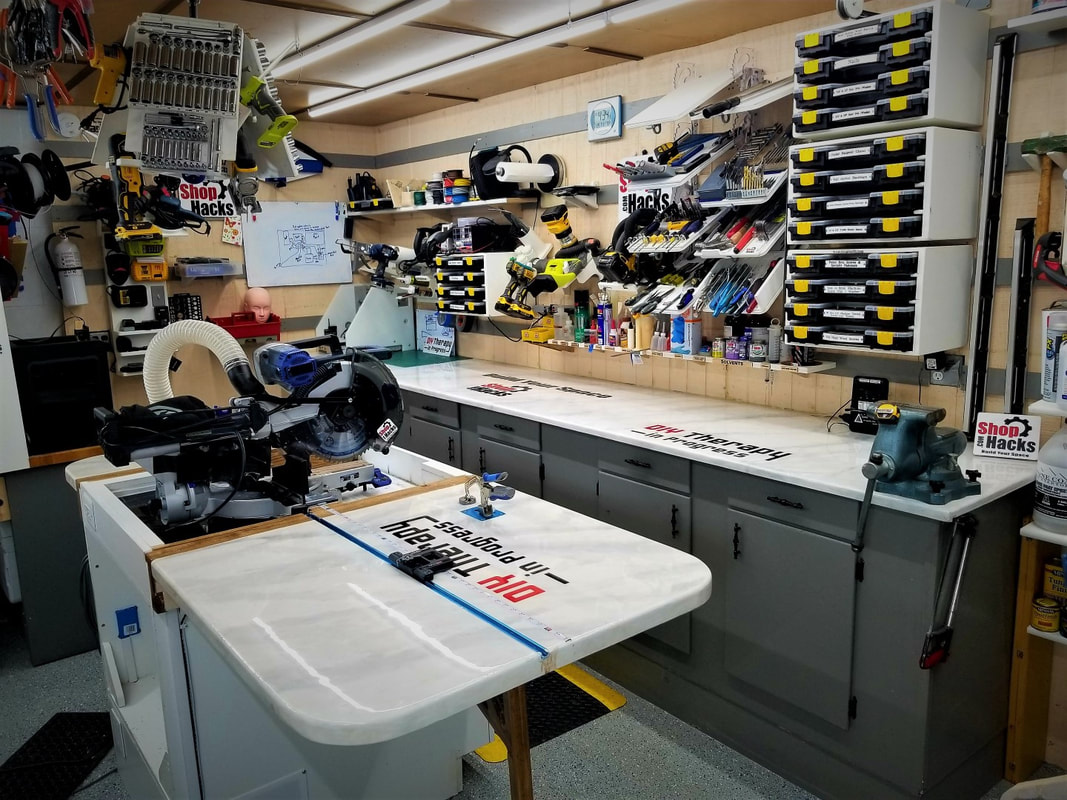
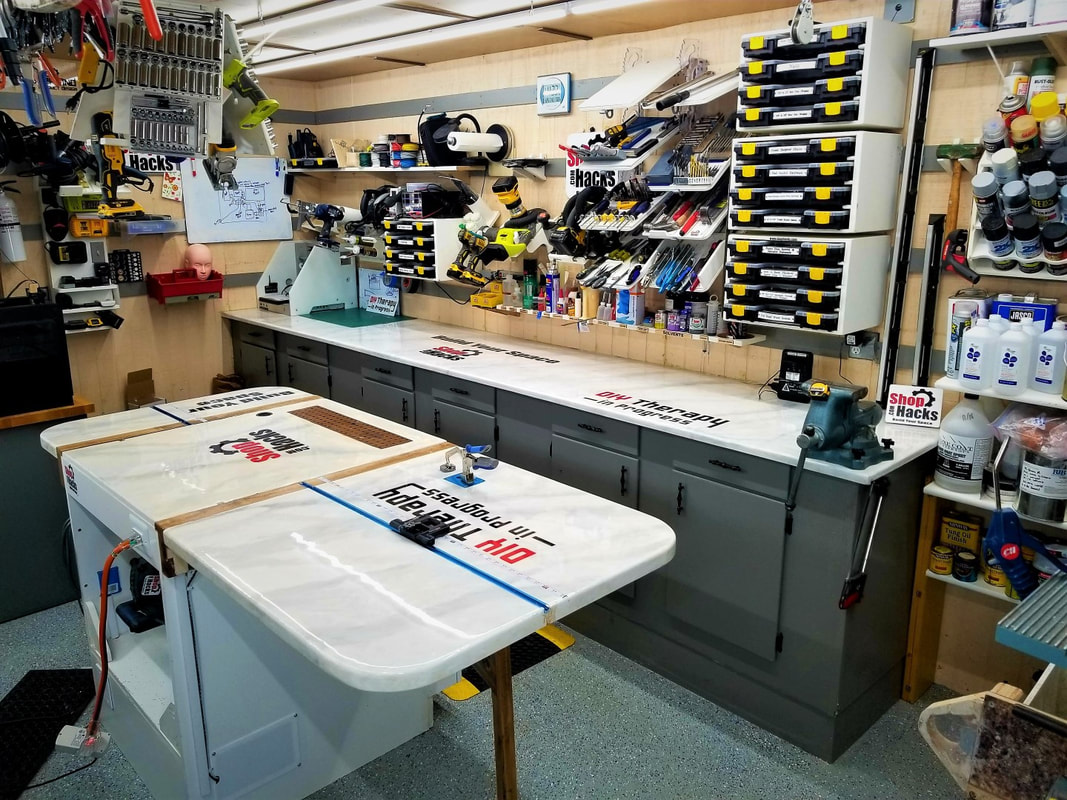
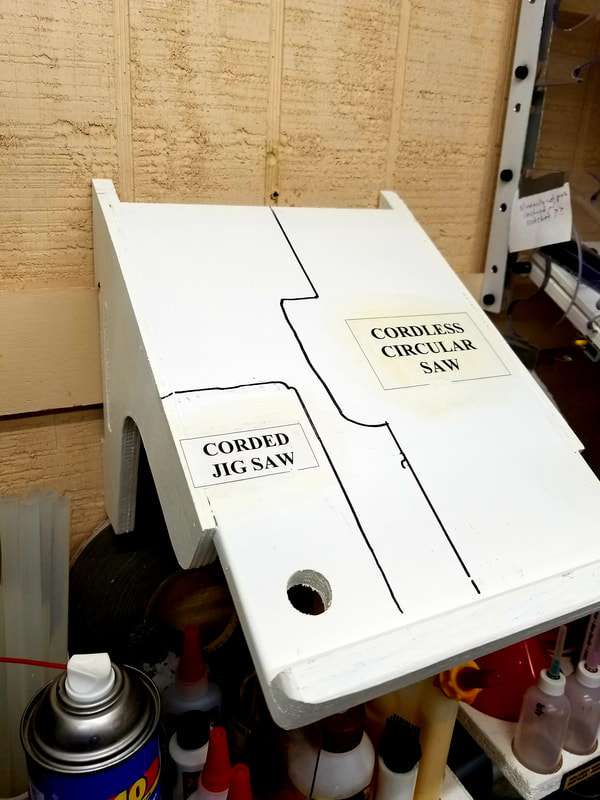

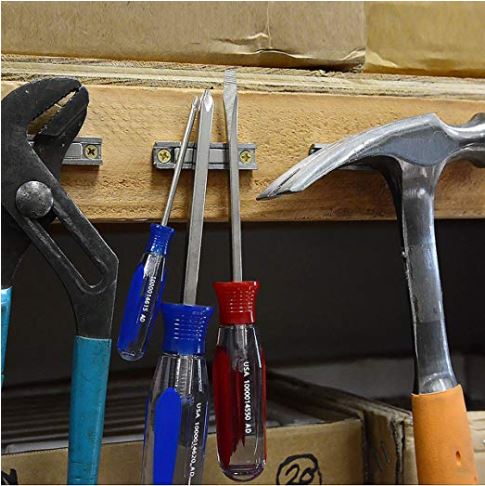

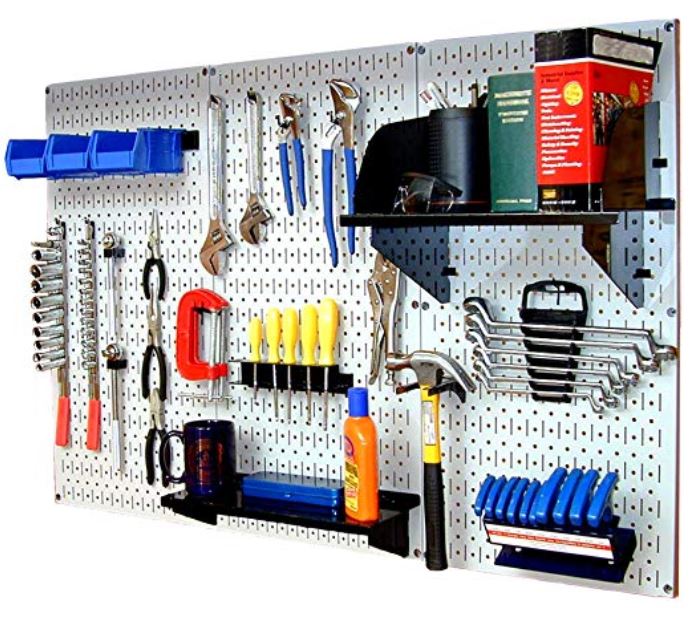

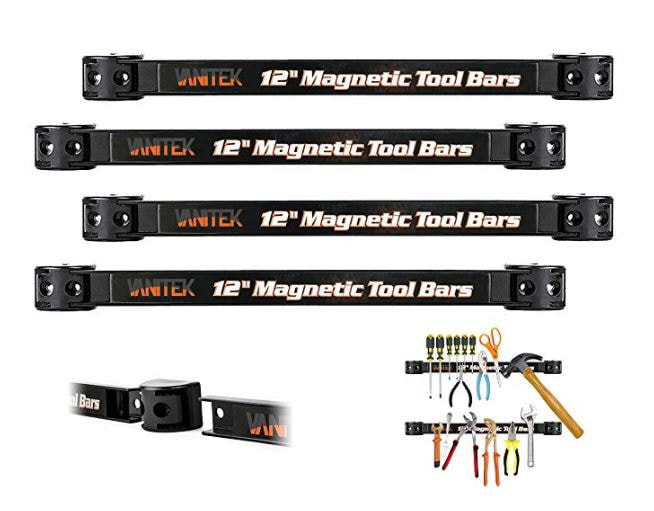
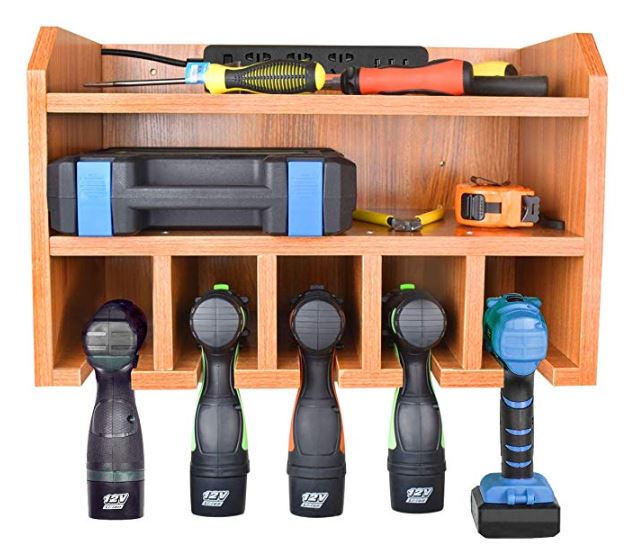
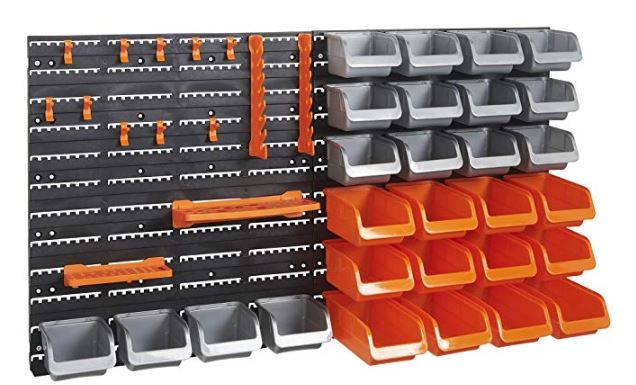
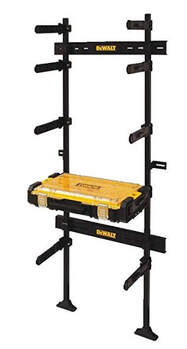
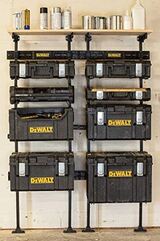
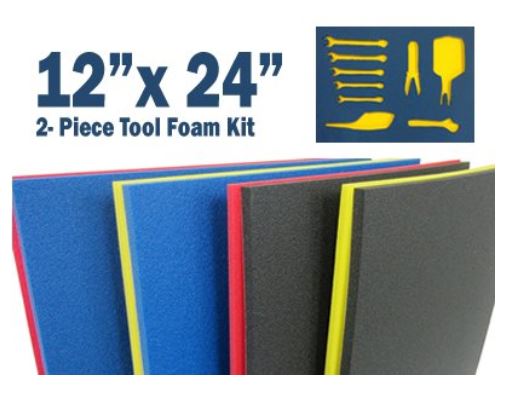
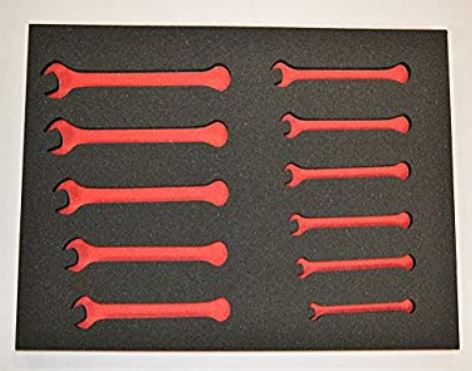
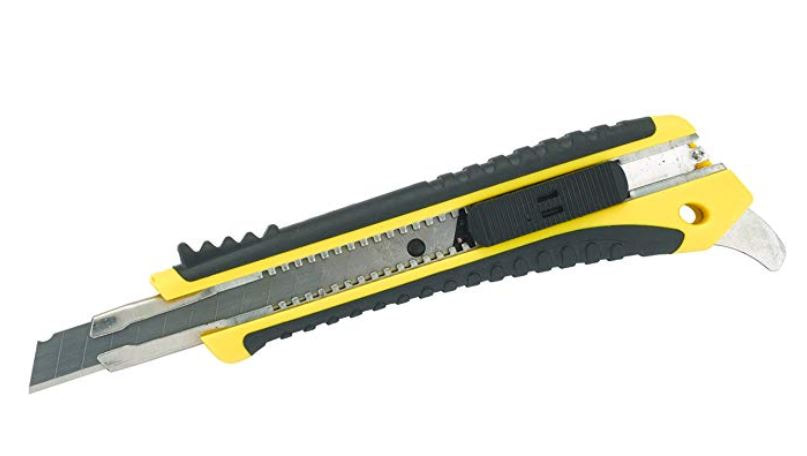
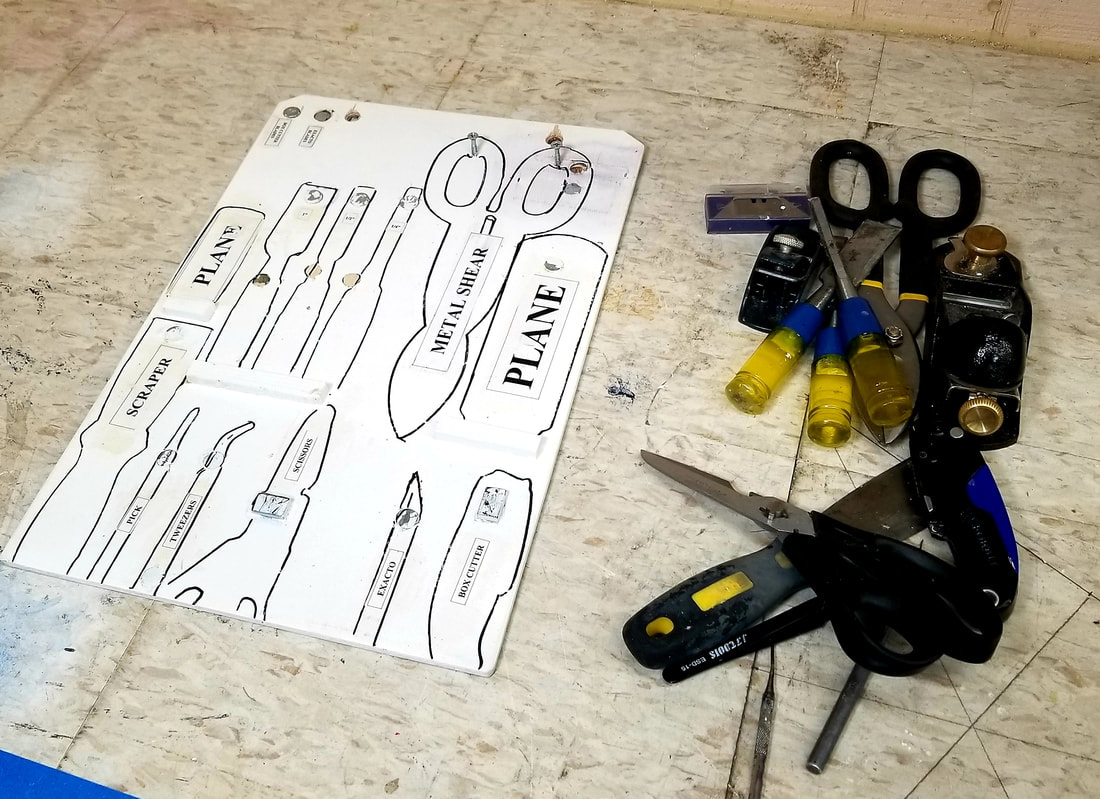
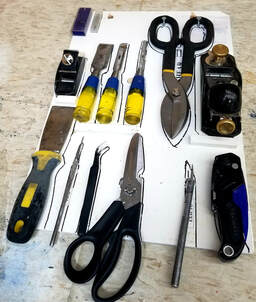
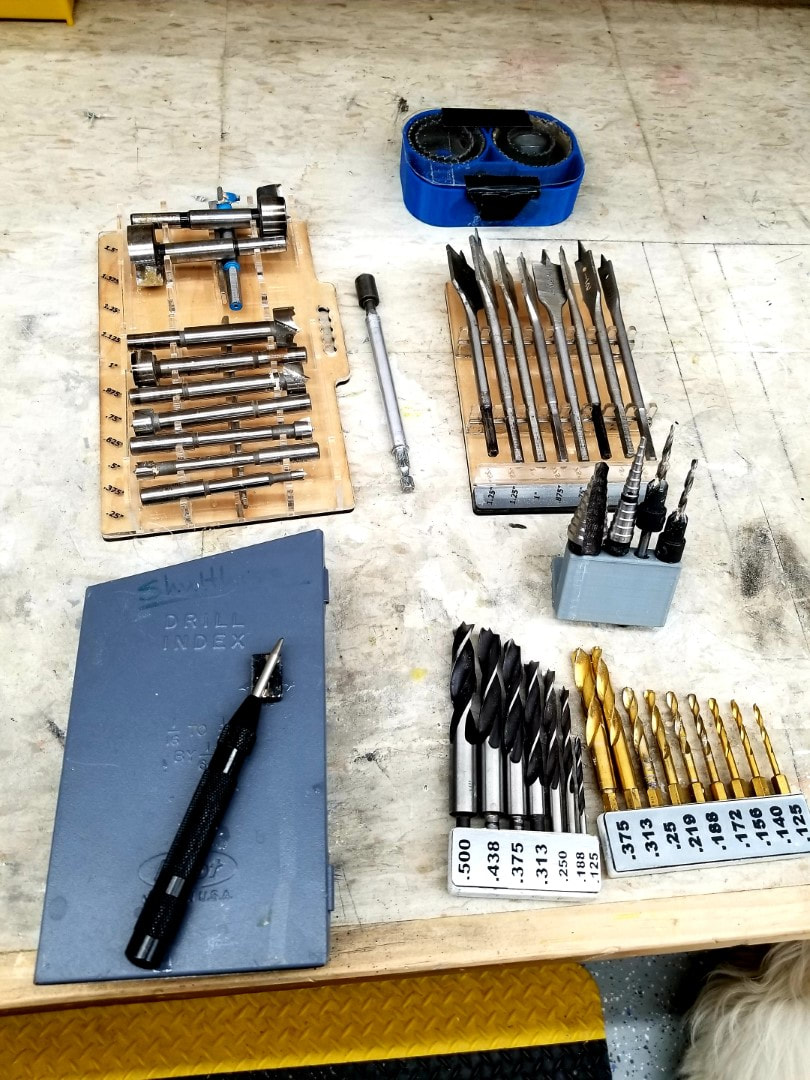

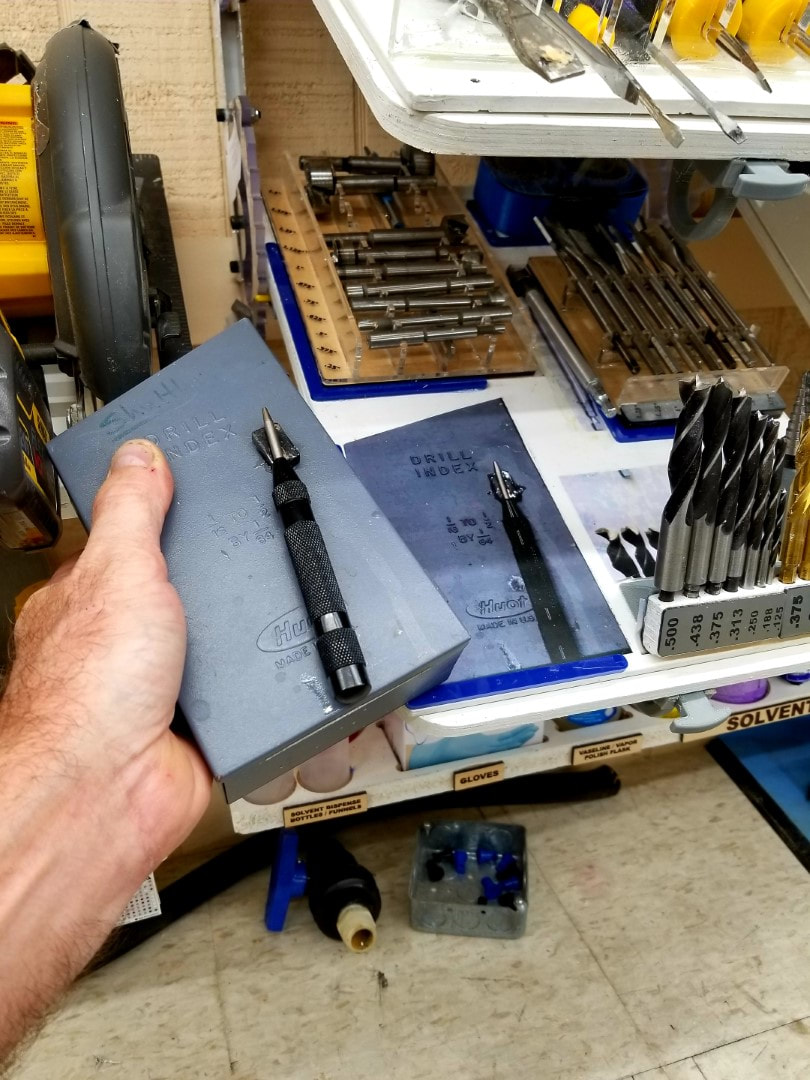

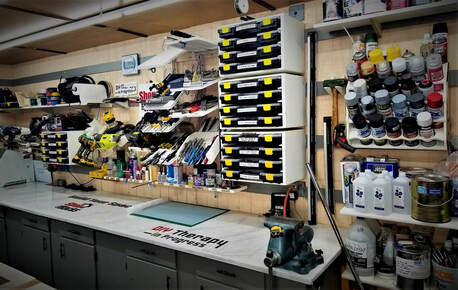


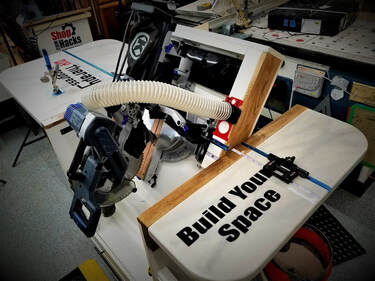
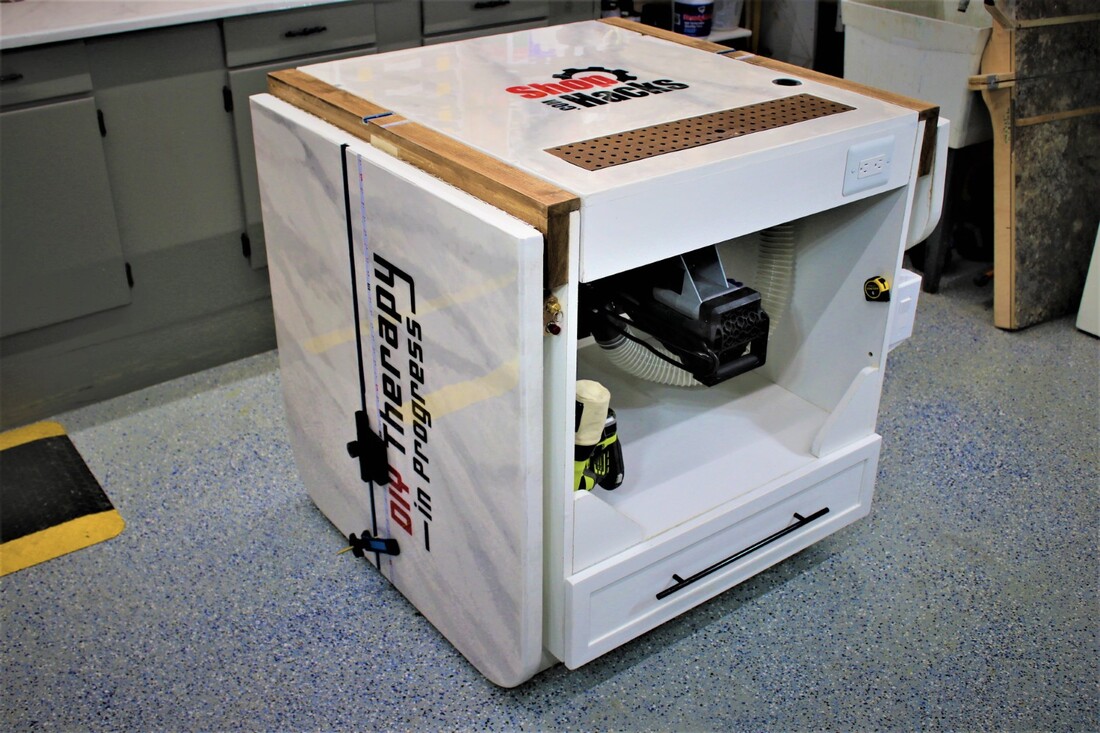
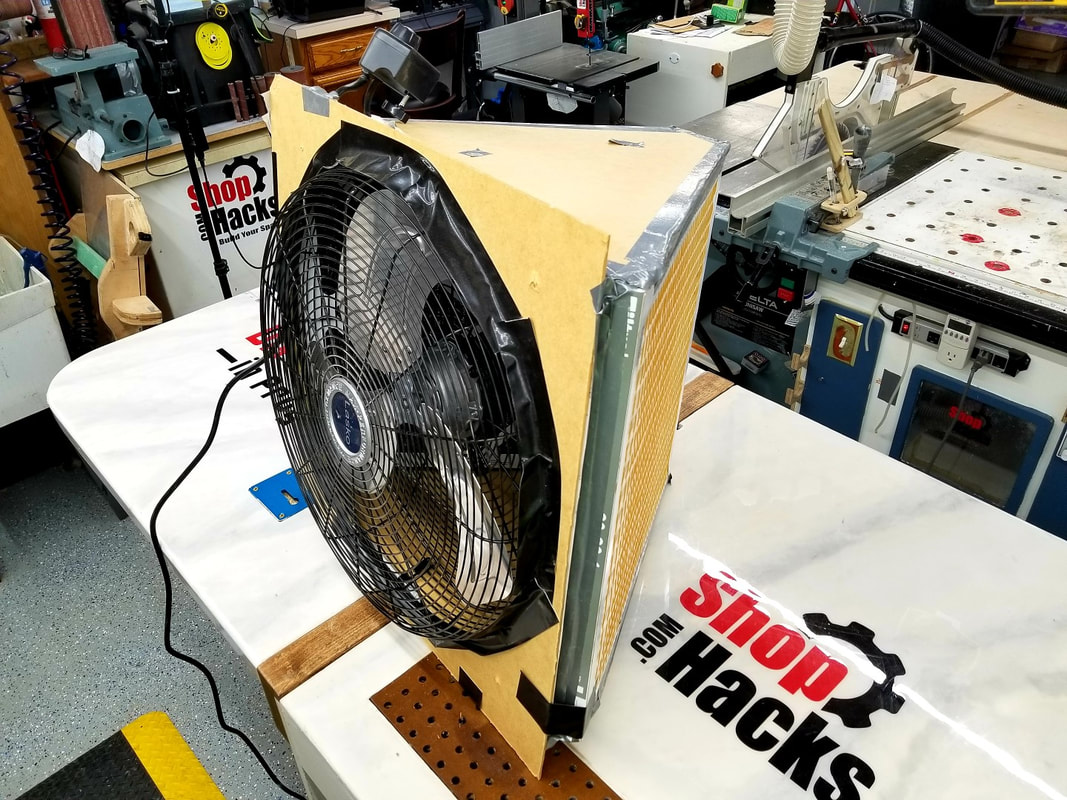

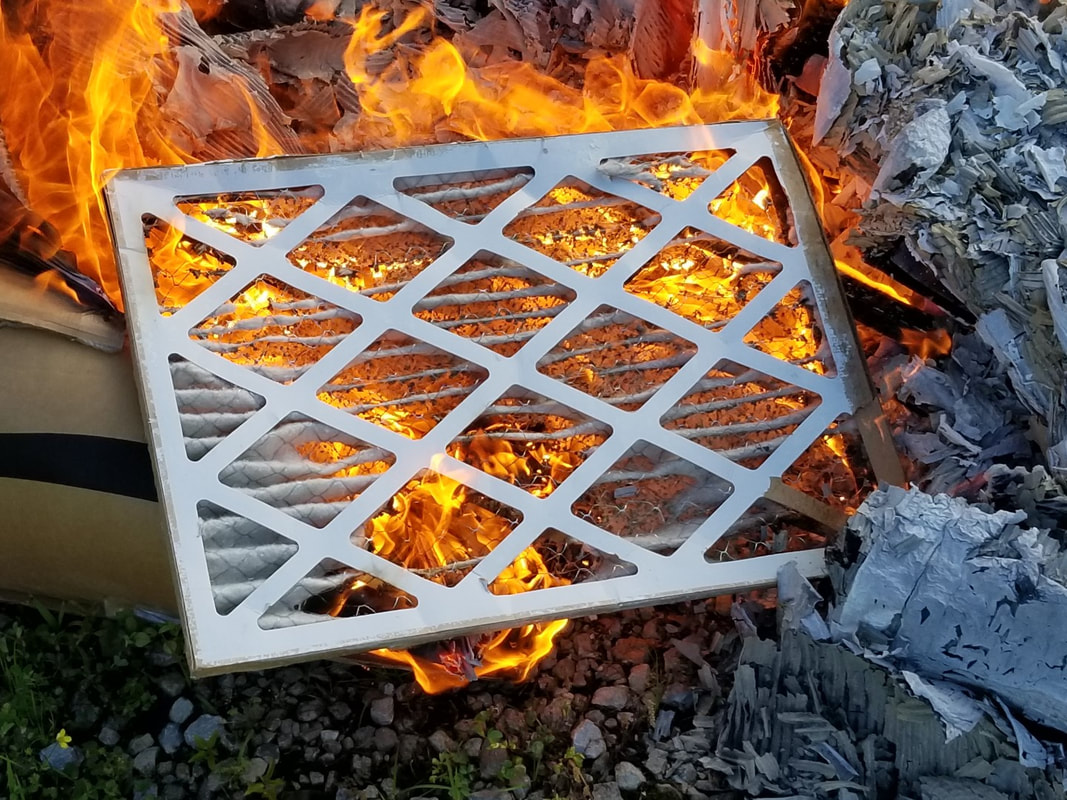
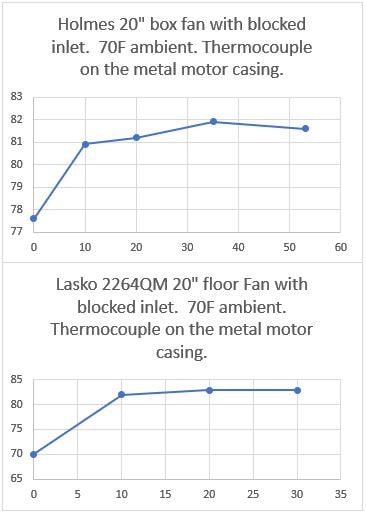
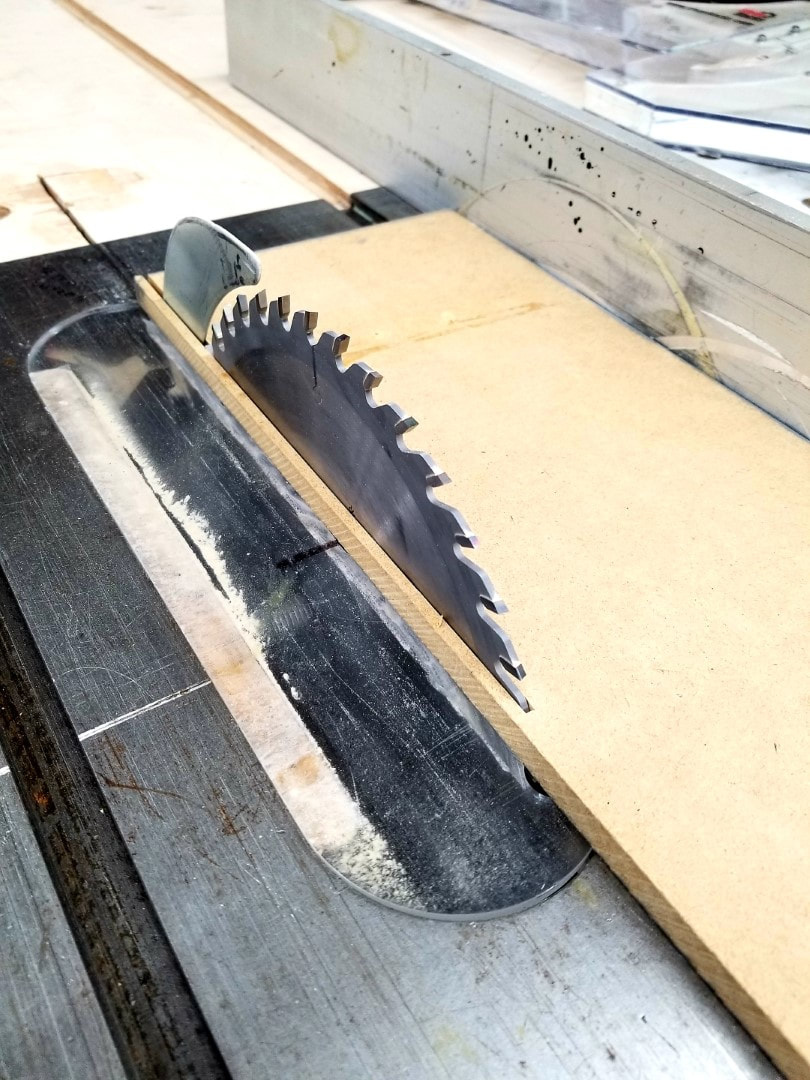

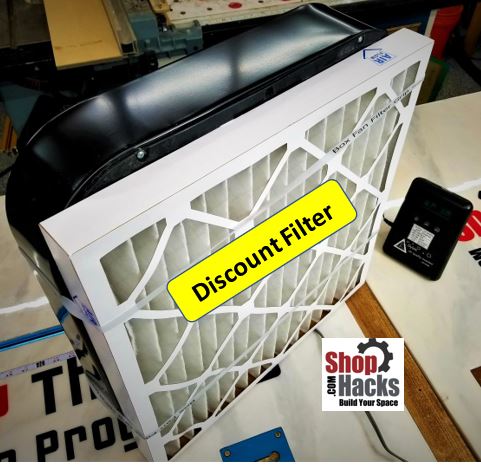
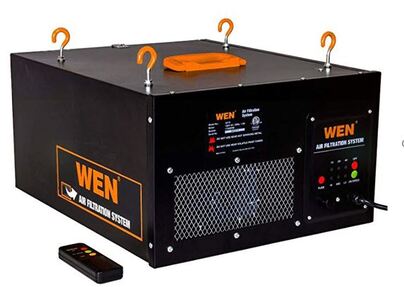
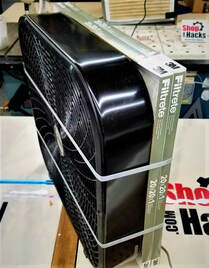
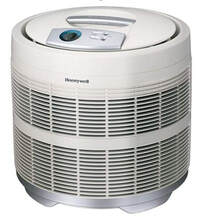
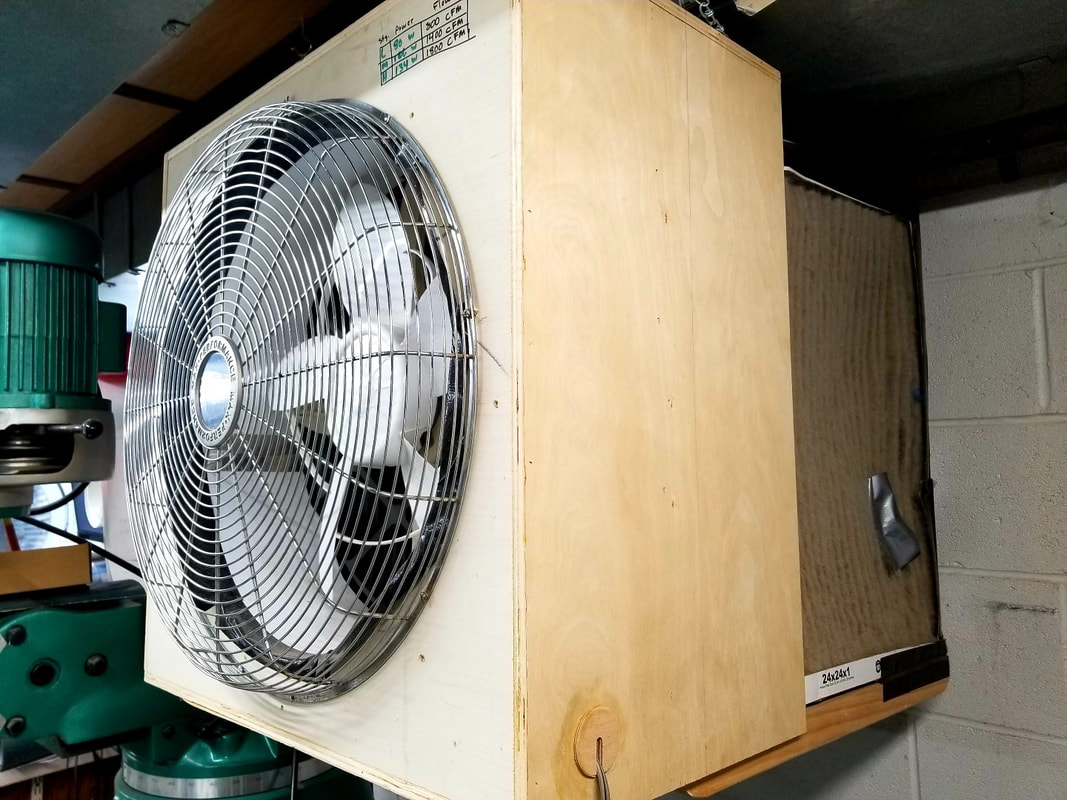
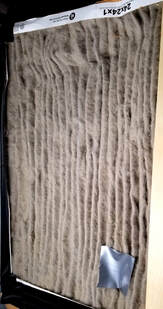
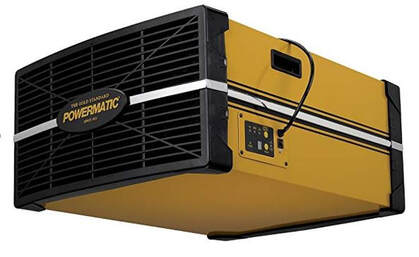
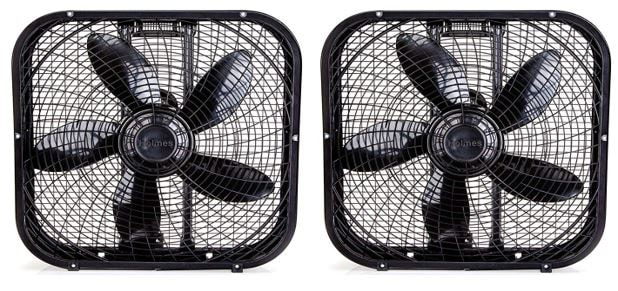
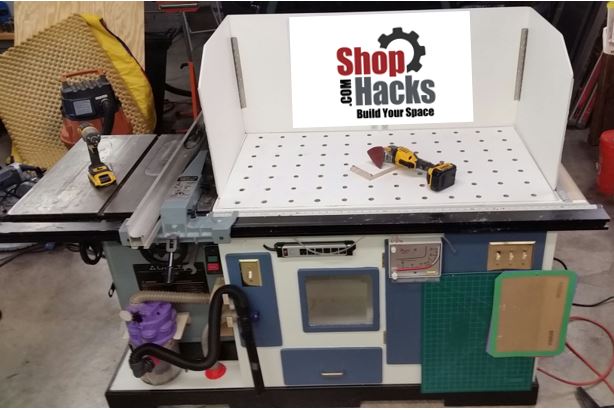


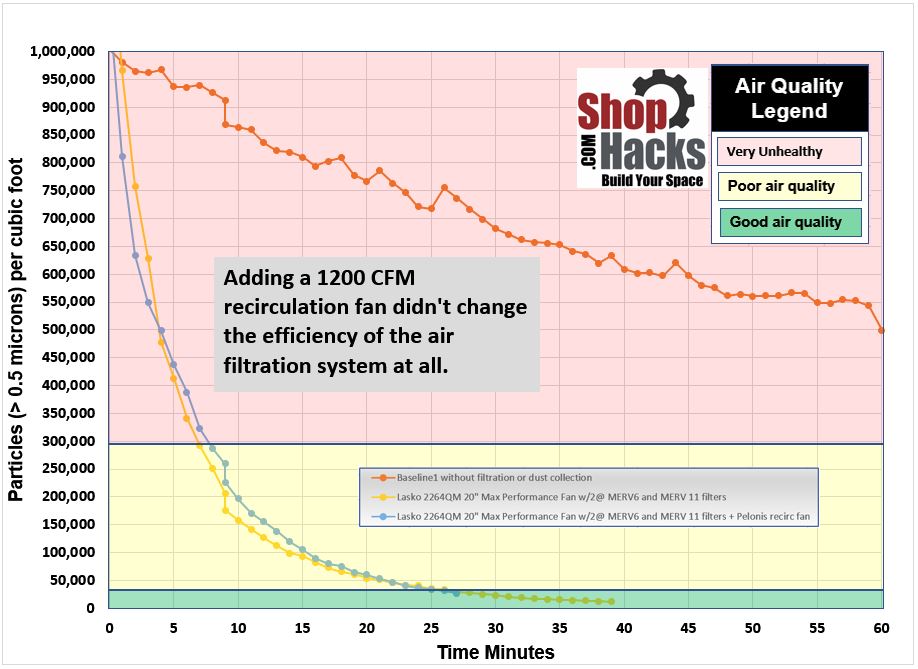

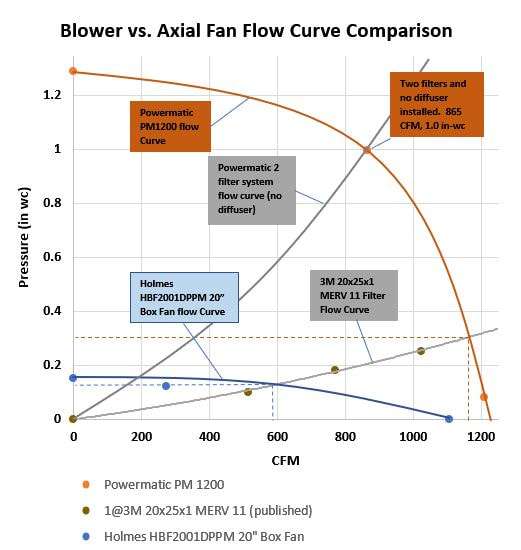
 RSS Feed
Get weekly blog articles and early bird discounts for new products
through the Shop Hacks Newsletter. Every Friday at 3:30 Eastern Time.
SUBSCRIBE to the weekly Shop Hacks Newsletter
through the Shop Hacks Newsletter. Every Friday at 3:30 Eastern Time.
SUBSCRIBE to the weekly Shop Hacks Newsletter
Site Map
© Copyright, Shop Hacks 2019