Workshop Organization - How to Organize Your Materials and Hardware Without Feeling Overwhelmed8/2/2019 If you aren't already subscribed and enjoy this type of content, you can subscribe to the weekly Shop Hacks Newsletter below. A sad but far too common shop related quote ... "I refuse to throw anything away, and never put anything back away. Eventually it gets so bad I don't even want to go in my shop." Does that sound familiar to you? We can all use some help organizing our workshop materials and hardware. Do you have a jar of screws that you just keep adding to thinking that one day you it will save your life? How about a scrap bin full of 20 years worth of off cuts that you are sure you will need one day? Have you ever started to organize that jar of screws or your many bins full of various hardware only to give up because there were just too many ways to sort them and it wasn't obvious at all which way you should choose? In today's article I'll show you how to organize common workshop materials and hardware. This article can help you get over the hump. I'll show you how I organized my hardware including pictures of several ways to store hardware and materials. Your workflow will likely dictate very different solutions than mine, but these ideas can be a starting point. Hopefully they will offer some extra encouragement to help you Build Your Space! 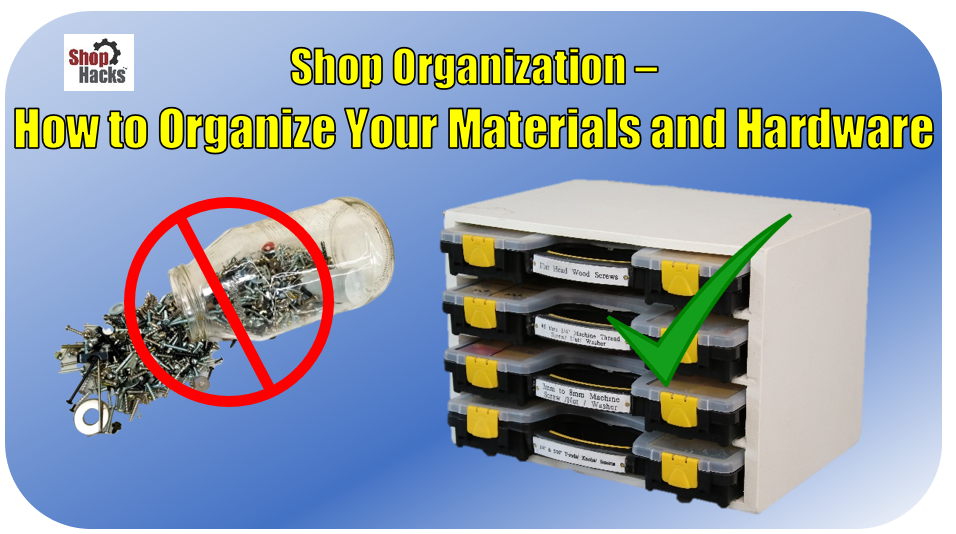 The idea of getting organized is very exciting. The act of organizing is certainly not a fun task. Why would anyone go through the work needed to organize materials and hardware? Three years ago my shop was a disaster area. I reached a breaking point after tripping over some sheet goods for the thousandth time. They were stored in the path from the door to my main work area. The frustration of not changing finally exceeded the dread of making a commitment to change. I had no idea at the time how these changes would totally transform how much I enjoy my shop time. Check out the before and after pics below. These pictures will give you a feel for the difference a concerted effort can make and I hope they encourage you to take those first steps forward. You can do this too. I'll show you where to start and how to go about the decision making process and I'll share about the specific organizers that I use that transformed my shop. 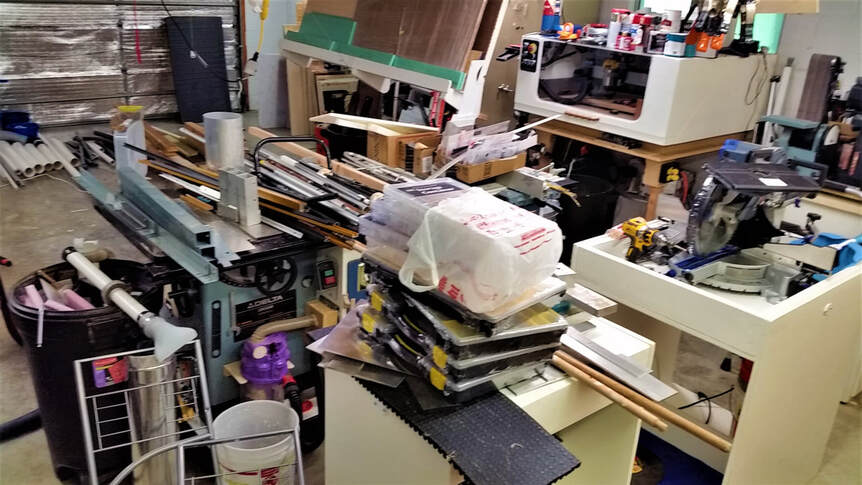 BEFORE: Piles of Materials EVERYWHERE 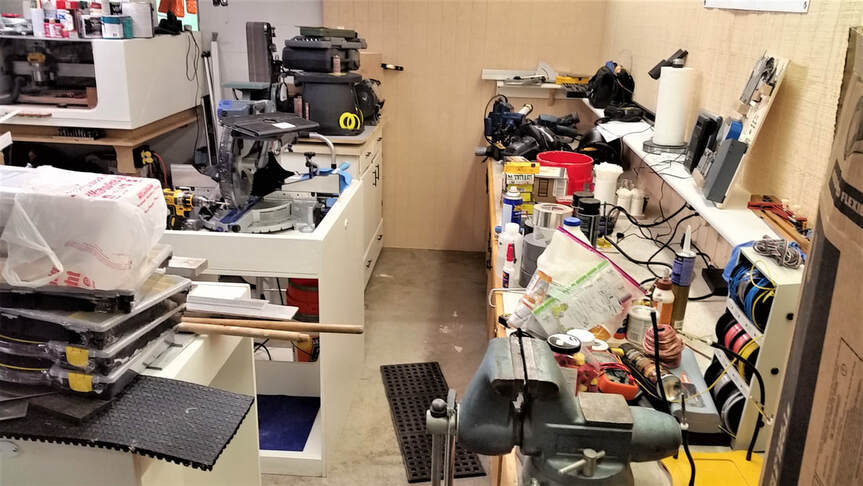 BEFORE: Every Horizontal Surface is Covered up 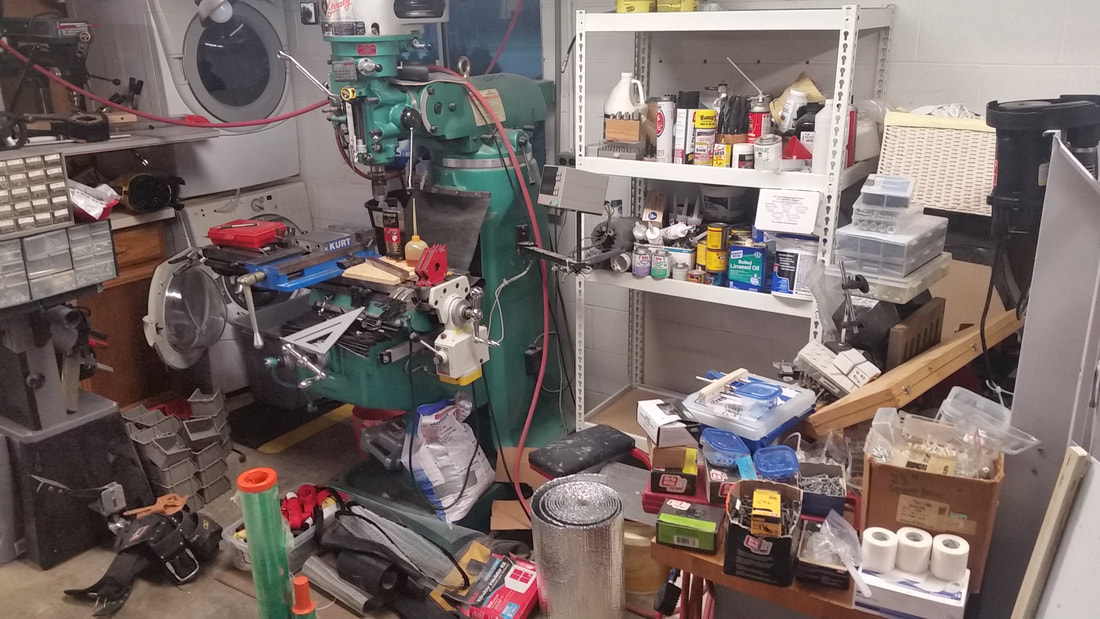 BEFORE: Paints, Solvents, Hardware in Disarray 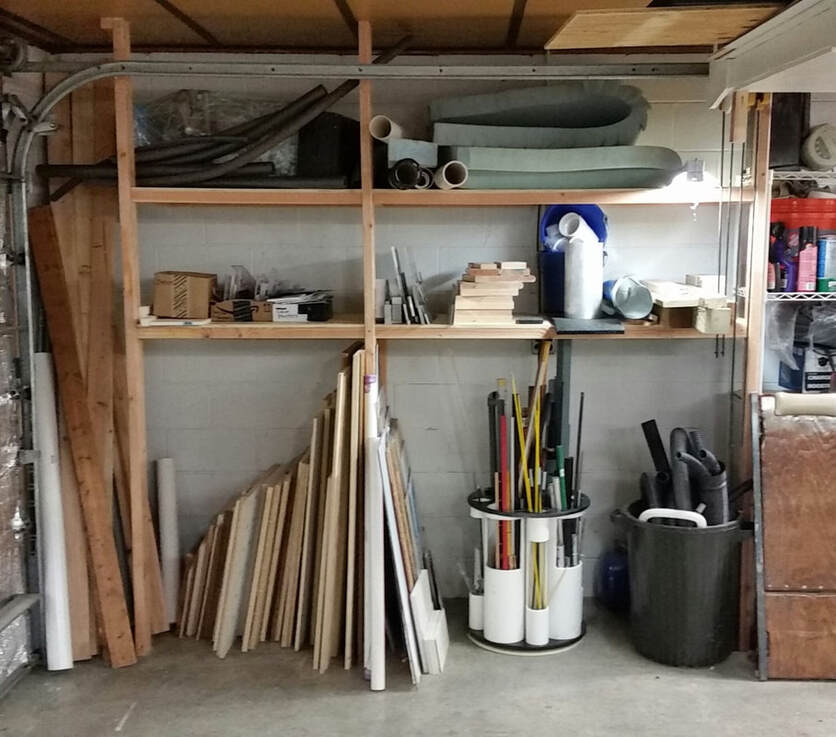 AFTER: Neatly Organized 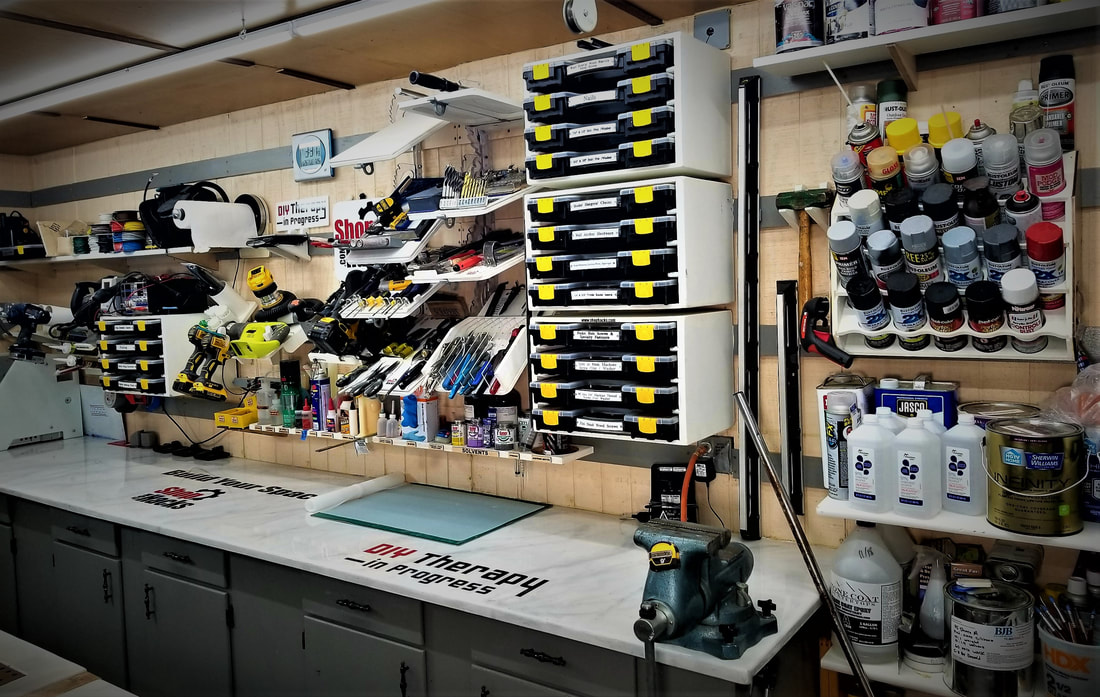 AFTER: FREEDOM!! Workbenches Free and Clear and my most used tools and materials are within arms reach All Materials and Hardware are in Labeled Locations and my shop stays like this all the time now that it's so easy to put everything away. Why Get Organized?? When I look at these 3 year old pictures of my shop, I realize that I've already forgotten how I worked for almost 30 years. I would NEVER consider working like that now that I've experienced a whole new level of workshop enjoyment. In the past my shop would get very disorganized. I would cover every horizontal surface with tools and materials again. Then, occasionally, I would spend a couple hours rearranging junk so it felt more organized (but nothing like it is now). I was always fighting for working space and wasting time.  How much time does it cost to be disorganized? One of the most common sayings I hear all the time is, "My shop is a mess but I know where everything is.". That may be true but you are still wasting a lot of time if you are keeping unused items in your active work areas and if the items you use 80% of the time are not within arms reach. Think about how many times an hour you have to walk to get a tool or a piece of hardware. Let's just assume that you walk 10 ft to get a tool or some piece of hardware or material at least 15x per hour that you work in your shop. That's probably a low estimate for most of us. Assuming it takes 20 seconds to get what you are looking for that's close to 5 minutes per hour wasted on motion and hunting for things. Let's just say 10% for an even number. If you look at the photo above you will see that I have pared my tools and materials down so that the items I use 80% of the time are within arms reach. Compared to my previous setup I now get to spend 10% more time making, building and fixing things vs. cleaning, sorting and hunting. I spend around 2,000 hours a year in my workshop so that adds up to around 200 hours (5 full weeks) that I get to spend on projects vs wasting time hunting. Let's say you spend 10 hours a week in your shop. Using the same numbers as above... Organizing your tools and materials can allow you to spend over 50 more hours each year doing what you love vs. walking around, hunting and sorting! What would you make in your shop if you had an extra 50 hours per year to spend without taking time away from anything else? What Should You Do First? As I mentioned earlier I had several false starts when I tried to organize my shop. If you try to organize everything you will fail. Work on one work area at a time. The more organized I get the more I realize that less is best. This is why it is imperative that you only try to organize what you physically touch over 10 sessions or so in any particular work area. If you haven't touched tools, hardware or materials in that work area in the last 10 sessions in your shop then trust me, it needs to go into a storage area or out of your shop. Save room for the tools, materials and hardware that you use 80% of the time in each work area and mount them all within arms reach. I previously wrote an article about How to Organize Your Tools Without Feeling Overwhelmed. In that article I show you how to pare down the tools to increase your efficiency and buy back as much as a full week per year of extra project time without taking that time from anything else. Click on the link to get more details about how this principle makes everything about organizing your shop much easier and more efficient, including hardware and materials. Organizing Your Hardware The first organizing task that I completed was to organize my screws and other small hardware pieces. If you want to succeed you will have to make some uncomfortable decisions to get everything you don't touch on a regular basis out of your work areas. You got where you are with comfortable decisions. If you want to spend more time doing what you love and less time hunting and sorting then you will eventually have to do this anyway... empty your junk drawers, jars, etc... into the garbage. If you just can't bring yourself to do that then put them away in a storage area that doesn't use valuable space but get everything out of your work area to start with. Unless you have expensive hardware that you already have slated for a specific project you are better off starting with a clean slate. You can buy hardware relatively cheaply at Harbor Freight or Tractor Supply so don't hang on to your random assorted hardware. Put together hardware bins and organizers It is easier to show you what I did than to try to explain it. I'll show you what I ended up with for every organizer.
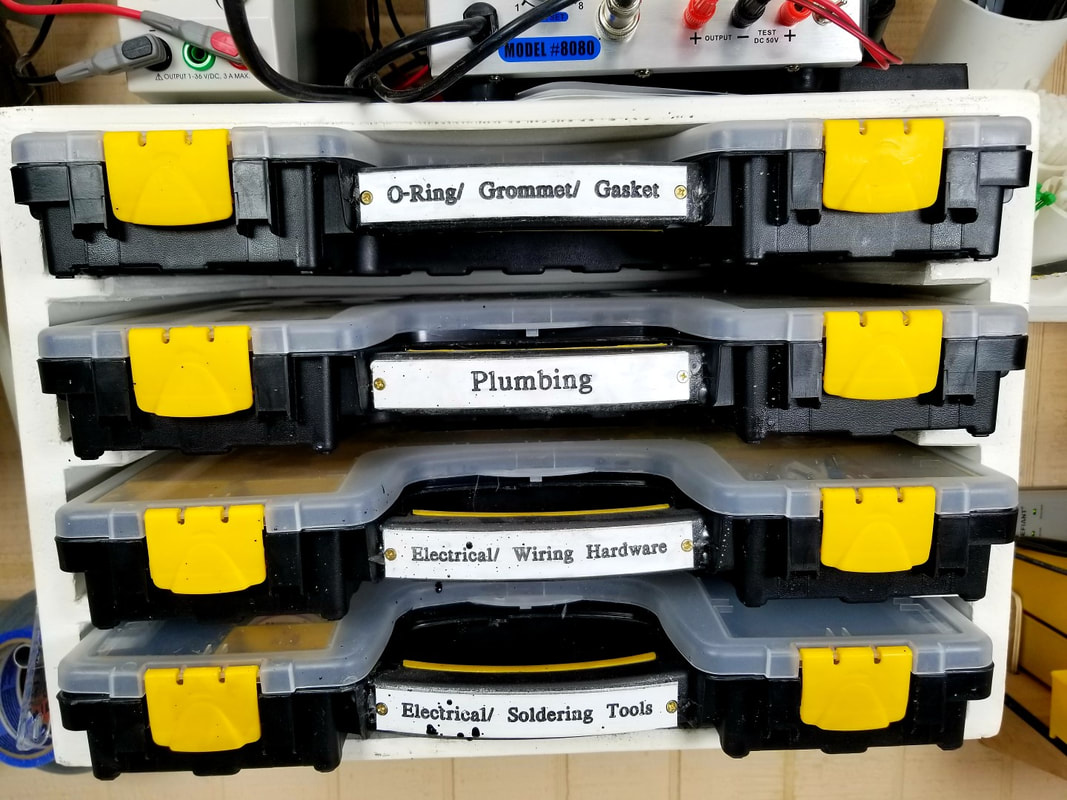
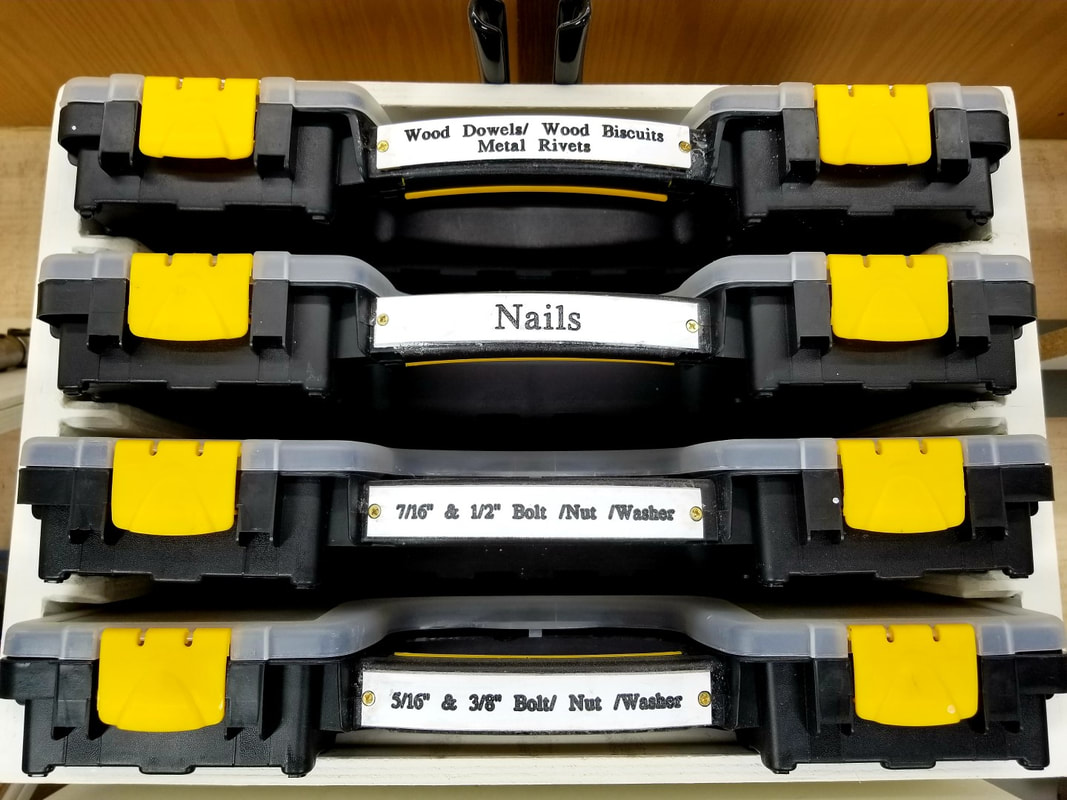
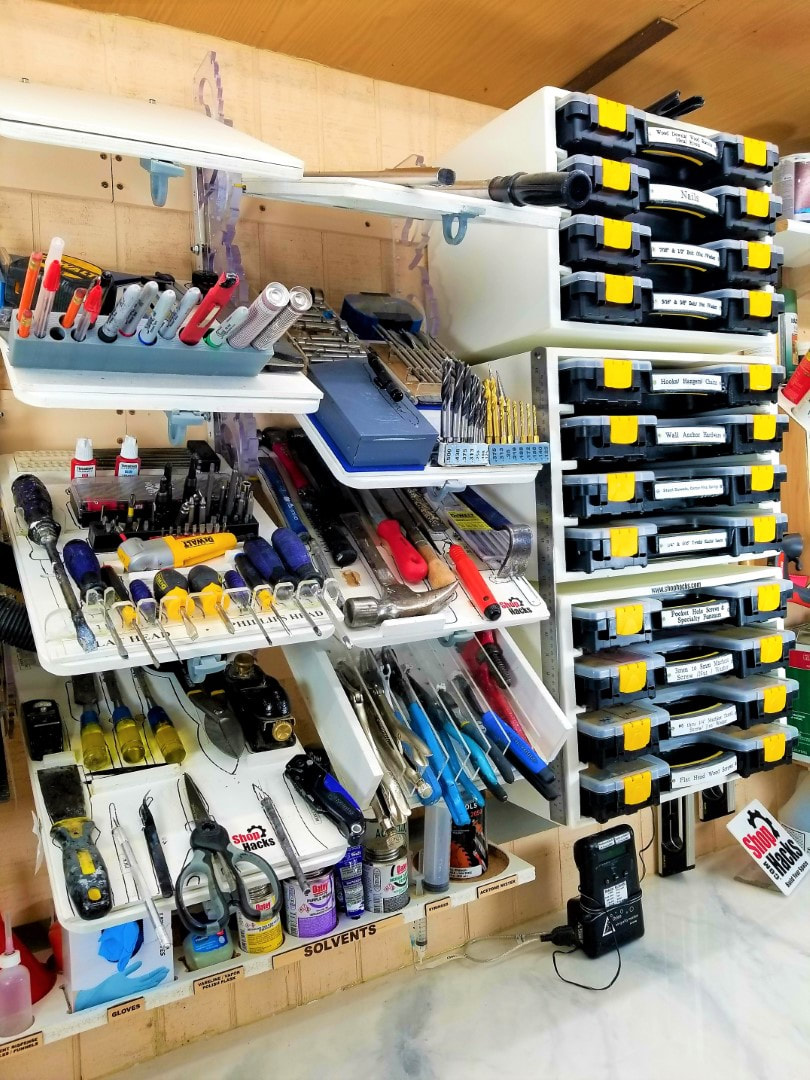
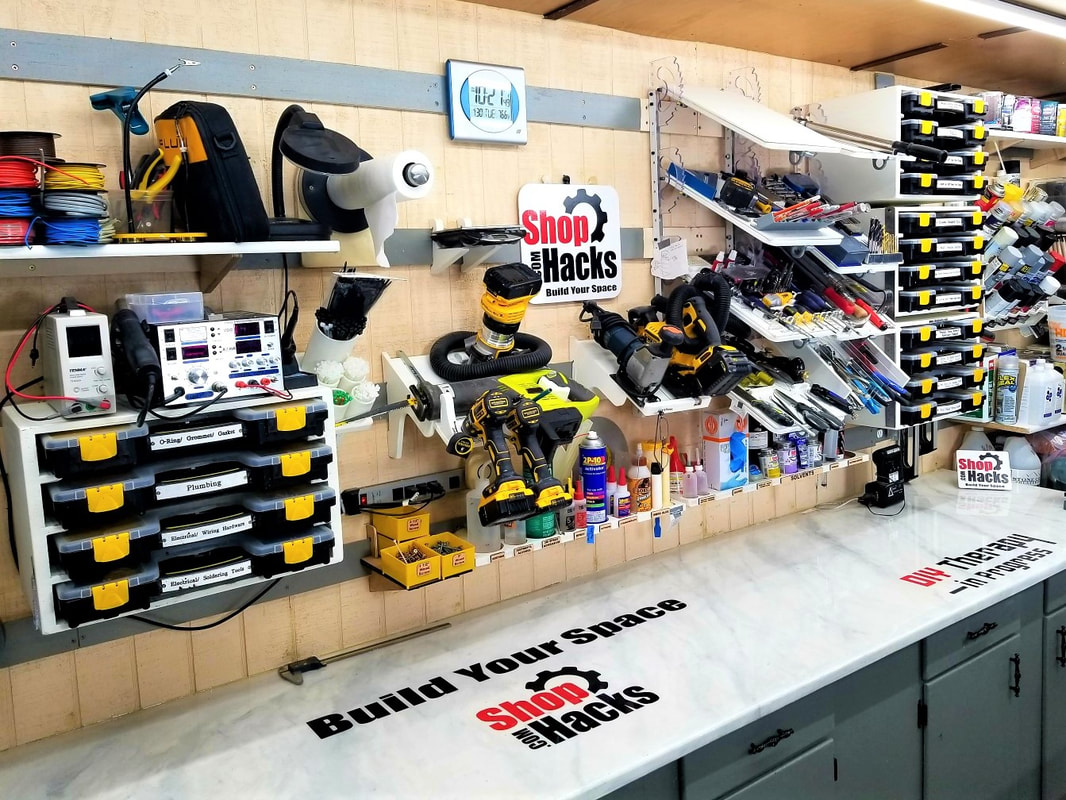
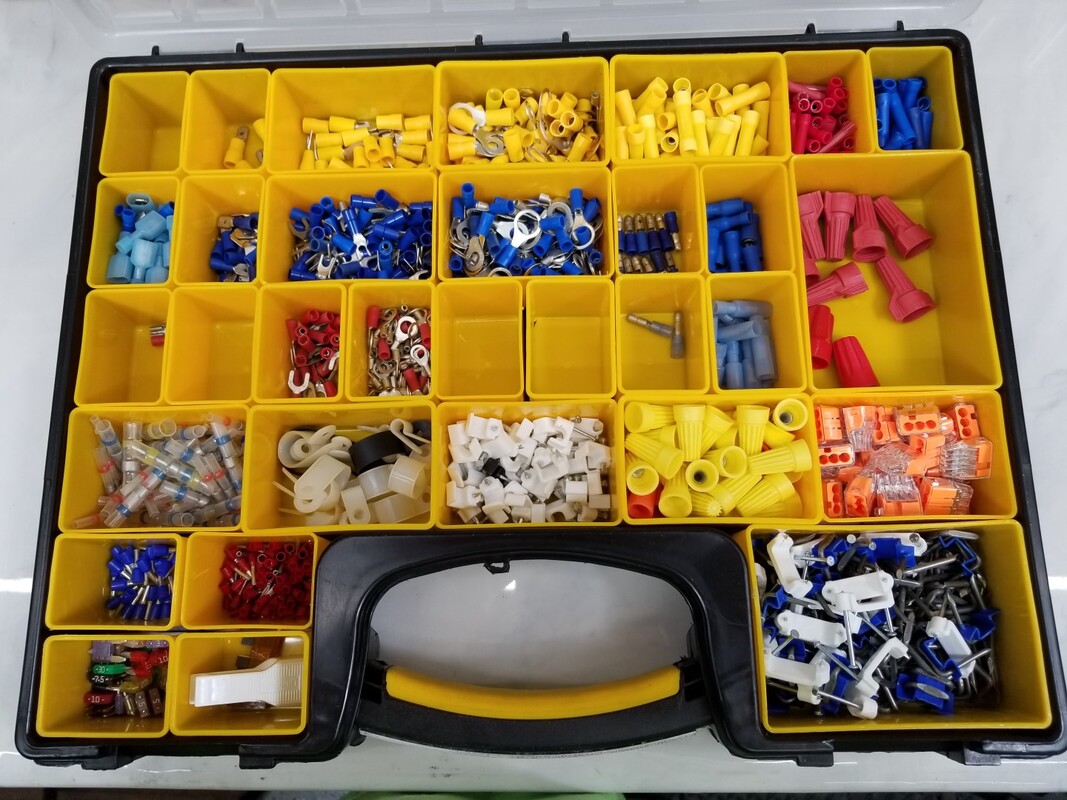
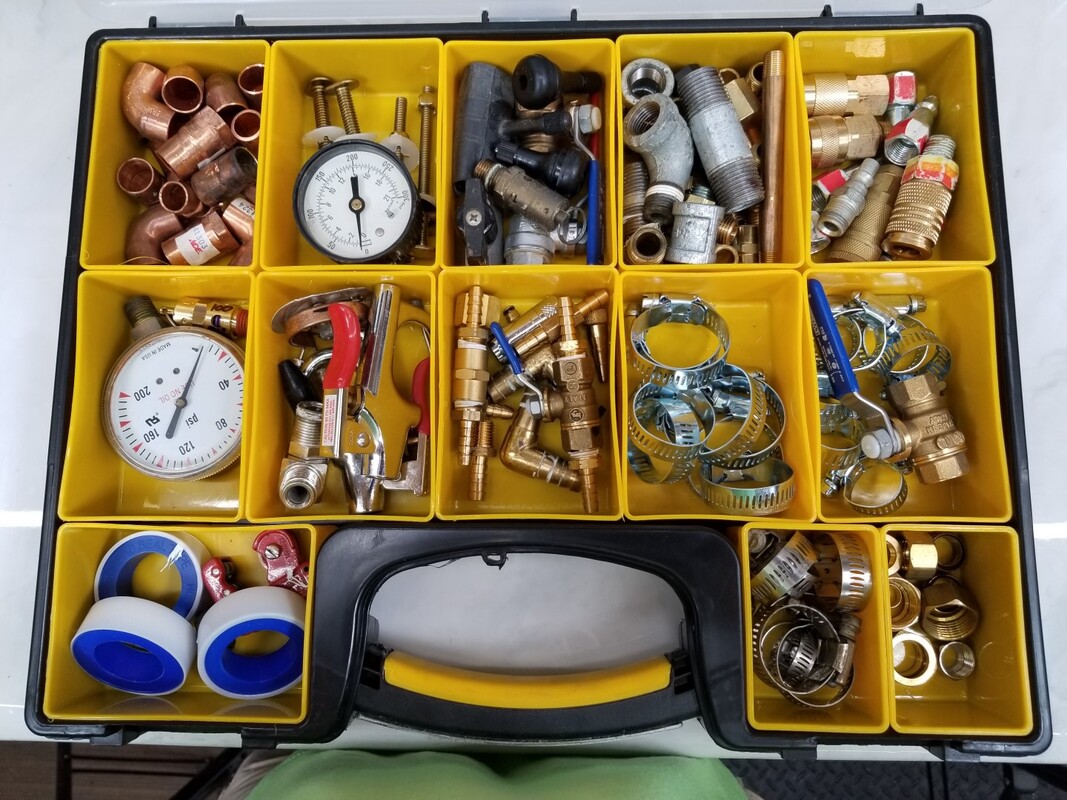
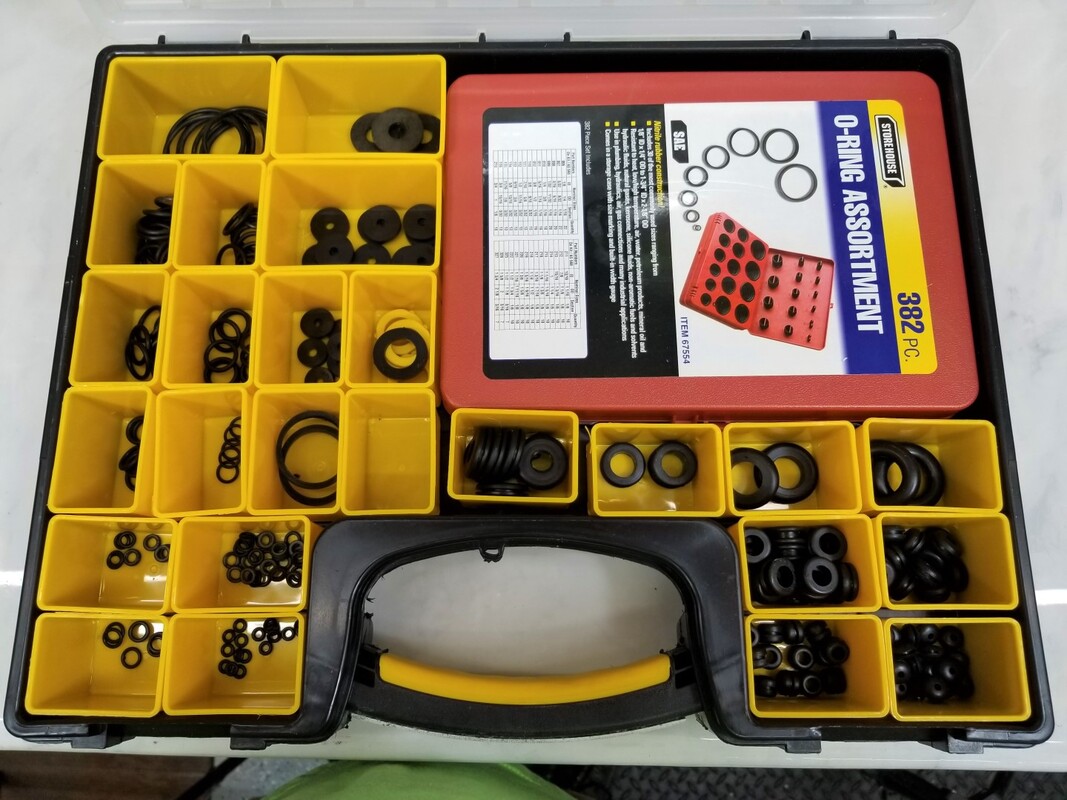
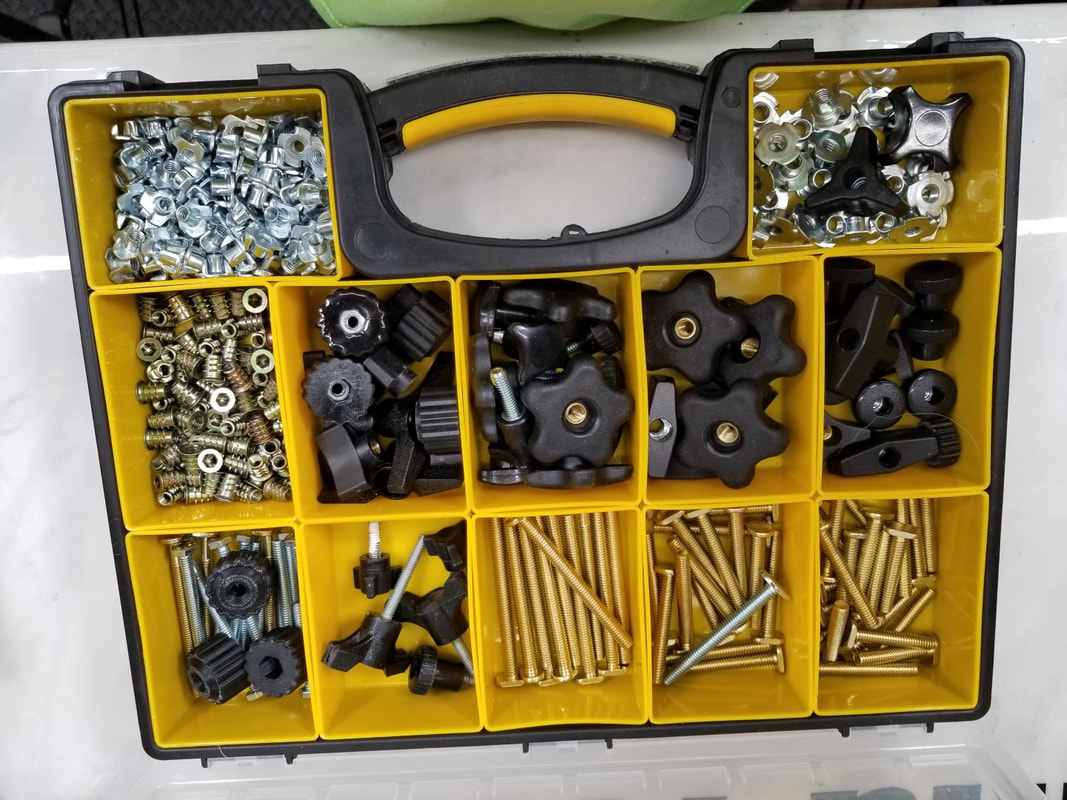
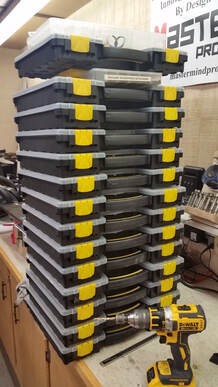 4. I labeled every bin and placed them with the ones I use the most frequently closest to me. Below are 4 sets of 4 organizers that I felt were worth keeping in my active work area within arms reach. I stored everything else away from my work area. Organizer bin labels I created: Bin #1
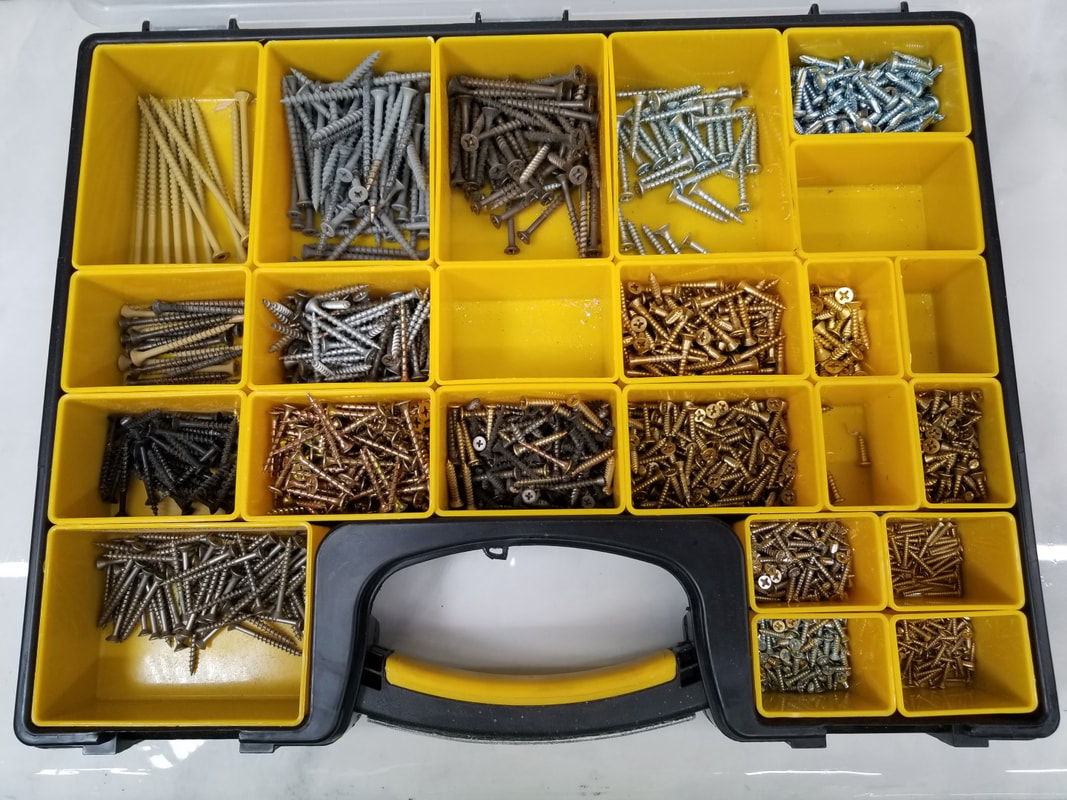
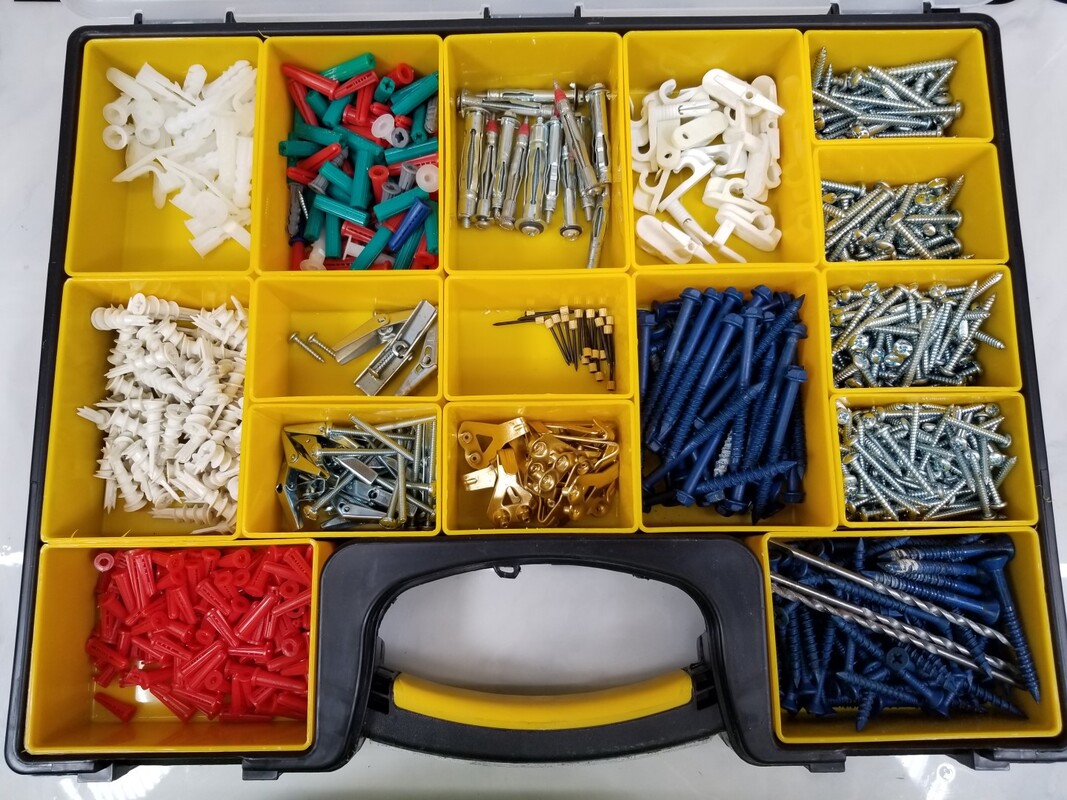
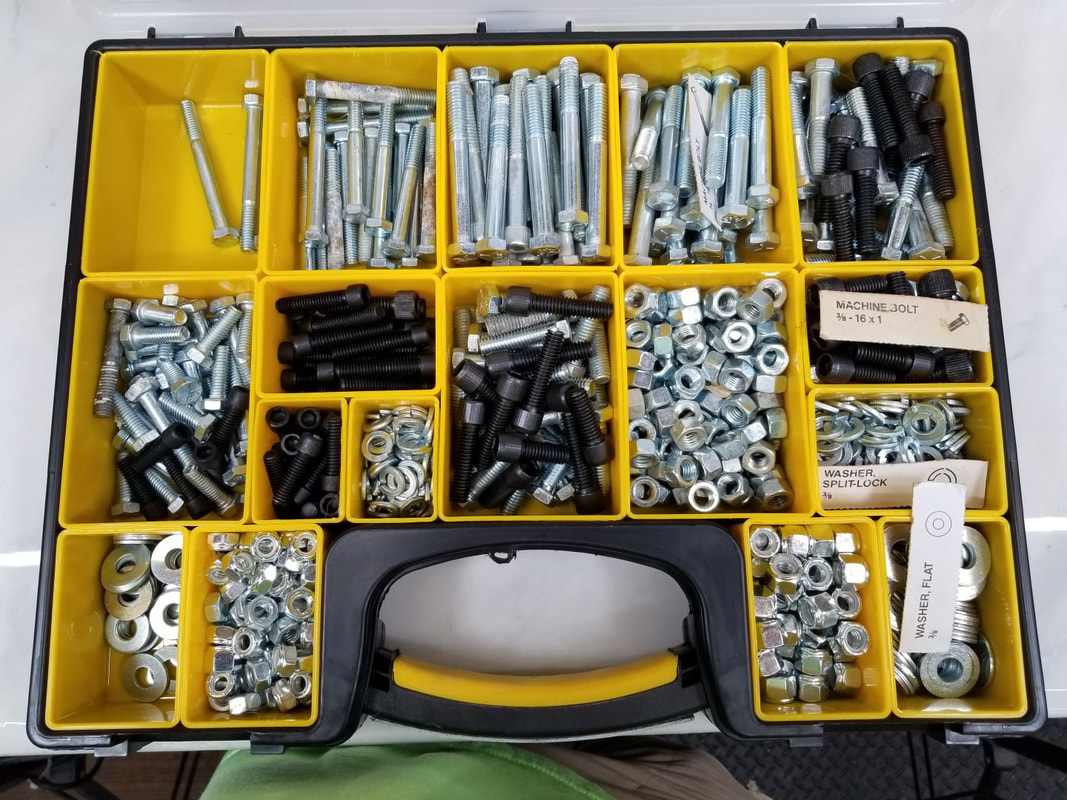
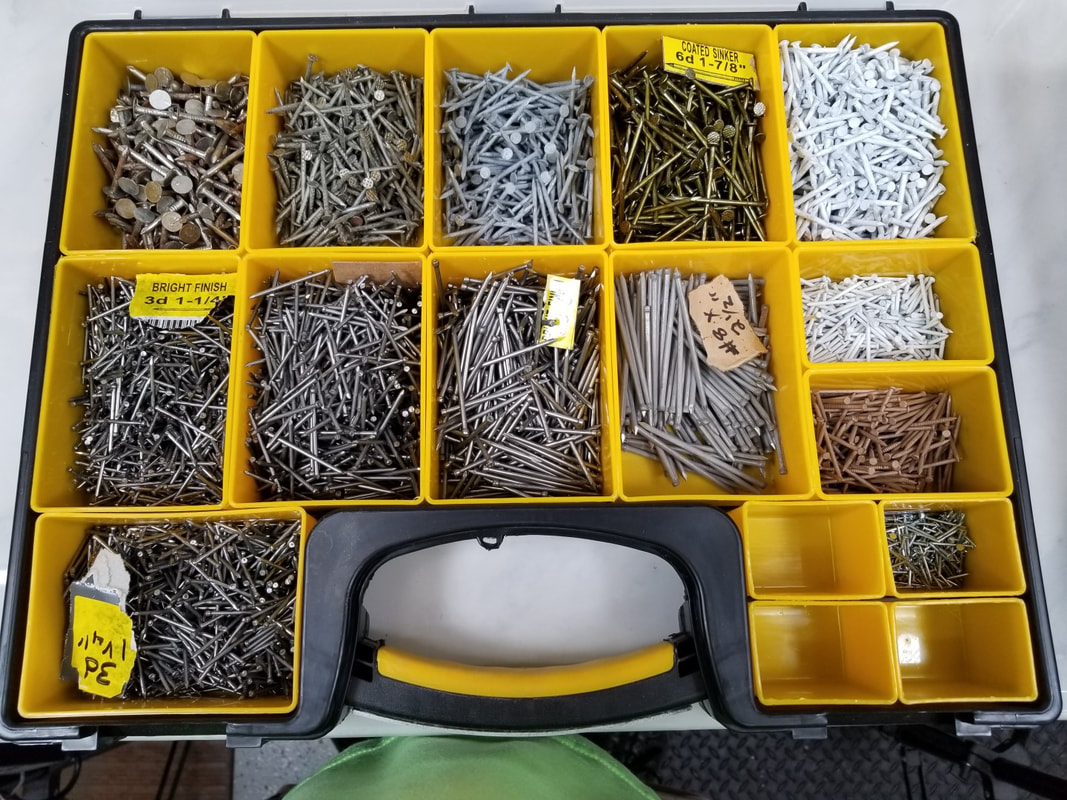
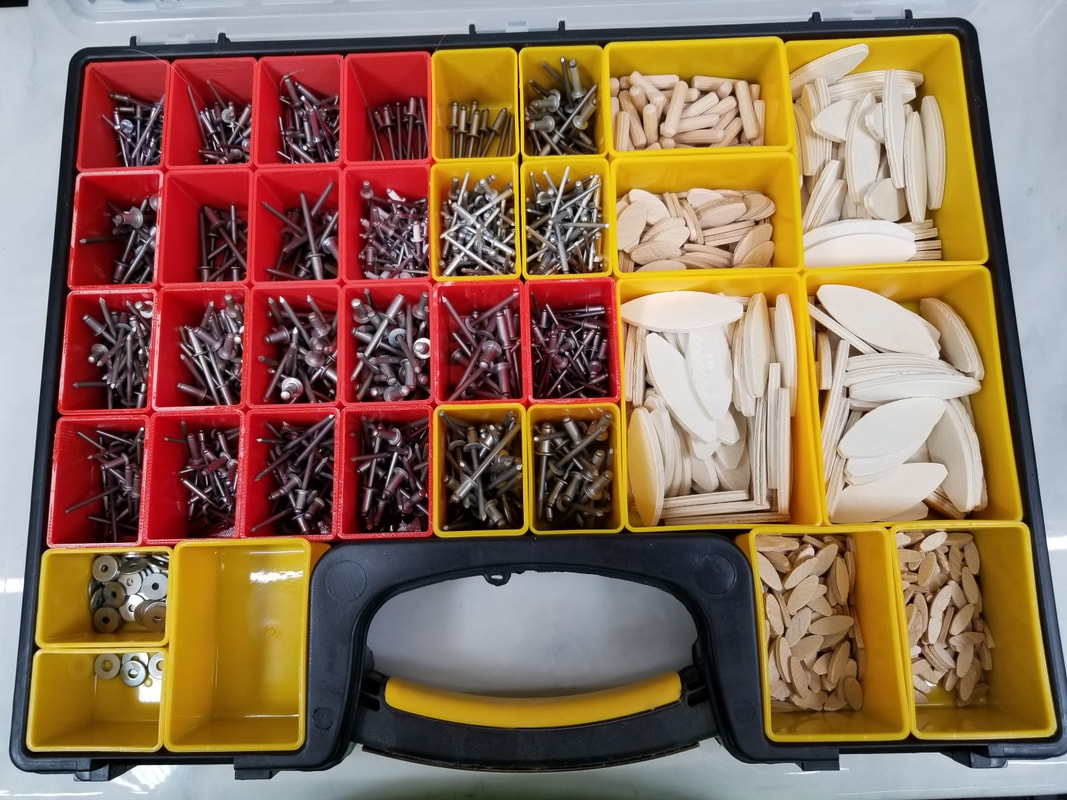
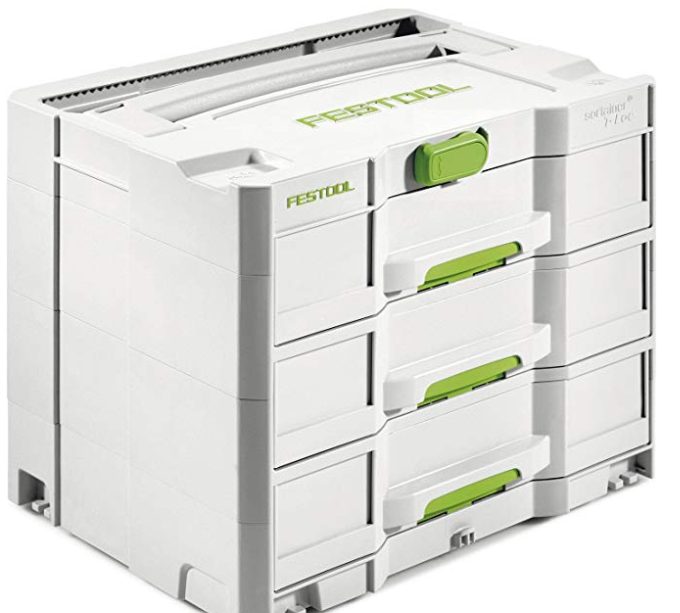
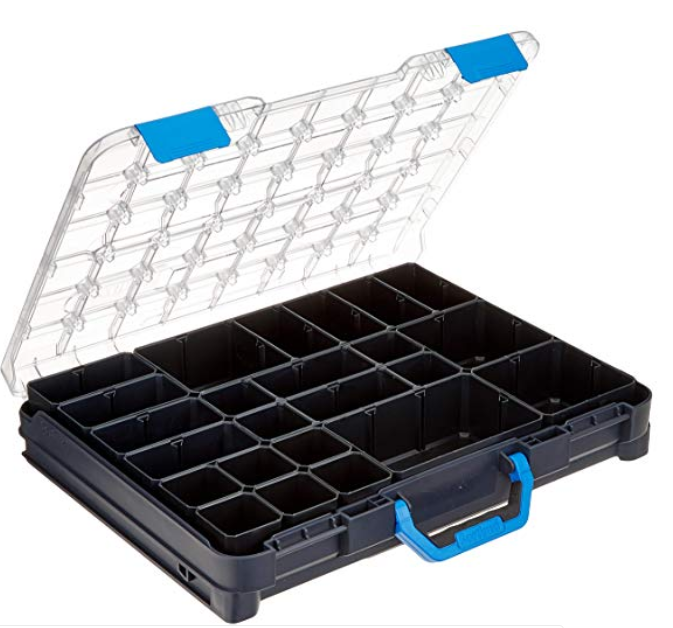
Pictures of the contents in each hardware organizer: I should reiterate that your setup will most likely look totally different than mine. I ended up using about half of these on a frequent basis so I could have saved some time and just put the rest in storage. It doesn't hurt to have to walk to a storage area for something you only use occasionally. However, it saves a lot of time to have everything you use frequently within arms reach. Organize only the items that you actually touch and store or purge the rest. I store refills for frequently used hardware in a storage area. I used the Harbor Freight hardware organizers. They have held up very well and I can recommend them for in shop use if you have a Harbor Freight store in your area. If you don't have a Harbor Freight store near you or if you want something more durable for rough use then you might be interested in one of the higher end sets listed below. Disclosure: The products listed are affiliate links. By using these links you won't pay any extra but Shop Hacks will receive a small commission on each purchase. Thank you for your support that enables me to continue creating these articles to help you Build Your Space! If money is no object then you might consider investing in the Festool Sortainer system
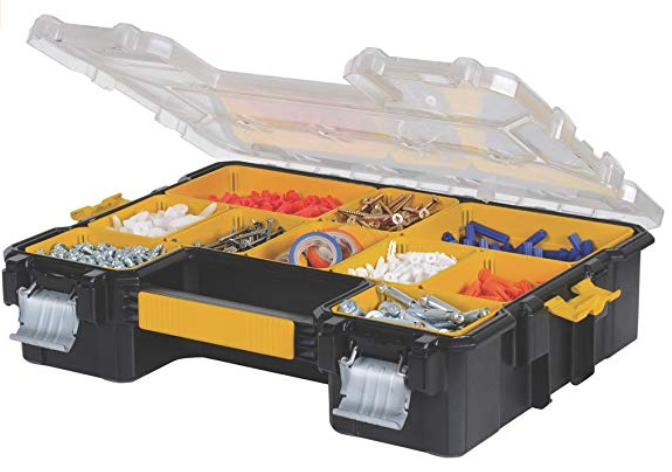
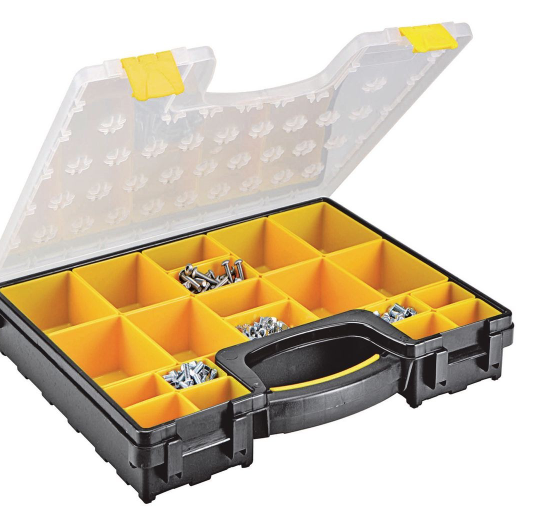
If you are content with a very good and durable system but don't want to spend 3x as much for it then the Sortimo T-BOXX G was highly recommended in the Shop Hacks Facebook group.
Spray Paint Can Storage... I used to keep my spray cans in an old refrigerator but I found that I didn't like having to bend over and move the cans in front to see what I had in stock behind them. I designed the rack to pack the cans as closely together as I could. It hangs on a French cleat which makes it easy to relocate. I've relocated it a couple times already. Some people would prefer to store volatile compounds in a flame rated cabinet and I can see their point, but I prefer this method. 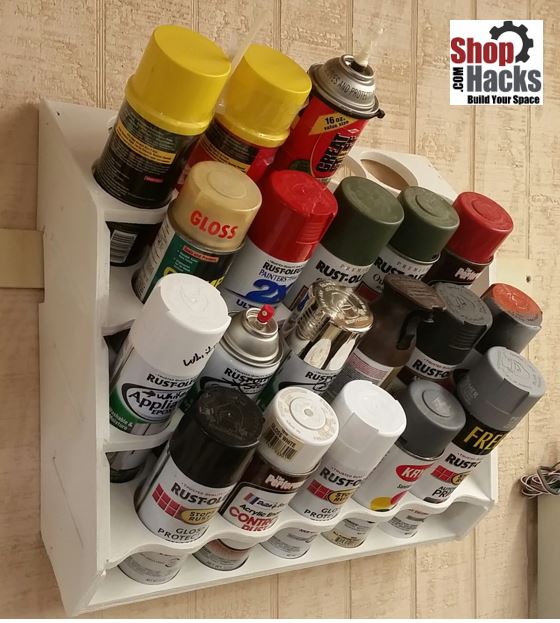 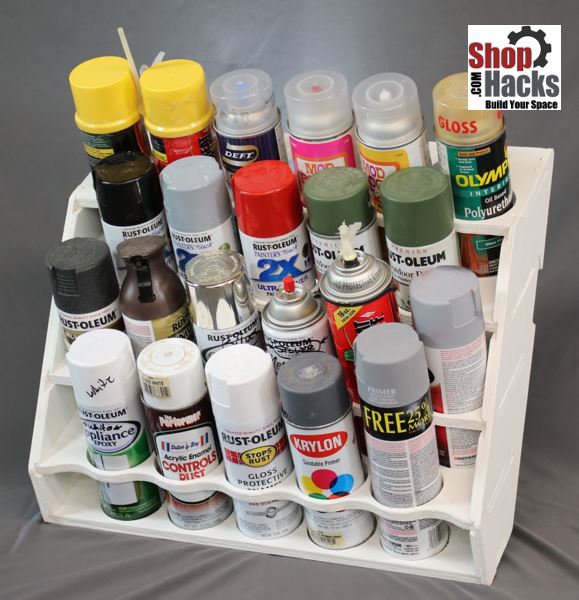 Adhesives and Solvent Storage... I originally stored my paints, adhesives and solvents on shelves. I had to walk half way across the shop just to use them. I paid attention to which ones I used the most often and made simple routed pockets in melamine boards for them. Every location is labeled so I know what is missing. Without labels most of these organizing systems fall apart so don't skip this step. This may seem like an inconsequential change but it has saved me many hours in just a couple of years now. I haven't had to change any of the boards to accommodate different shaped containers yet but, if I do, I can easily modify the CNC file and cut another one out in 10 minutes. Before and after pics below...  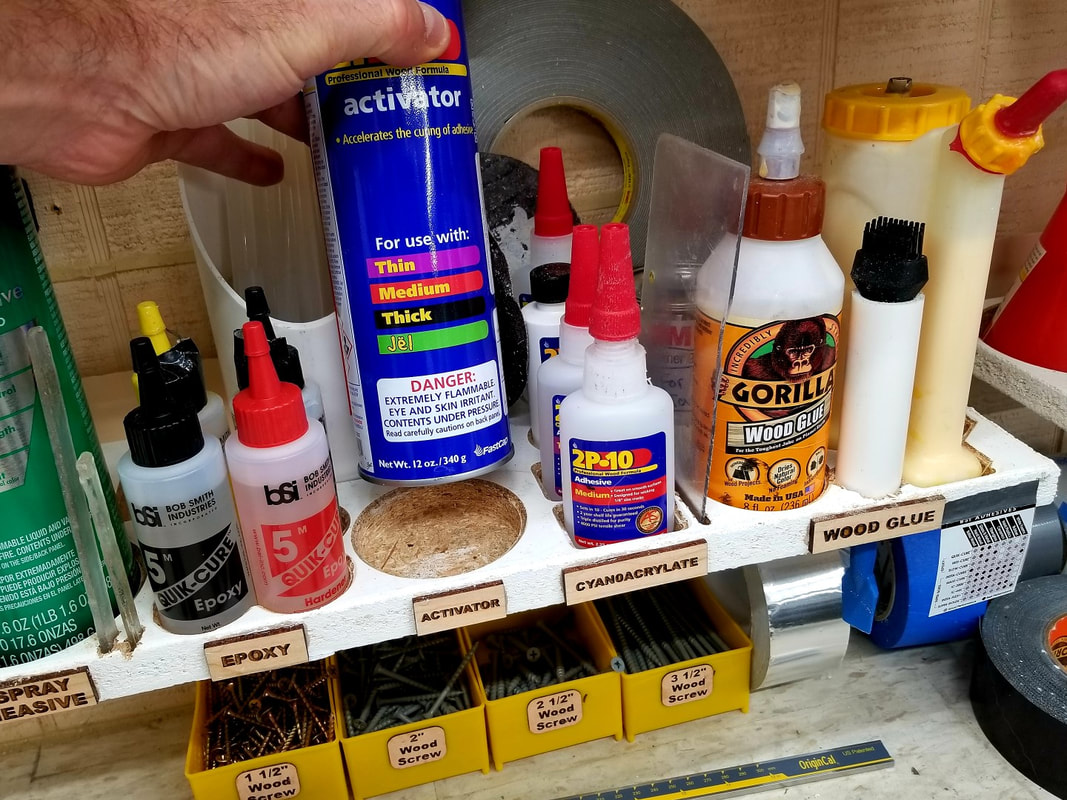  Sheet Goods Storage... Unfortunately I don't have any pictures to show the "Before" chaos in my shop. I tried three different methods to store my sheet goods.
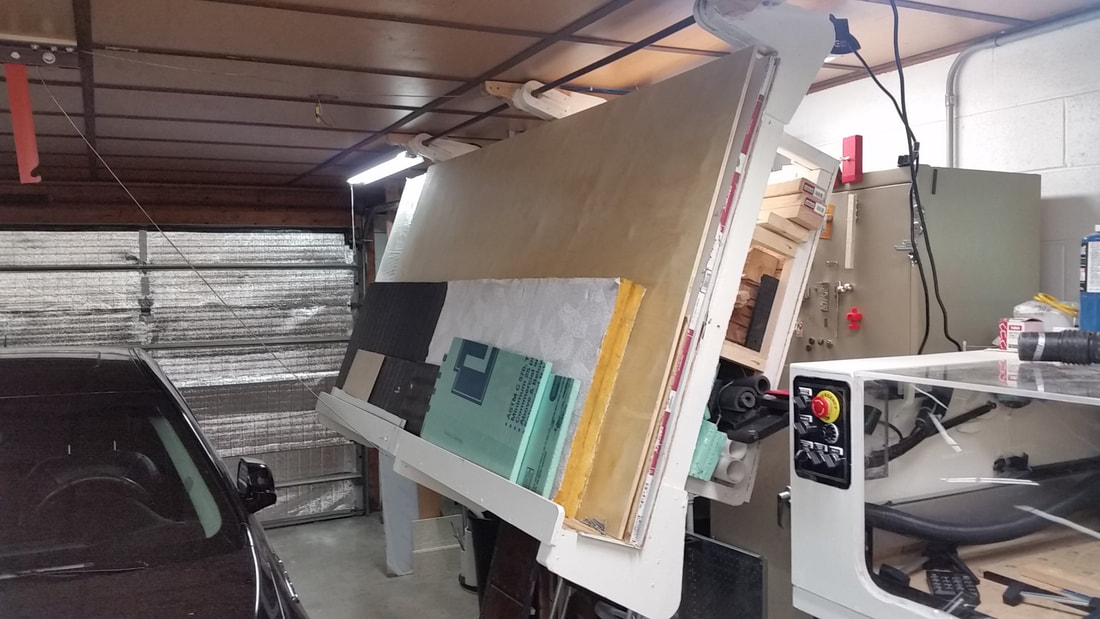
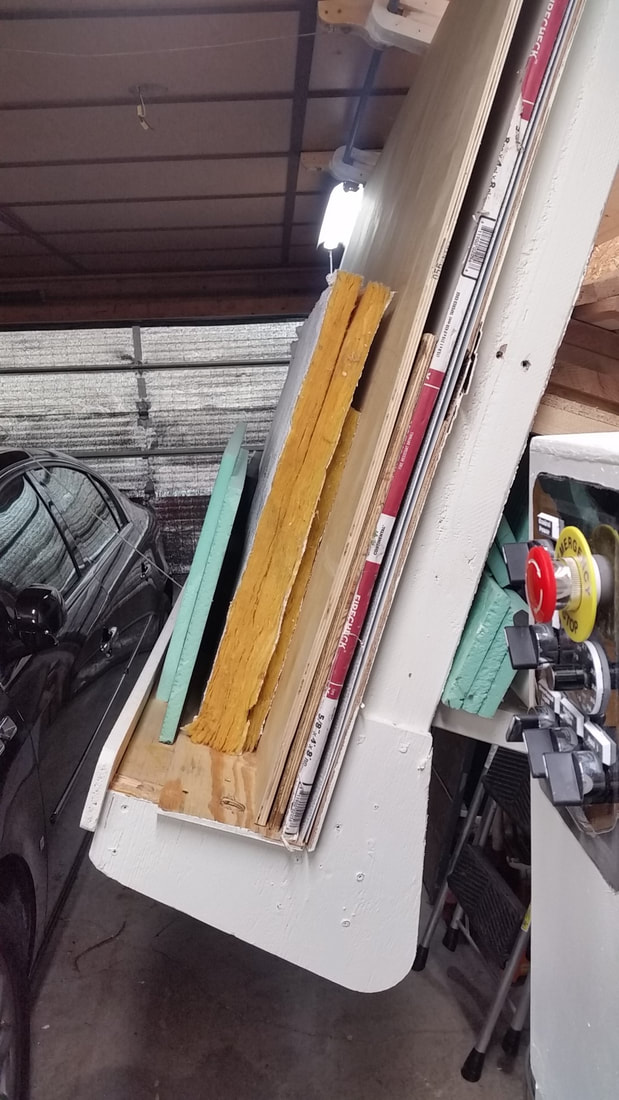
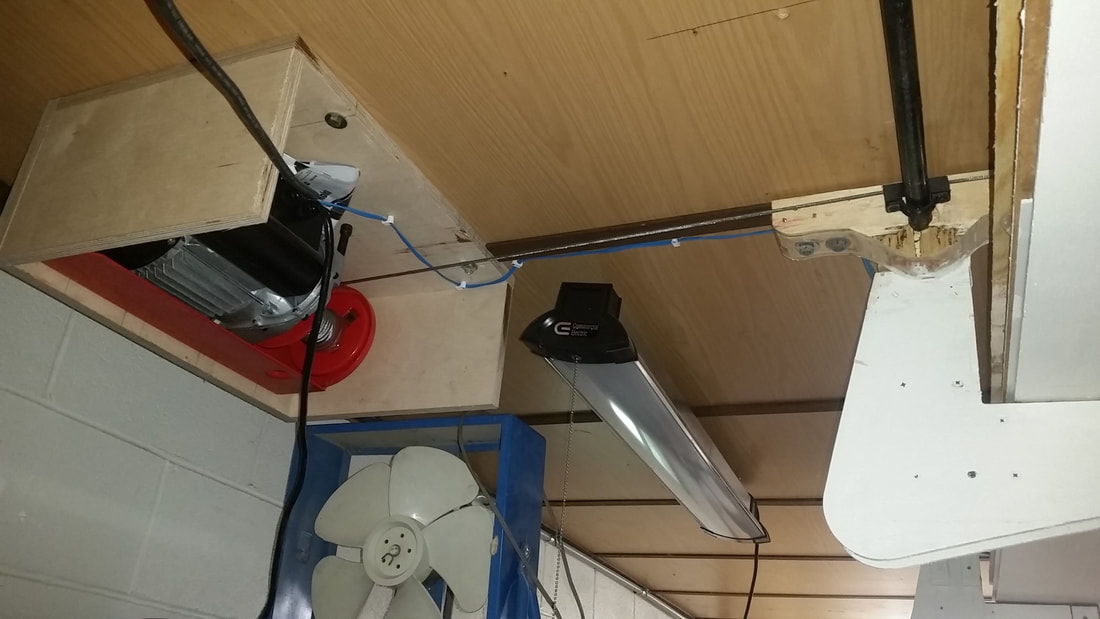
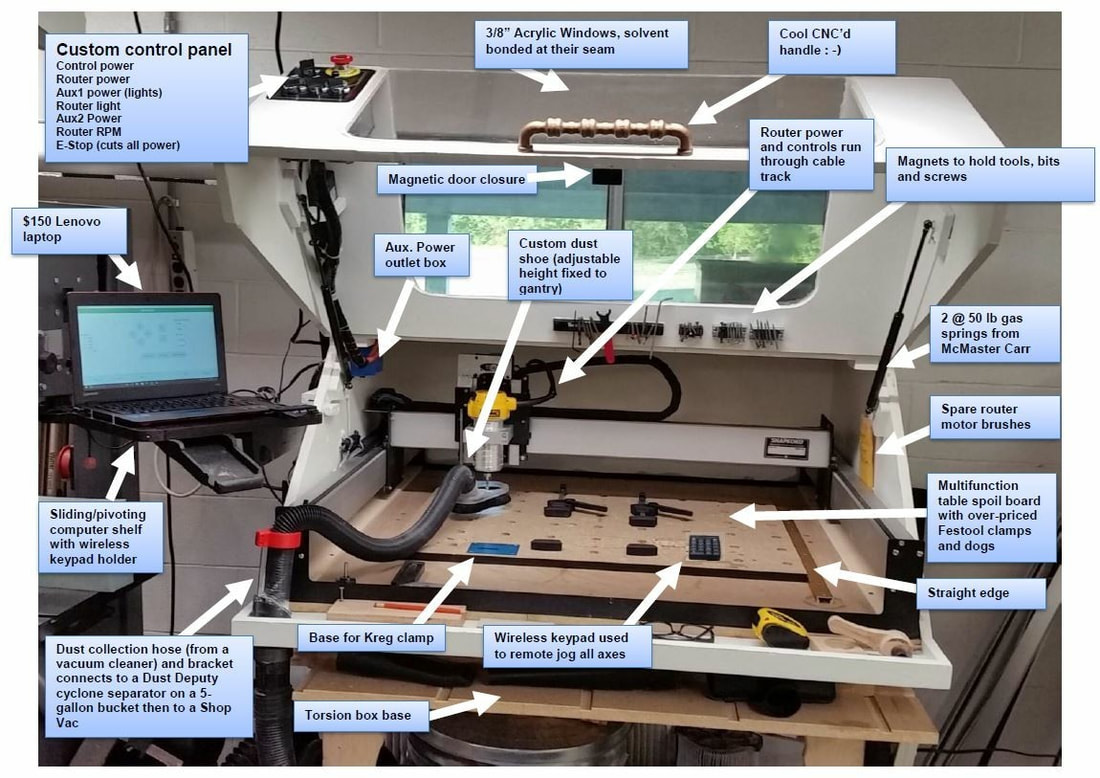
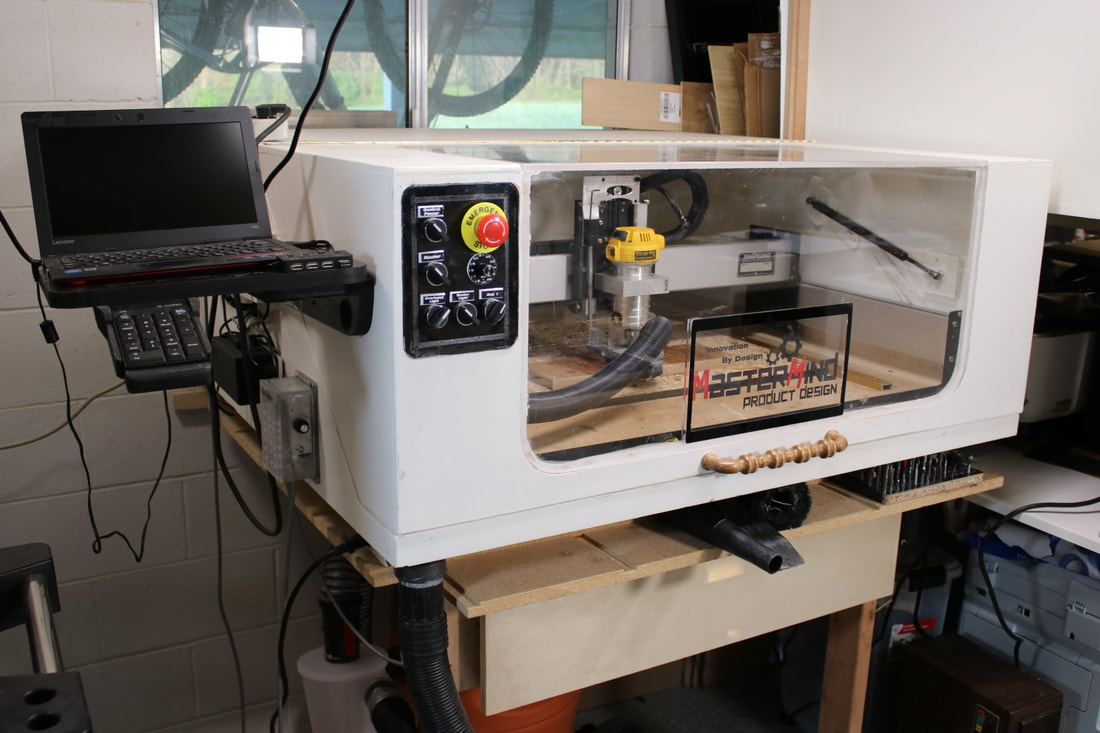
I didn't like having to lower the rack and move things just to get to something in the rear. I found that I often would forget about stock that was stored here because it wasn't easy to see everything at a glance. Cool innovation but unfortunately it wasn't very practical for my work flow. The sheet goods storage method I like the best so far... Sometimes the simplest way ends up being the best way. I can easily pull out any sheet I want without moving or lifting around another sheet and I can easily see everything I have available to use with a single glance. 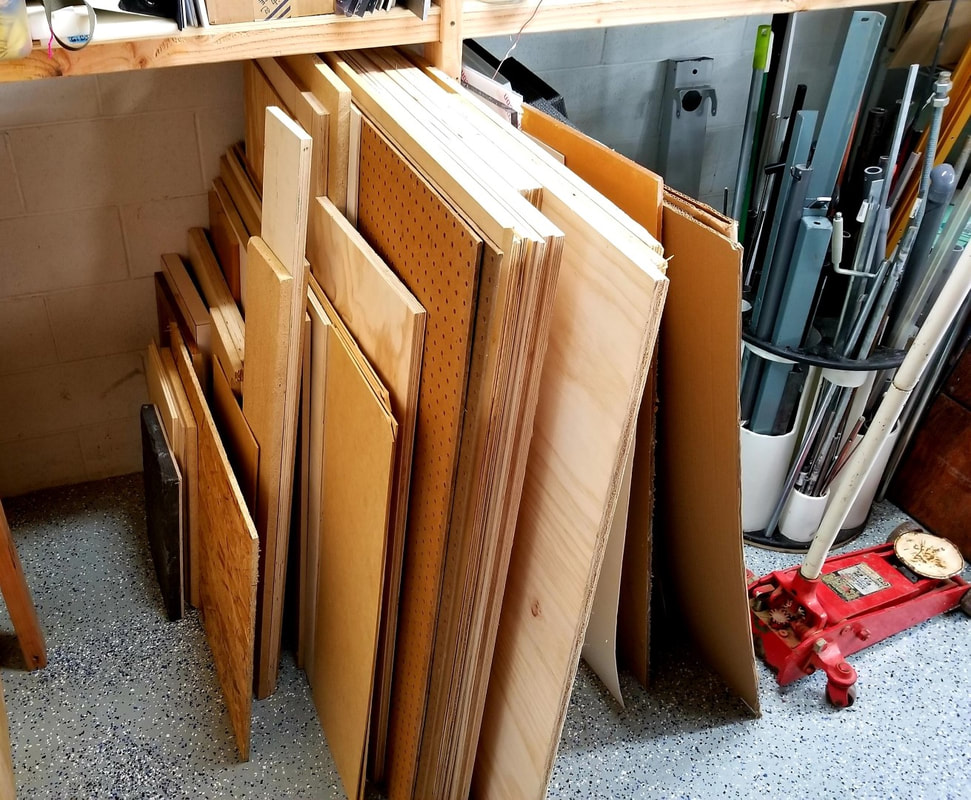 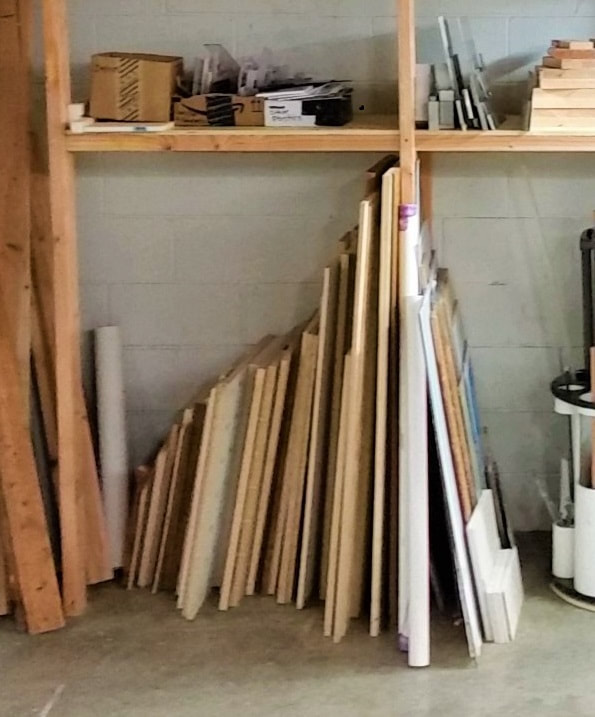 CNC Router Work Area... I use my CNC router a lot so I didn't want to have to walk to another area to get anything that I used for CNC tasks. Except for a drill and driver I have everything I need within arms reach of my CNC. I almost always screw my stock to the waste board so I have various length screws mounted on magnets in the lid. Various fixtures and hardware are stored in a drawer just below the CNC. Bars, Rods and Tubing Storage... I don't use bars, rods and tubing very frequently but just frequently enough to justify storing them in my shop. Below are some before and after pictures. The organizer is on a lazy Susan bearing so I can rotate it to access any of the stock I need without reaching around anything. 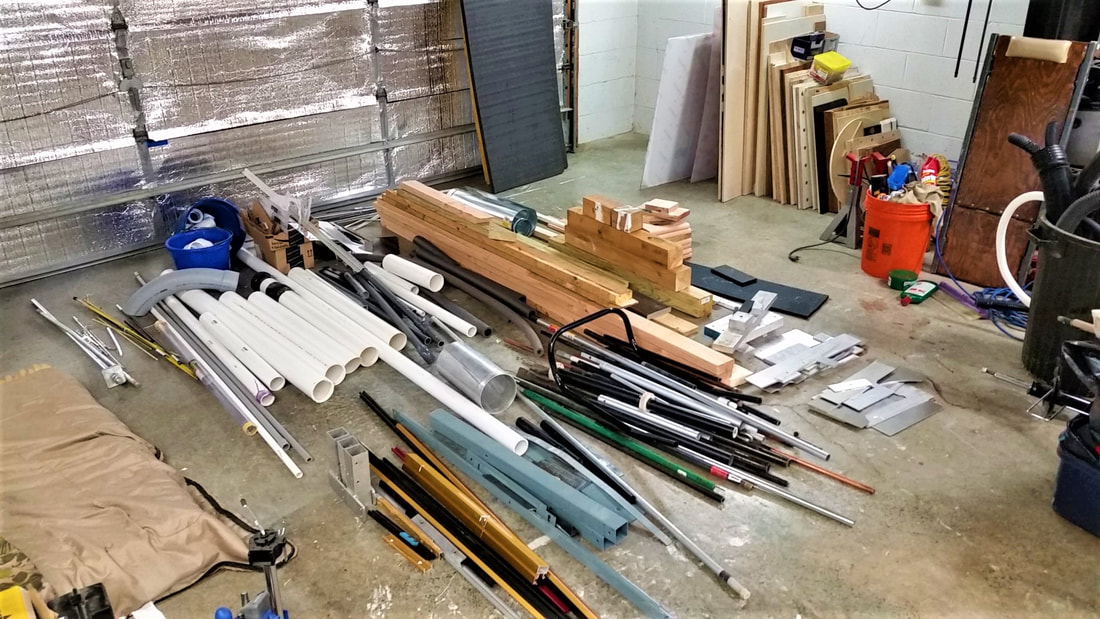 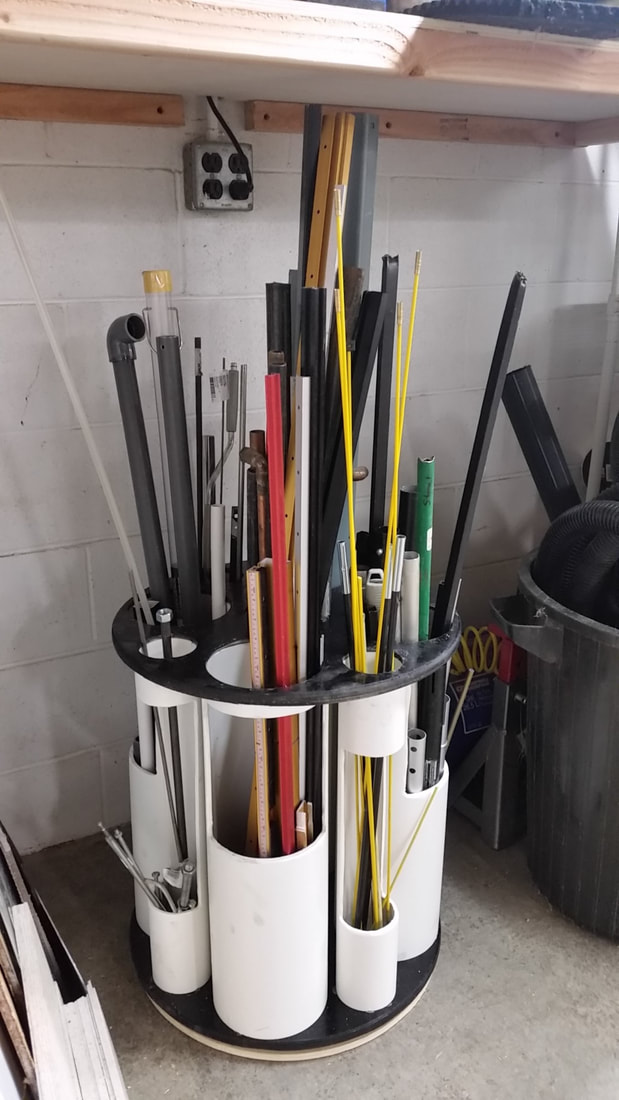  I have quite a few other organizing systems in place but this should get you started with plenty of ideas. Start with one small set of hardware and work your way out. I can guarantee you that you will enjoy working in your shop more than ever once you follow the simple methods that I've laid out in this article as well as in the How to Organize Your Tools Without Feeling Overwhelmed article.
If you enjoyed this article and want to receive weekly tips like this via email, you can subscribe to the the Shop Hacks Newsletter . If you want to see new shop hacks every day then join the Shop Hacks Facebook group!
12 Comments
Jon Peterman
10/28/2019 08:34:11 pm
do you have the plans for the spray can shelf available? 10/28/2019 09:09:17 pm
Jon,
Earl
4/16/2020 04:41:09 pm
Any updates on the spray can holder? Not sure why but I really like the looks of this one. Thanks for everything.
Shop Hacks
4/18/2020 02:29:50 pm
It's on the list but the list is very long :-) someone posted a version in the Facebook group earlier this week. There's also a nice version in the "storage, organization, and efficiency" topic section in the FB group.
Darren
4/21/2020 09:03:55 pm
The bars, rods and tube storage is inspired. And it inspired ME. Thanks. Got some down time so I'm getting organized.
Ron
7/26/2020 04:24:28 pm
How were the labels on the handles created and what materials were used? Thank you.
Dan
4/14/2021 11:53:28 am
Wondering if you have plans or helpful hints for the hardware organizer shelf system you built. I have close to 30 of those (HDX) small parts organizers and currently they're stacked 8 high on shelves, forcing me to pull all the organizers down to get to the one I want. Interested in what dimension lumber you used, both for the box and the rails to separate the bins. 5/5/2021 03:39:47 pm
Thanks for the tip about how your hardware organization solutions will differ depending on your workflow. However, I'd like to just get a good idea of how to organize my everything. Then I could know what I have and what I need to buy from the hardware store. 9/10/2021 01:02:50 pm
I agree that less is best when organizing. I want to have fewer shelves. That way I can have more open space to enjoy. 9/8/2022 08:02:12 pm
Shelving does seem like the way to go. I need to get something to store all of my wood. I'll have to order something online.
Shelley P Ashfield
4/6/2024 06:25:38 am
Lady here. Leave a Reply. |
Categories
All
NewsletterShop Hacks exists to help you Build Your Space! Archives |

- Home
-
Improve your Workspace
-
Dust Collection and Air Filtration
>
- Table Saw Dust Collection
- All About Cyclone Separators
- Dust Deputy and Dustopper Review and Comprehensive Scientific Testing
- Dust Sheriff Cyclone Separator
- Dust Collection System Options
- Air Filtration System Options
- Why clean air matters
- Is your shop air safe???
- How to maintain healthy air in your shop
- Dust Collection Resources and Links
- Why I became obsessed with dust collection and air filtration
- Storage, Organization, Efficiency >
- Improve your workshop floors and lighting >
-
Dust Collection and Air Filtration
>
-
Improve Your Tools
- Shop
- Contact


 RSS Feed
Get weekly blog articles and early bird discounts for new products
through the Shop Hacks Newsletter. Every Friday at 3:30 Eastern Time.
SUBSCRIBE to the weekly Shop Hacks Newsletter
through the Shop Hacks Newsletter. Every Friday at 3:30 Eastern Time.
SUBSCRIBE to the weekly Shop Hacks Newsletter
Site Map
© Copyright, Shop Hacks 2019