
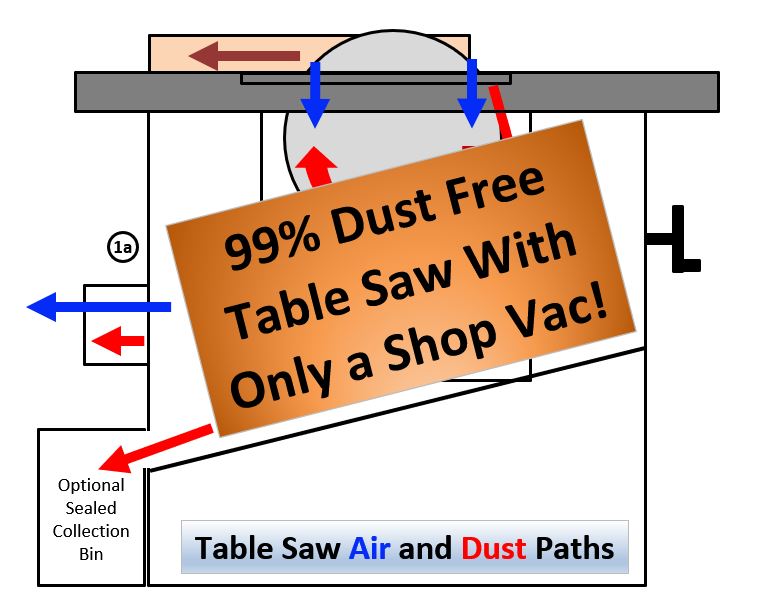
Table Saw Dust Collection -
Collect 99% of your table saw (or any tool) dust with only a shop vac.
Hear me out and don't click away when you read this next paragraph. I promise that it won't sound nearly as crazy after read how this can be done.
Using the method I'll outline in this article, your table saw dust collection will be just as effective using a $30 yard sale shop vac as with a $3,000 dust collection system. I've proven it using a laser particle counter to monitor air quality during all of my testing and development. Most of the time my shop air stays 5x cleaner than the outside air. I'll explain how to modify your table saw in this article but this principle works for any tool.
Using the method I'll outline in this article, your table saw dust collection will be just as effective using a $30 yard sale shop vac as with a $3,000 dust collection system. I've proven it using a laser particle counter to monitor air quality during all of my testing and development. Most of the time my shop air stays 5x cleaner than the outside air. I'll explain how to modify your table saw in this article but this principle works for any tool.
Sign-up for the Shop Hacks newsletter to receive free shop hacks like this every Friday at 3:30 Eastern Time. You can opt-out anytime.
Why does dust collection matter?
1. Without effective dust collection you will spend more time cleaning and less time making.
2. Breathing dust is as unhealthy as smoking. Like smoking, you can get away with it for a long time but it takes a toll on your health over time.
Effective dust collection should always be your first line of defense. An effective air filtration system should be a second line of defense. Both are required to maintain a safe work environment. You can expect to lose about 1% per year of your respiratory function if you work daily in a dusty environment. Don't sacrifice your health. https://www.ccohs.ca/oshanswers/chemicals/lungs_dust.html
Why use a shop vac?
1. Less Cost - You can plumb a shop vac to every tool in your shop for less money than a good dust collector will cost with no plumbing. Dust collectors last about 10x longer but a quality shop vac will last 500 to 1,000 hours which is a lifetime in most home shops. Plumbing a dust collection system with 6" pipe and fittings can cost thousands of dollars and it is very intrusive.
2. It's easy - You can plumb your entire shop to every tool in a single day with big box store supplies of 2" PVC pipe and fittings.
There are cases where a dust collector makes more sense. For shops that operate dust collection less than 10 hours per week I will argue that a dust collector is not the best choice in most cases.
Can you really capture 99% of your dust with a shop vac or is this just a theory???
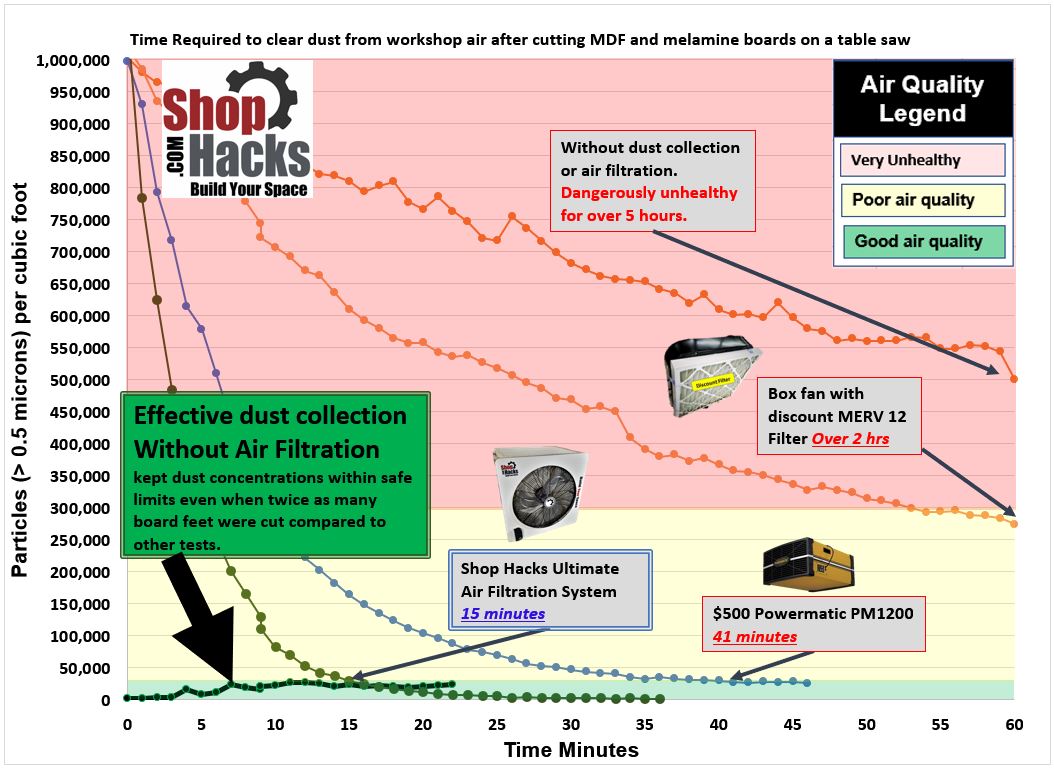
The test data below was gathered during research and testing phase of the the Shop Hacks Ultimate Air Filtration System Shootout. I cut about twenty feet of 1/2 MDF and twenty feet of 3/4" melamine while logging dust concentrations using a laser particle counter. The bottom green line represents the air quality while using effective dust collection with a shop vac setup... NO DUST COLLECTOR REQUIRED. It shows that the dust concentration in my shop never went out of the "good air quality" range while making twice as many cuts compared to all the other tests.
The test data below was gathered during research and testing phase of the the Shop Hacks Ultimate Air Filtration System Shootout. I cut about twenty feet of 1/2 MDF and twenty feet of 3/4" melamine while logging dust concentrations using a laser particle counter. The bottom green line represents the air quality while using effective dust collection with a shop vac setup... NO DUST COLLECTOR REQUIRED. It shows that the dust concentration in my shop never went out of the "good air quality" range while making twice as many cuts compared to all the other tests.
Effective dust collection at the source is the best way to save cleanup time and maintain a safe work environment and it is entirely possible to achieve using only a shop vac.
Effective dust collection should always be your first line of defense. However, even with good dust collection you still need an effective air filtration system . That's because a little bit of dust always escapes even with the best collection systems. The fine dust stays aloft for over 5 hours so the concentration just keeps building during the day. Coupled with effective dust collection, a good air filtration system keeps the dust concentration within healthy limits.
Effective dust collection should always be your first line of defense. However, even with good dust collection you still need an effective air filtration system . That's because a little bit of dust always escapes even with the best collection systems. The fine dust stays aloft for over 5 hours so the concentration just keeps building during the day. Coupled with effective dust collection, a good air filtration system keeps the dust concentration within healthy limits.
A $500 Powermatic PM1200 air cleaner took 41 minutes to bring the air quality back into the "good" range. Without dust collection or air filtration, the dust concentration remained in the unhealthy range for over 5 hours even after just one set of cuts were made. The Shop Hacks Ultimate DIY Air Filtration System required only 15 minutes to clear the air after the initial cuts, with no more cuts being made. Without effective dust collection at your tools, even the best air filtration system will not maintain healthy air quality.
The #1 takeaway from this test is that it is essential to capture as much dust as possible at the source rather than to try to filter it from the air after it escapes. An air filtration system, no matter how powerful, will not be able to maintain good air quality unless your shop is set up with effective dust collection. On the other hand, most dust collection isn't effective enough to prevent dust from building up to dangerous levels unless you also use an air filtration system. Both are required essentials to maintain a healthy environment.
The #1 takeaway from this test is that it is essential to capture as much dust as possible at the source rather than to try to filter it from the air after it escapes. An air filtration system, no matter how powerful, will not be able to maintain good air quality unless your shop is set up with effective dust collection. On the other hand, most dust collection isn't effective enough to prevent dust from building up to dangerous levels unless you also use an air filtration system. Both are required essentials to maintain a healthy environment.
So, what's the trick to capturing almost all the dust with just a shop vac?
In short, create a vacuum within a sealed volume that surrounds the dust coming off the blade. If air is flowing into the only opening then the dust simply cannot get out.
THE PRESSURE DIFFERENCE ACROSS THE THROAT PLATE IS ALL THAT MATTERS... not how much flow your vac or dust collector can produce. Only the air that flows across the slot in the throat plate matters.
Most tools have terrible dust collection design. They are equivalent to designing a house that needs a giant HVAC system because the owner didn't bother to seal the cracks or close the windows. That seems ridiculous but it is exactly the same as using a 600+ CFM dust collector to flow 25 to 80 CFM through the throat plate of your saw. The other 520+ CFM is just wasted energy and unnecessary flow.
Building vacuum pressure in an enclosure around the blade forces a high velocity stream of air through the throat plate even with a relatively low flow rate (100 CFM is more than enough in most cases), thus capturing all the dust. This will work with a small shop vac all the way up to a huge dust collector. In fact, with a sealed cabinet, a shop vac can pull MORE air through a zero clearance throat plate than a dust collector because it can create 5x more vacuum pressure than a dust collector. However, as I will discuss later, you don't want to create over 0.1 psi (2.8 in WC) of vacuum pressure. That is plenty to do the job. This method will work pretty well all the way down to about 0.5 psi (1.4 in WC).
To demonstrate how this works, consider the two setups below. Picture this being a cabinet saw to make it easy. However, we can use the same principle to achieve effective dust collection with ANY table saw or any tool.
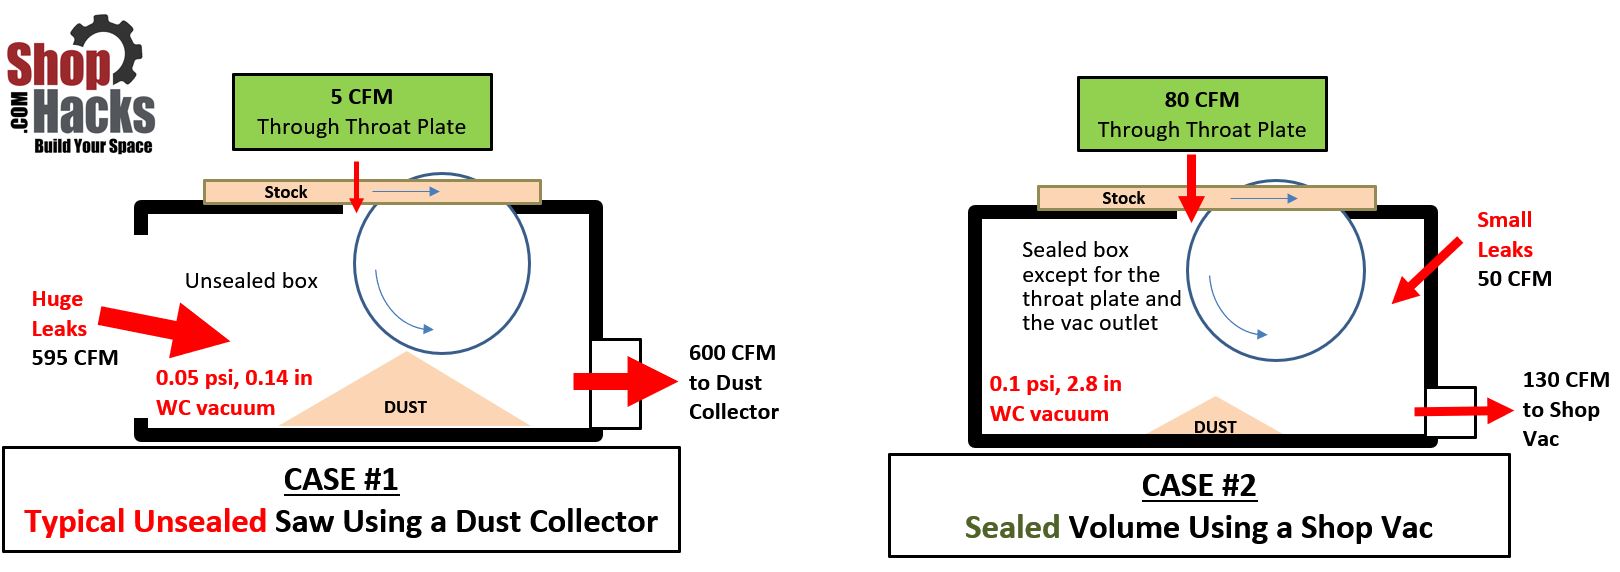
Case #1 represents a typical table saw setup with a shop vac or dust collector connected. 95% of the air flow goes through openings in the saw and NOT through the throat plate where you need it. All of the openings make it impossible to build up much vacuum pressure inside the cabinet so very little air is forced through the throat plate. It is similar to trying to air condition your shop with the doors and windows open. You can do the job with an industrial sized air conditioner but the right answer is to close the doors and windows and use an appropriately sized AC unit.
Case #2 represents a table saw with a (mostly) sealed volume around the blade. In this case there are still leaks but they are very small so the vac can create a vacuum pressure inside the volume with a fairly low flow rate (80 CFM or less). This vacuum pressure forces air through the throat plate which makes it much more difficult for the dust to escape as it comes off of the stock. Note: you don't want to completely seal the volume if it encloses the motor.
A vacuum pressure of 0.1 psi is enough to be very effective. This is equivalent to about 3" of water column (in WC).
NOTES to keep in mind (more details are provided later in the article):
1. Creating more than 0.1 psi vacuum pressure can cause large sheet goods to stick to the table making them hard to slide. Don't exceed this vacuum pressure.
2. The 50 CFM leak is needed to keep your motor cool when the throat plate is covered up and to reduce dust concentration in the cabinet so dust doesn't come back out the back side of the throat plate slot.
3. If you do production work where the motor is under continuous load for long periods of time, I recommend putting a temperature sensor on the motor before you make any changes to determine the normal operating temperature. Then you can adjust air flow after you seal up the cabinet to keep the motor temperature within acceptable limits.
Thought experiment:
If you connect a dust collector hose directly to a table saw throat plate it will flow less CFM through the slot than a shop vac will. Why? Because a dust collector can only produce around 0.5 psi vacuum pressure, max. A shop vac can produce about 6x to 7x that much. As a rule of thumb, a shop vac will flow more air than a dust collector when flowing through anything less than 3 square inches of open area. A dust collector will flow more air through anything with more than 3 square inches of open area (a 2" ID hose or pipe). The length of the hose or pipe and the surface roughness make a difference too but you can use this as a general rule of thumb.
Are you ready for a change for the better?
Do you know anyone who still uses an outhouse? Probably not, but it was the accepted way for hundreds of years until a better way came along. Today I'll show you how to move from the old way of collecting dust by using super-expensive and bulky dust collectors to a new paradigm that will save you time, space, and a LOT of money! It will protect your health at the same time. Let's dig in and Build YOUR Space!
Do you know anyone who still uses an outhouse? Probably not, but it was the accepted way for hundreds of years until a better way came along. Today I'll show you how to move from the old way of collecting dust by using super-expensive and bulky dust collectors to a new paradigm that will save you time, space, and a LOT of money! It will protect your health at the same time. Let's dig in and Build YOUR Space!
I have a lot of respect for Bill Pentz. If you aren't familiar with Bill, he has one the best dust collection information websites that I've found to date. I've had a couple lengthy conversations with Bill about dust collection and he agrees that the published recommendations for effective dust collection flow rates are very high because most tools are not designed for effective dust collection. They are designed to remove bulk dust only.
There's only so much air that you can flow through the throat plate of a table saw. It is certainly well under a 100 CFM if you use a zero-clearance throat plate. The rest of the flow a dust collector creates is just wasted. As I mentioned earlier, it's like trying to air condition a house with the windows and doors open.
After reading and implementing the modifications outlined in this article, you will be able to achieve more effective dust collection with 100 CFM than you could previously with 600 CFM. As noted in the first figure in this article, using a laser particle counter, I've tested and proven that this works so it's not just a theory. It works and it works very well!
Dust is an enemy for several reasons...
1. It has to be cleaned up which means less time building, making and fixing, and more time cleaning
2. It gets everywhere. The Shop Hacks Ultimate Air Filtration System does an outstanding job of removing dust from the air faster than any commercial system costing 5x more, but no air cleaner can keep up with a shop that doesn't have effective dust collection.
3. Breathing dust is like smoking... you don't notice the health effects for a long time (usually) but over time it takes a toll on your health. Related health issues include but are not limited to: COPD, allergies, cancer an inflammation that triggers many diseases.
The very fine dust reaches the full extents of your lungs where it enters your bloodstream, so it is the most problematic. Imagine the glues, formaldehyde, and other chemicals that are used in wood being injected into your bloodstream. That happens on a very small level every time you make a cut without effective dust collection and filtration.
|
This chart is from the All About Cyclone Separators page. It illustrates how the smallest dust particles are the most unhealthy because they aren't naturally filtered by your lungs like visible dust particles are. (ignore the cyclone efficiency curves and focus on the red, yellow, green regions)
In general, particles under 10 microns are the most problematic. Particles under 50 microns are not visible to the human eye without magnification. You need to capture dust close to its source and filter it out using high quality filters to protect yourself from the long term health effects of breathing dust. |

|
Characterizing the problems so we can deal with them one at a time.
|
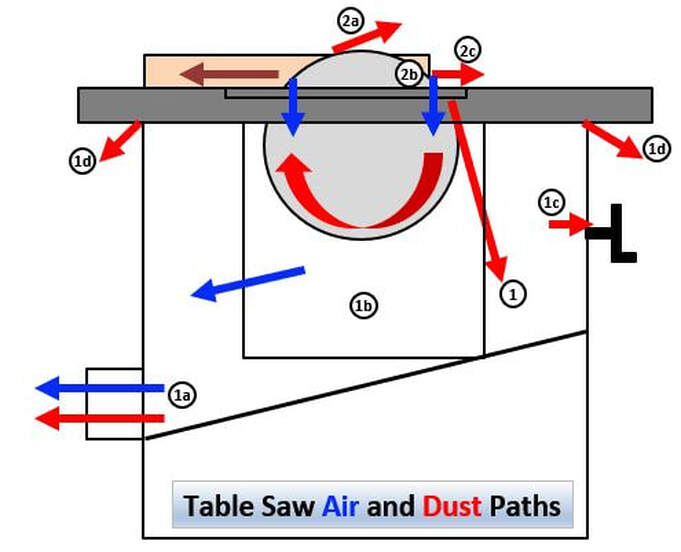
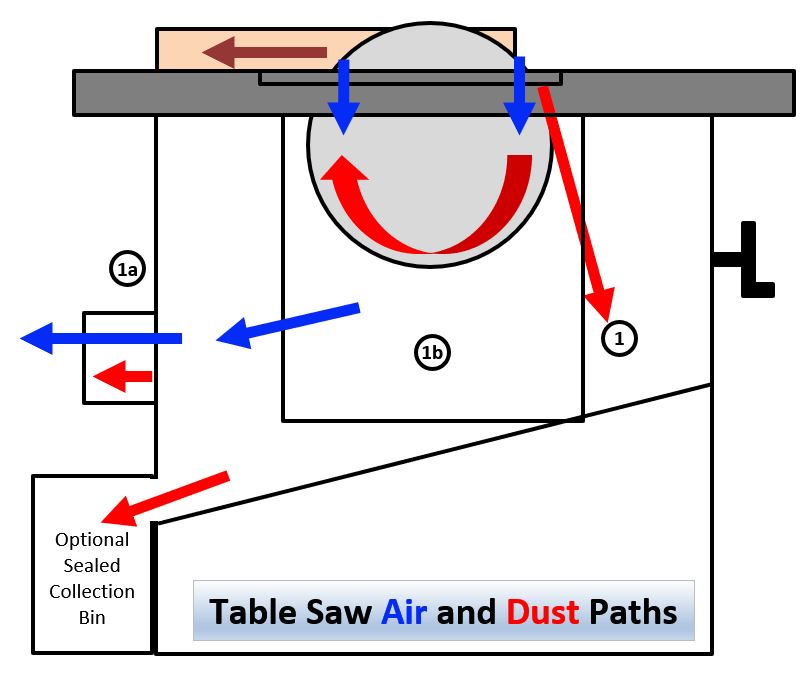
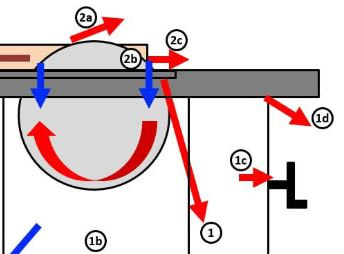
If you think about where the dust goes when you make a cut with your table saw it will be easier to deal with each area, one at a time...
1. 90% of the dust comes off of the bottom of the stock and into your table saw cabinet (1). Work on containing and capturing this dust first. Table saws are designed with MANY openings where dust can escape. Of the dust that makes it into the cabinet (1), it goes to... 1a. To the base and then to the dust collector, if you have one. 1b. Through the openings in the cabinet 1c. Through the elevation crank arm slot 1d. Through the gaps between the table and the cabinet. |
2. The rest of the dust comes off of the top of the stock (2a, 2b and 2c).
Depending on the alignment of your blade to your fence and how true your blade runs, a significant portion of the dust coming off the top comes from...
2a. Off of the top of the stock. Some dust is pulled from the concentrated dust cloud inside the cabinet and some is from recutting of the stock due to the blade hitting the stock as it passes the teeth on the back side.
2b. If you are cutting less than a full blade width off of the stock then a lot of dust comes off the side where the teeth cut the stock 2c. You will also get a burst of dust as the blade exits the trailing edge of the stock. This dust usually ends up in your lap or pockets and on the floor.
I use a laser particle counter to determine how effective different techniques are at maintaining air quality. Even though only a small percentage of the dust comes off the top of the blade, I have not always been able to maintain good air quality over a long series of cuts unless I use some type of over blade dust collection or containment. It depends on the material that I am cutting.
So... what are the tricks to capture 99% of your table saw dust with less than 100 CFM of air flow?
In a nutshell -
1. Seal your saw cabinet enough to create a vacuum of at least 1.4 in-WC (0.05 psi). Do not exceed 2.8 in-WC (0.10 psi) or the vacuum will cause your stock to stick to the table making it difficult to move.
2. Include a 1/2" hole on the trailing edge of your throat plate to allow a significant amount of clean air to flow into the cabinet across the rear of the blade. You also need enough air flowing through the cabinet to keep the dust concentrations down so it isn't shot back out the top by the blade. You also need enough flow to keep your motor cool. 100 CFM total should be enough to keep a 3-hp motor within an acceptable operating temperature.
3. Contain or capture the dust coming off the top of the blade.
I built the test system shown below so I could easily explore the limits and understand exactly how well the saw cabinet needs to be sealed up to have effective dust collection on the bottom side. The lessons learned work just as well on my 3hp Delta Unisaw.
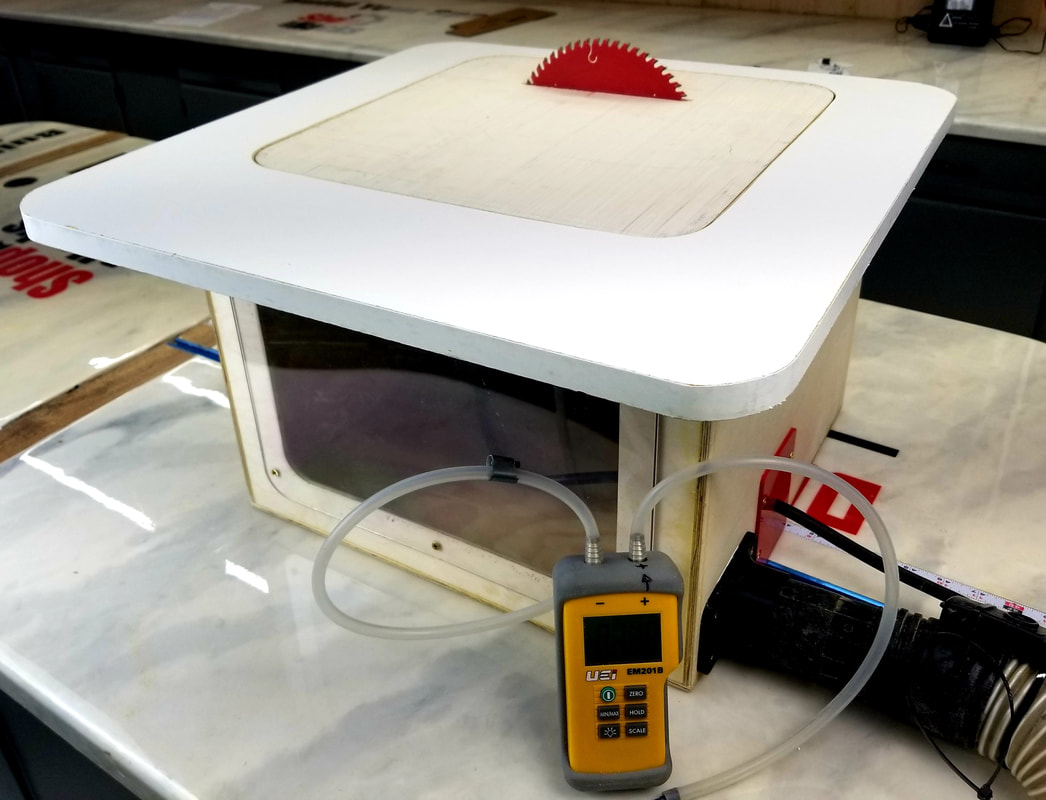
Initially, I sealed the system very well and it was maintaining a 1psi vacuum and pulling all the air across the blade through the throat plate. It worked well and captured 100% of the dust off the bottom side. However, I found that it is possible to have too much vacuum which meant not enough flow to keep the dust concentration inside the cabinet low. When I moved the stock over the blade slot it created a force pulling the stock to the table which made it very difficult to slide. I had to dial the vacuum back to less than 0.1 psi before that effect wasn't felt.
My saw cabinet is about 3 cubic feet in volume. That means a 150 CFM shop vac will pull in enough air to replace all the air in the cabinet in just a little over one second. That means the blade is moving through relatively clean air which means less dust gets pulled out as it rotates.
Lesson Learned: Don't seal your cabinet so well that you don't pull enough clean air in to keep the dust concentrations inside the cabinet down to a low level. Aim for a vacuum between 0.05 and 0.10 psi. With any shop vac or dust collector, this will allow enough air flow to keep your motor (up to 3hp at least) cool and to keep the dust concentration in the cabinet minimized. You need enough air flow through the cabinet to lower the dust concentration because the gullets of your saw blade act like a pump, pulling whatever concentration of dust that's in the cabinet back out into the shop air.
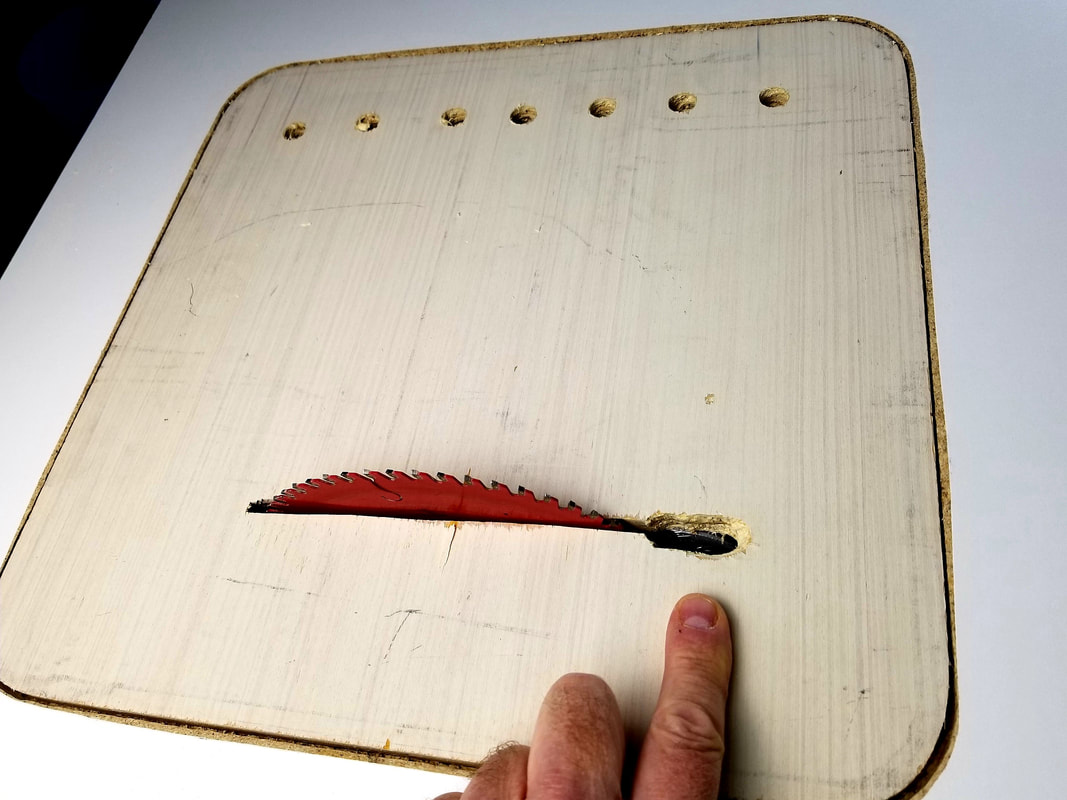
Next, as shown below, I added a large hole on the rear of the blade slot to allow more air to flow past the blade. This may seem counter intuitive since you don't want dust to come out of the rear of the slot but adding a larger hole allows more flow which allows the vac to clear the cabinet of dust so there's less dust to pull up. It also allows a significant volume of air to flow across the blade to "wash" the dust off before it comes out. Using a laser particle counter to monitor my shop air quality, there was ZERO increase in dust concentrations in the air after cutting several feet of 1/2" plywood. This method was VERY effective.
I kept adding holes to the plate (upper portion of the picture) to allow more air flow to clear the dust cloud inside the cabinet. I kept making cuts until I saw the counts star rising once the vacuum inside the cabinet dropped about 0.05 psi (1.4 in-wc). Once it dropped to 0.05 psi the particle counter started creeping up after each cut. That was not enough vacuum to create enough flow over the blade to keep the dust inside the cabinet. Keep working on sealing your cabinet until you can reach a vacuum of 0.1 psi with whatever dust collection method you choose.
My saw cabinet is about 3 cubic feet in volume. That means a 150 CFM shop vac will pull in enough air to replace all the air in the cabinet in just a little over one second. That means the blade is moving through relatively clean air which means less dust gets pulled out as it rotates.
Lesson Learned: Don't seal your cabinet so well that you don't pull enough clean air in to keep the dust concentrations inside the cabinet down to a low level. Aim for a vacuum between 0.05 and 0.10 psi. With any shop vac or dust collector, this will allow enough air flow to keep your motor (up to 3hp at least) cool and to keep the dust concentration in the cabinet minimized. You need enough air flow through the cabinet to lower the dust concentration because the gullets of your saw blade act like a pump, pulling whatever concentration of dust that's in the cabinet back out into the shop air.
Next, as shown below, I added a large hole on the rear of the blade slot to allow more air to flow past the blade. This may seem counter intuitive since you don't want dust to come out of the rear of the slot but adding a larger hole allows more flow which allows the vac to clear the cabinet of dust so there's less dust to pull up. It also allows a significant volume of air to flow across the blade to "wash" the dust off before it comes out. Using a laser particle counter to monitor my shop air quality, there was ZERO increase in dust concentrations in the air after cutting several feet of 1/2" plywood. This method was VERY effective.
I kept adding holes to the plate (upper portion of the picture) to allow more air flow to clear the dust cloud inside the cabinet. I kept making cuts until I saw the counts star rising once the vacuum inside the cabinet dropped about 0.05 psi (1.4 in-wc). Once it dropped to 0.05 psi the particle counter started creeping up after each cut. That was not enough vacuum to create enough flow over the blade to keep the dust inside the cabinet. Keep working on sealing your cabinet until you can reach a vacuum of 0.1 psi with whatever dust collection method you choose.
|
Conclusion: To achieve effective dust collection, seal your cabinet until you achieve a cabinet vacuum of between 1.5 to 3 inches of water column (0.05 to 0.10 psi) with whatever vacuum source you are using and include a hole near the trailing edge of the blade slot to reduce the amount of dust being pulled out by the blade.
Using a shop vac you will have to seal the cabinet much tighter to achieve this than you will if you use a dust collector. I didn't take any great pains to seal my cabinet air tight and I get about 0.06 psi vacuum using my shop vac. You can test the vacuum in your saw cabinet with a simple DIY water manometer or you can purchase an inexpensive digital pressure meter (affiliate link). The digital pressure meter will come in very handy as we work through effective dust collection for your other tools in upcoming articles. |

|
How to seal your saw...
Since most of the dust that contaminates your air comes off of the bottom of the stock out out of our table saw cabinet, let's start there. You will know you have succeeded when you test the vacuum created inside your cabinet and it is at least 1.5 in-wc or 0.06 psi.
NOTE: The ultimate goal is to have a TOTAL open area of less than 2 square inches, including the throat plate if you plan to use a shop vac. That may seem easy but if you consider the throat plate will use up anywhere from 0.5 (zero clearance plate with rear hole drilled) to 1.5 square inches of that open area. That only leaves you with 0.5 square inches of open area for the rest of the saw cabinet. You can probably get away with closer to 10 to 15 square inches of open area with a dust collector and still maintain the required 1.5 in-wc vacuum in the cabinet but at the expense of a lot more cost and wasted space.
Another NOTE: I know... it looks like a hack job ;-) Don't judge me by the looks. Judge me by the performance! I know this looks terrible but the only thing I cared about a couple years ago when I did this was getting my dust concentration readings down on the particle meter. I accomplished that goal with this very fast and ugly fix. Fortunately, no one except me has ever seen this before now. Focus on the results. You can do yours this way or you can make it look great. I don't care but just seal up your saw so you aren't breathing dust. I do care about your health and about how much more you can enjoy your workshop!
Cabinet Saws
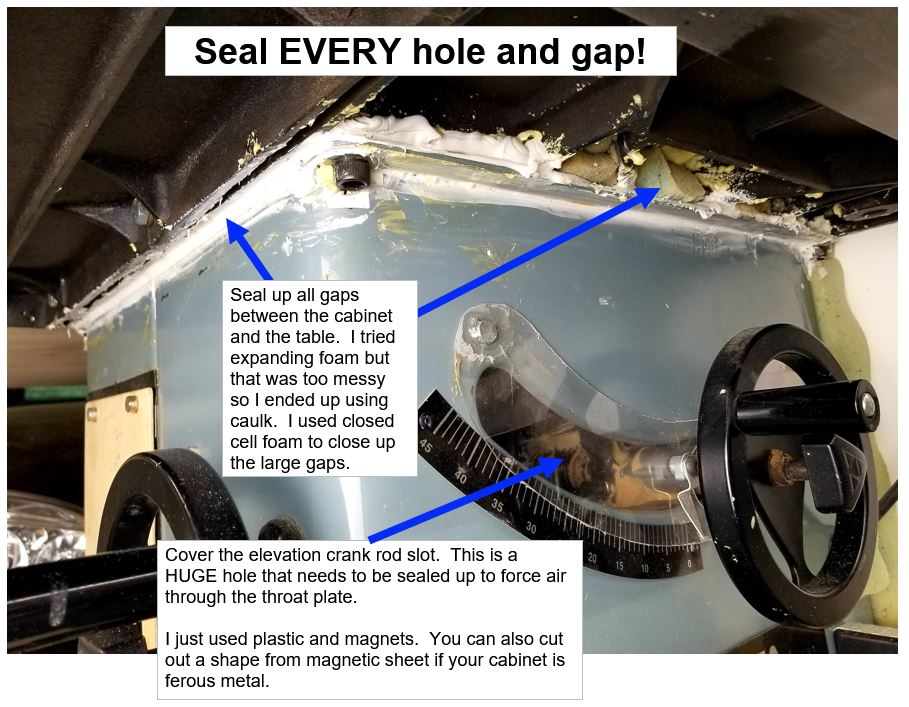
I own a Delta Unisaw (cabinet saw). Cabinet saws are the easiest to seal up but any saw can be sealed with a little ingenuity. I did the following to seal up my saw. It is still "leaky" but it is still tight enough to acheive a 1.5 in-wc vacuum which works very well:
1. Caulk every seam in the sheet metal from the inside.
2. Fill all other gaps, including the gaps between the cabinet and the table. I used a combination of caulk and closed cell foam. Some people have take the time to scribe a board to fit this gap. I wasn't concerned about the looks since it is an area no one will ever see so I chose the fast and easy route.
3. Close off the elevation crank slot. I just super glued magnets to a think piece of plastic that I cut with scissors. Others have cut out a sheet of magnet strip. This is pretty important so don't neglect this step. My saw had another slot in the rear that I had to seal up also.
4. Not shown... I built an integrated downdraft table that that seals off the open side where the saw motor protrudes. However, you can construct a simple box from 1/4" ply or lauan with flanges to screw it to the cabinet. Make sure you caulk the flanges where it mounts to the cabinet. You can build it similar to how I built the test box shown earlier in the article. I just glued and pin nailed 5 pieces of 1/4" ply to make the box. It's super fast and easy to do. You will need to add flanges to yours and seal the inside with caulk.
5. I used a hole saw to bore a 1.875" hole in my saw cabinet to attach the shop vac. I plan to add a sealed dust collection bin outside the rear of the saw so my vac inlet is above where the sawdust collects in the cabinet so I don't fill the vac nearly as quickly with dust.
Regarding the dust collection port location...
At this point you have two options... Place the vac hose at the lowest point in the cabinet so all the dust is funneled into it or place the hole higher so it only captures the fine dust in the air and make another hole that leads to a sealed collection container. See the figure below for more details. I'll write another article to show how to do that later.
Contractor Saws
Contractor saws are more of a challenge to seal but you will use the same principles to make it work.
Contractor saws are more of a challenge to seal but you will use the same principles to make it work.
|
A few of the common differences with contractor saws include ...
1. The bottom is usually completely open 2. The cabinet is not typically steel so magnetic sheets to block the elevation crank slot won't work. 3. On old models the motor may mount outside of the cabinet with a belt between a motor pulley and the arbor shaft pulley. I haven't tried to seal up a contractor saw so I may be missing some small details but this should get you 99% the way there... |
Start by sealing up the bottom. I would do the same way I suggested earlier and build a box out of 1/4" plywood or lauan. I always make my first prototypes out of cardboard and duct tape so I can move quickly and cheaply. Once I get everything the way I like it I make the final version out of something more durable. Sometimes I find that the cardboard prototype is good enough and I never change it.
Add an angled chute to gravity feed the dust into the sealed box. Make the chute portion permanent and the collection bin removable to you can empty it. You can also simply connect the shop vac to the bottom of the chute and not include a collection bin at all. You can use a cheap retail dust hood made just for this.
Add an angled chute to gravity feed the dust into the sealed box. Make the chute portion permanent and the collection bin removable to you can empty it. You can also simply connect the shop vac to the bottom of the chute and not include a collection bin at all. You can use a cheap retail dust hood made just for this.

As with the cabinet saw, you have to seal up all of the other openings on the saw cabinet until you have less than 2 square inches total open area, including the throat plate opening. If your cabinet is not ferrous metal you can use Velcro to secure the elevation crank shaft slot cover. However, that will allow some air to pass through the Velcro so you may have to experiment.
Seal between the table top and the cabinet as well as ALL other openings, seams and slots.
If you have a very old saw with the motor hanging off the back then just build an outfeed table with a box under it that encloses the entire motor and belt system. Make sure you make it large enough to accommodate the full range of motion of the motor as the saw blade is raised, lowered, and tilted.
As before, you will know you have succeeded when the cabinet vacuum reaches at least 1.5 in-wc or 0.06 psi.
CAUTION: Your saw motor produces a substantial amount of heat which can build up quickly and can cause damage if you don't draw enough air through the cabinet. Most shop vacs will pull 100 to 200 cfm at the pressure differentials we are dealing with here. That is enough to keep a 3 hp motor cutting heavy stock to within safe operating temperature limits.
------DO NOT OPERATE YOUR SAW FOR MORE THAN A FEW MINUTES OUT OF EVERY 20 MINUTES WITHOUT PROVIDING AIRFLOW THROUGH THE SEALED CABINET OR YOU CAN CAUSE DAMAGE BY OVERHEATING THE MOTOR------
------DO NOT OPERATE YOUR SAW FOR MORE THAN A FEW MINUTES OUT OF EVERY 20 MINUTES WITHOUT PROVIDING AIRFLOW THROUGH THE SEALED CABINET OR YOU CAN CAUSE DAMAGE BY OVERHEATING THE MOTOR------
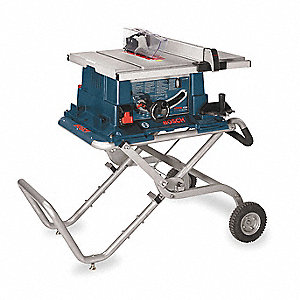
Cabinet or contractor type saws with built-in blade shrouds
There are several saw brands that now include blade shrouds that duct much of the dust out the back of the saw through a vac port.
There are several saw brands that now include blade shrouds that duct much of the dust out the back of the saw through a vac port.
|
|
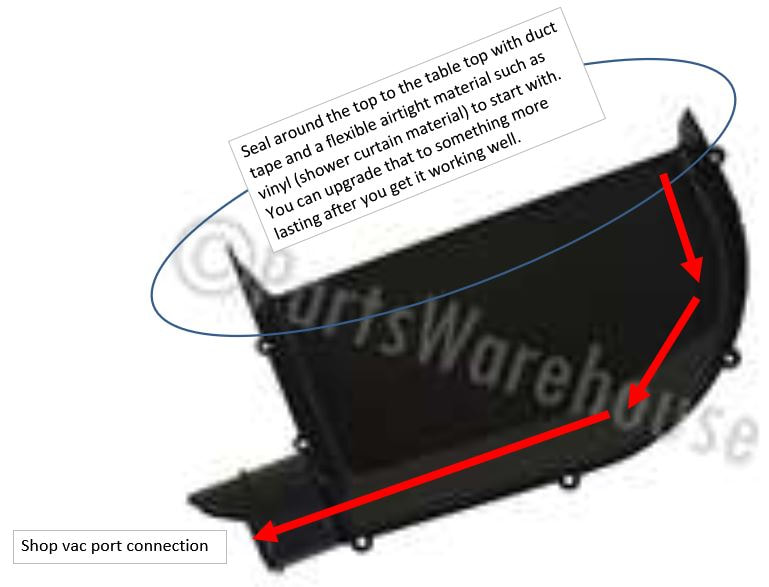
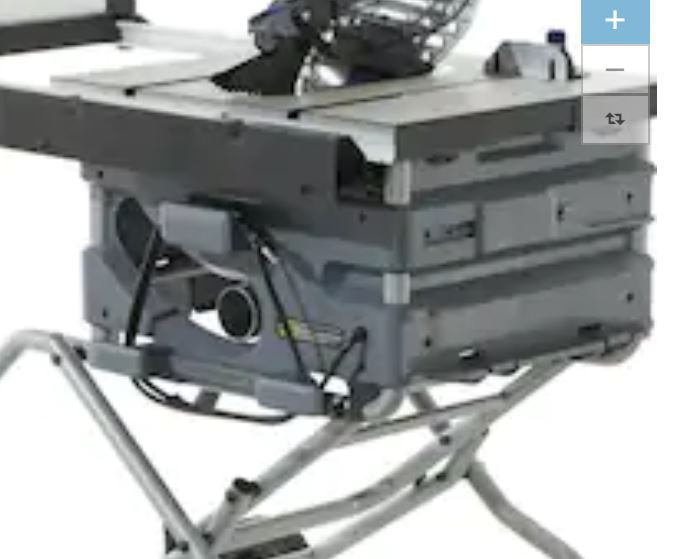
There are a couple of ways to go with these saw. One is to remove the shroud and enclose the entire base as discussed earlier in this article and put an airtight dust bin under it.
A better way IMO is to finish sealing up the shroud that they placed around the blade. The problem with the current designs is that they have too much open area so not enough air velocity is created to keep the dust contained in the shroud. You just need to add some flexible airtight material between the top of the blade shroud and the bottom of the table. I would start with some old shower curtain and duct tape and close it completely up at the top. Make sure the ONLY opening in the shroud is the opening where you connect the shop vac or dust collector. Using a flexible material will still allow the blade to tilt but it will force the airflow through the throat plate of the saw. With a shop vac connected to the outlet, you will find that you have almost zero dust coming off the saw anymore.
A better way IMO is to finish sealing up the shroud that they placed around the blade. The problem with the current designs is that they have too much open area so not enough air velocity is created to keep the dust contained in the shroud. You just need to add some flexible airtight material between the top of the blade shroud and the bottom of the table. I would start with some old shower curtain and duct tape and close it completely up at the top. Make sure the ONLY opening in the shroud is the opening where you connect the shop vac or dust collector. Using a flexible material will still allow the blade to tilt but it will force the airflow through the throat plate of the saw. With a shop vac connected to the outlet, you will find that you have almost zero dust coming off the saw anymore.
Over-blade Dust Containment/Collection
I ran some tests cutting 1/2" plywood and the particle count in my shop remained well under half of the safe limit after cutting several board feet. The particle counts did rise a little so I believe if I were to cut for more than a few minutes straight I would need to have my Air Filtration System turned on to keep the air in check. I believe my air filtration system would be able to keep up with the small amount of dust that was escaping. However, if I were to cock a board as it went through the blade or if I were running a cheap blade that has a lot of run out, I would probably see the particle counts move up into the very unhealthy range.
There are several cases where you won't be able to maintain quality air in your shop unless you use an over-blade dust collection system. They include...
1. If your fence or miter slot are not aligned parallel to your blade the stock will run into the teeth when they pass the rear teeth of the blade. That will cause recutting which will create dust that can't be captured in the cabinet.
2. If your blade is not very flat it will recut the stock from the backside and possibly burn the wood as you pass it through.
3. If you are cutting wood that has built in stresses and it pinches the rear of the blade which causes recutting.
4. If you move the stock into the side of the blade as you pass it through. This will cause recutting.
For this reason I recommend running an over-blade dust collection system. I will introduce a new Shop Hacks product in the near future that is a step up from any over-blade dust collection systems you've seen so far. My over-blade collector also takes care of situations 2b and 2c illustrated in the figure below. However, there's another method that I use that works quite well. This method will work with saws equipped with riving knives but it will not work with saws using splitters that protrude above the height of the blade.
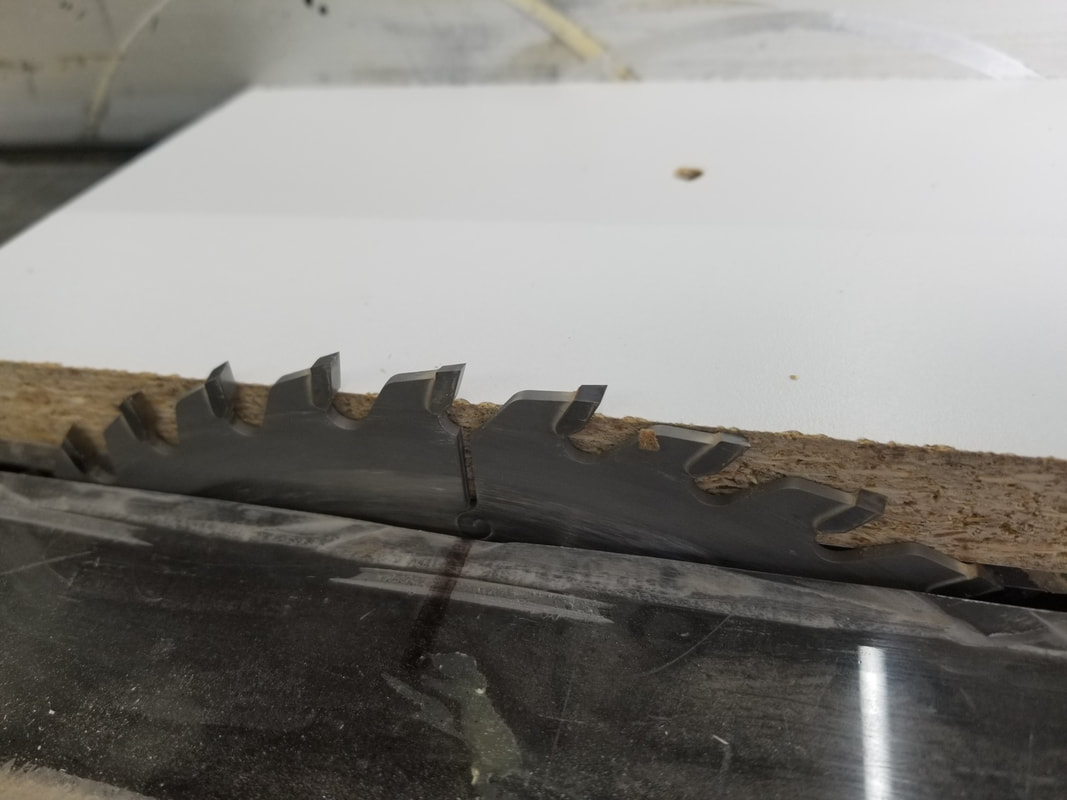
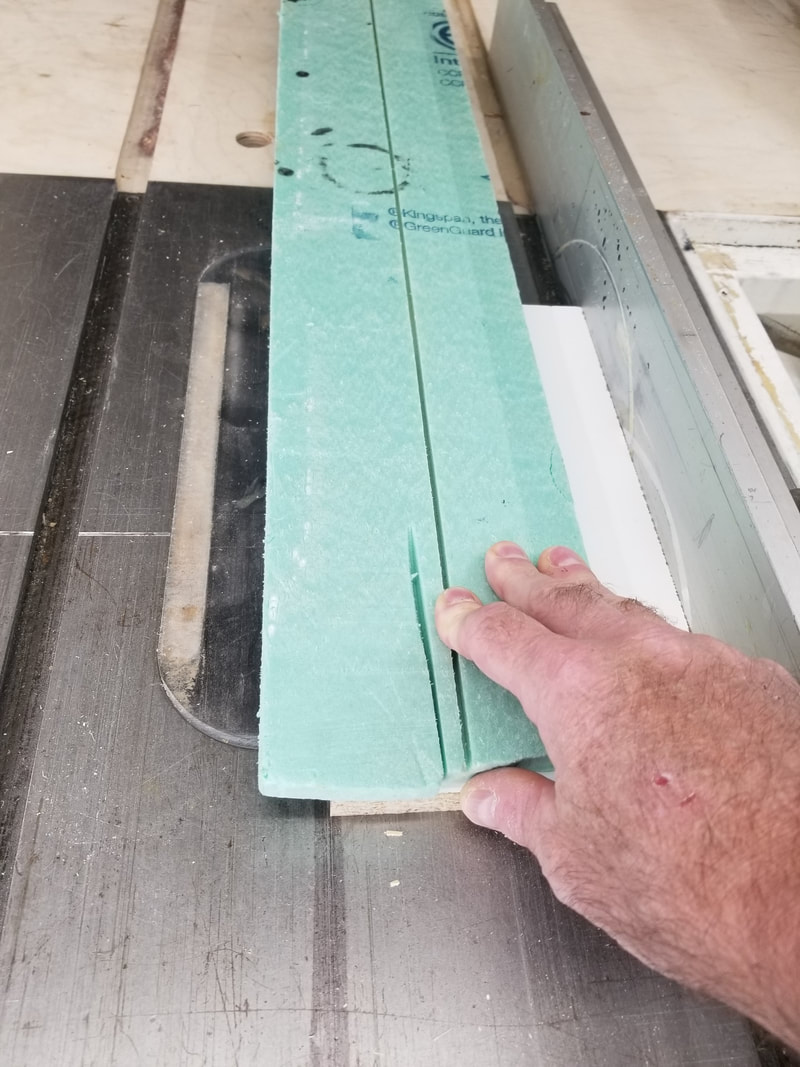
It is a rather simple but elegant solution... simply raise your blade so that the teeth are about 1/4" above the height of your stock and place a piece of hard foam board over the stock to force any dust that comes off the top of the blade back down into the cabinet. It works very well.
WARNING: The foam board blocks you from seeing the blade. If you use this method make sure you know exactly where the blade is so you don't cut through a finger or thumb. I mark a 1/8" wide line on my table top that represents the plane of the blade. Use this method at your own risk. I'm not condoning it for anyone who is not absolutely sure they have the confidence and discipline to use it in a safe manner.
WARNING: The foam board blocks you from seeing the blade. If you use this method make sure you know exactly where the blade is so you don't cut through a finger or thumb. I mark a 1/8" wide line on my table top that represents the plane of the blade. Use this method at your own risk. I'm not condoning it for anyone who is not absolutely sure they have the confidence and discipline to use it in a safe manner.

You are now armed with all the knowledge you need to make your table saw dustless with just a shop vac.
Questions, Comments, Discussion....
I will answer questions or and take comments about this article in this thread. I encourage you to add your questions and comments there.
Shop Hacks exists to help you Build YOUR Space!
Getting control of the dust is one of the first steps to creating a destination workshop that you enjoy working in as much as you enjoy the projects that you make there. I plan to share more articles in the future to show you how to make all of the major tools in your workshop dust free with a simple and cheap shop vac. Stay tuned!
Next Article - Build your own DIY Ultimate Air Filtration System
As an Amazon Associate I earn from qualifying purchases
As an Amazon Associate I earn from qualifying purchases