|
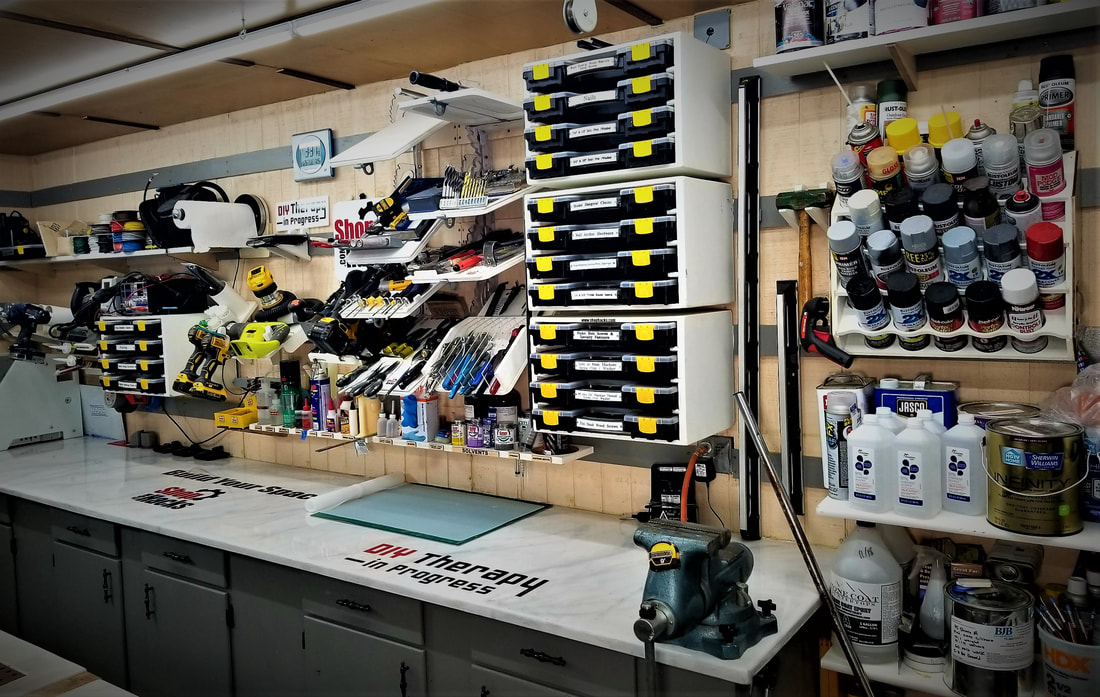
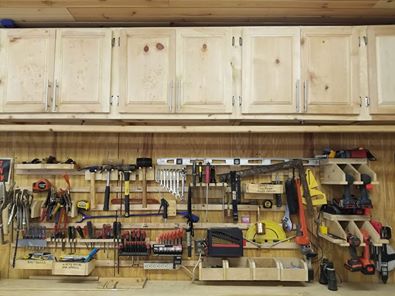
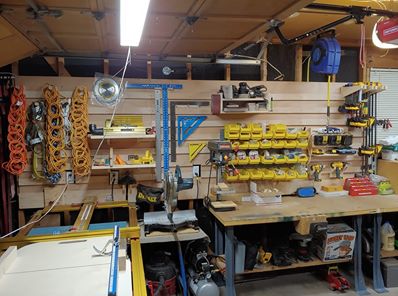
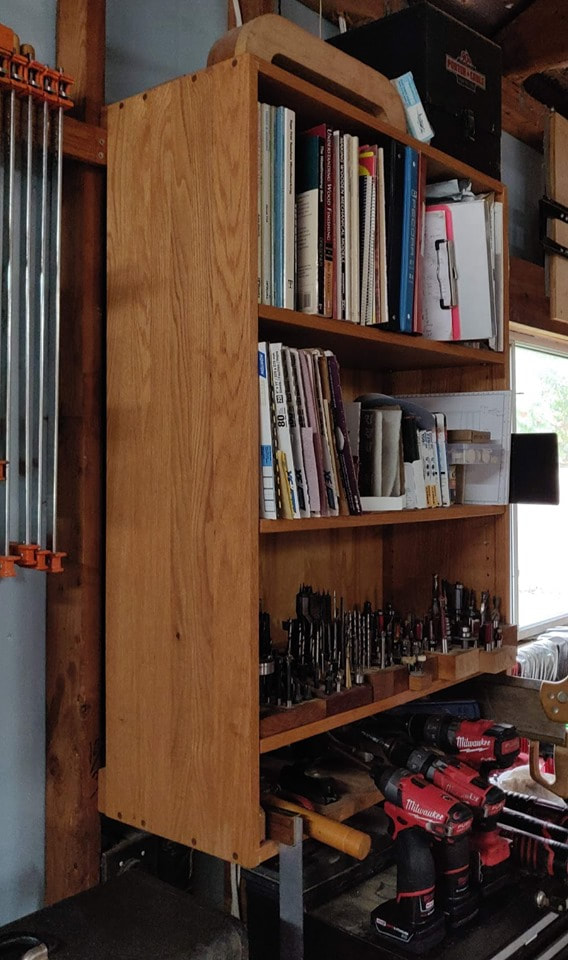
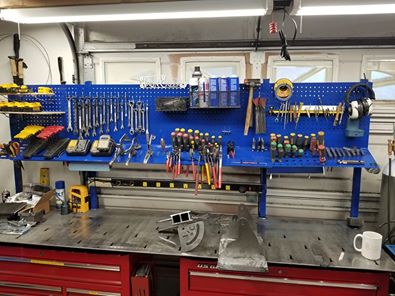
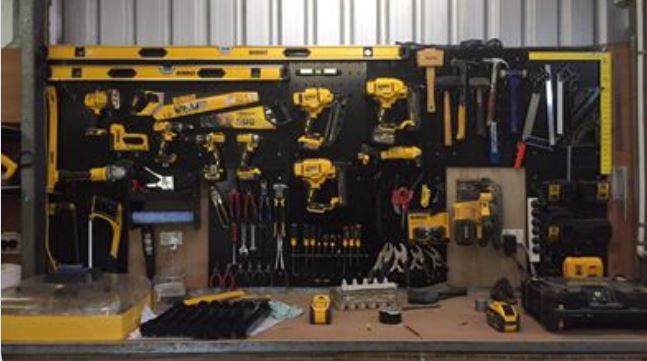
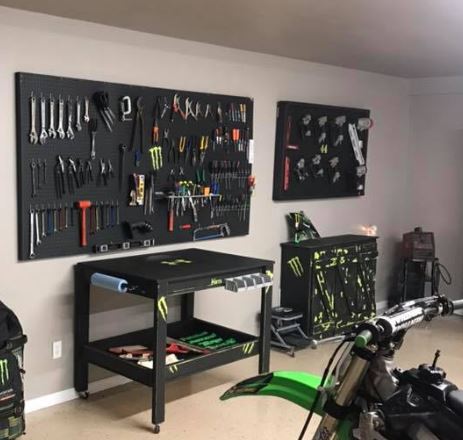
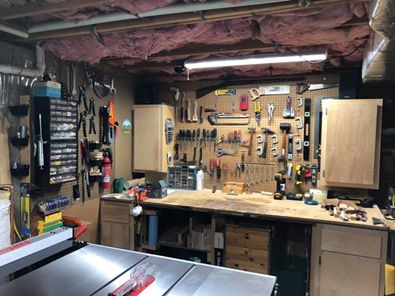
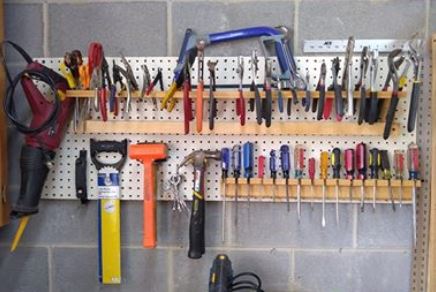
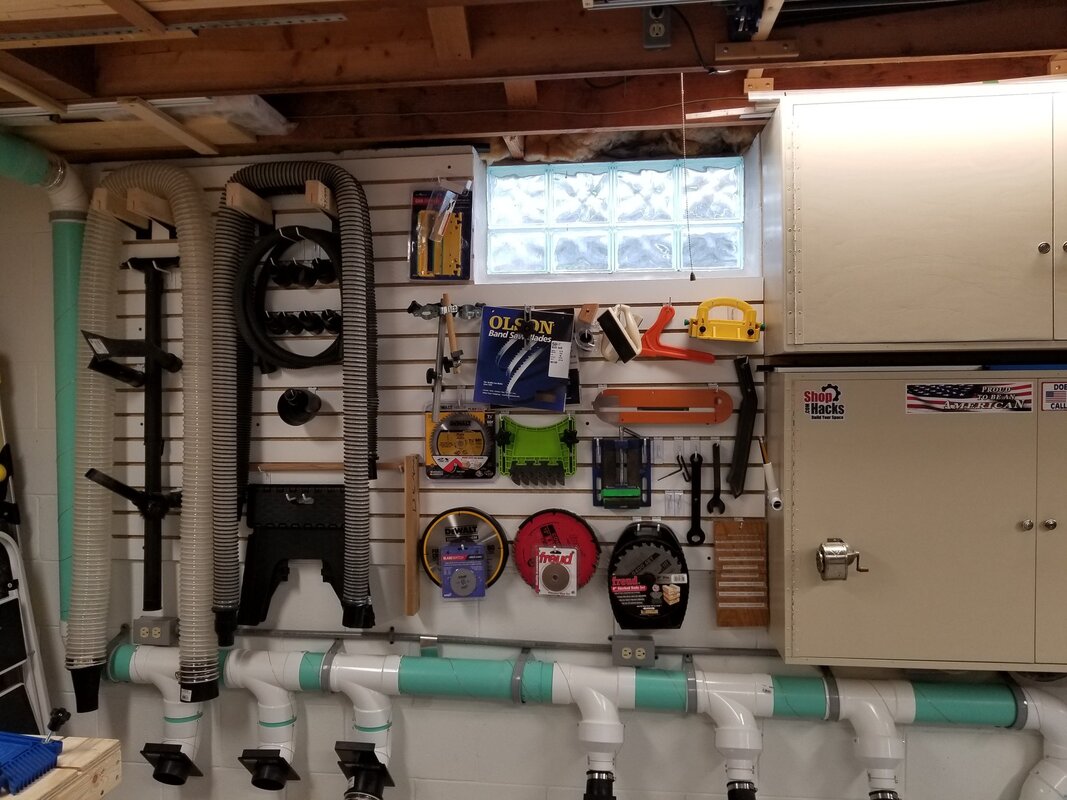
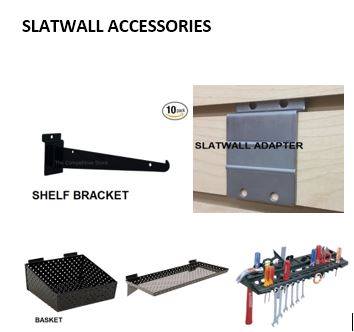
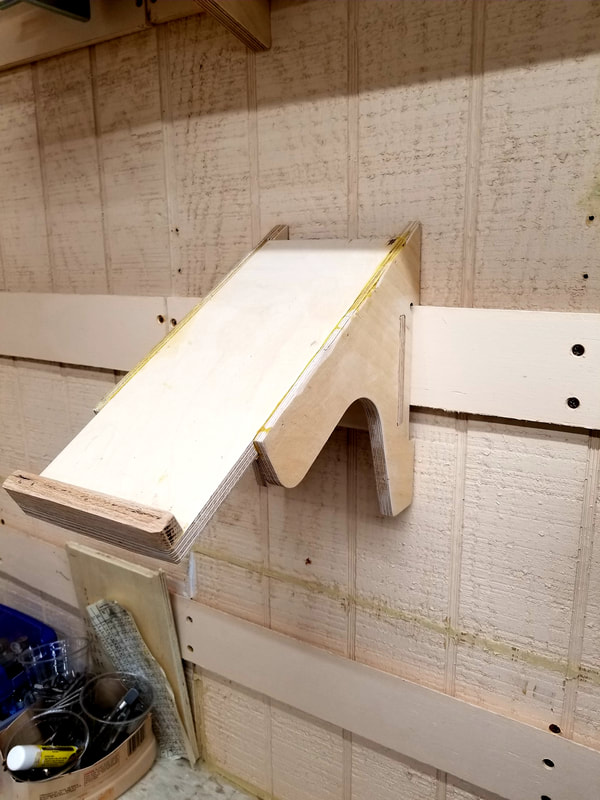
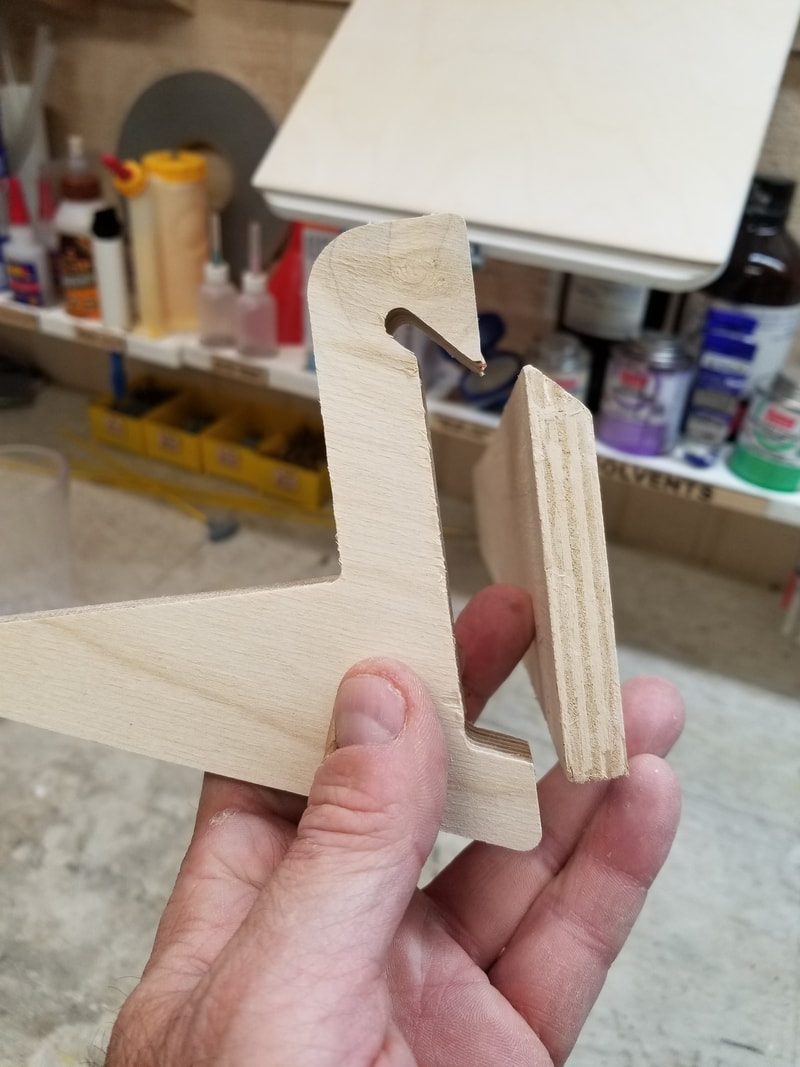
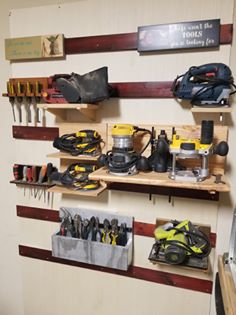
If you would like to receive FREE Shop Hacks like this every Friday at 3:30 Eastern Time... subscribe below... What are your Tool Organizer Options and what might work best in your shop? There are 6 popular types of tool organizers... 7 if you count the pile of tools on your workbench ;-) The following poll was taken in the Shop Hacks Facebook group regarding which system you like the best... 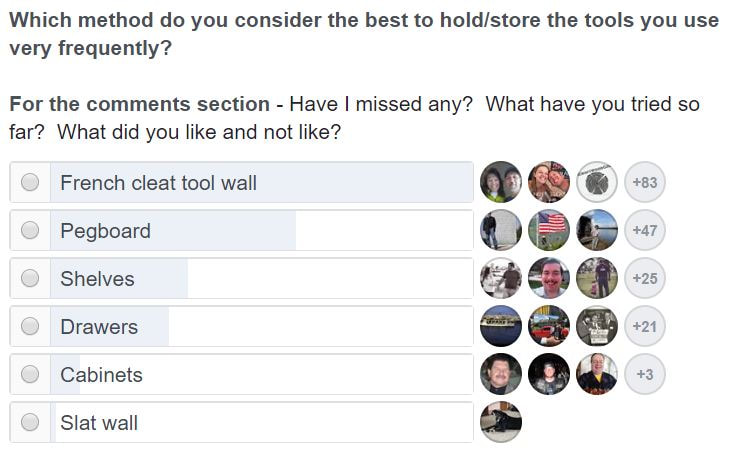 I was a little surprised about how much French cleats came out ahead of the rest of the options combined, but I understand why. I'll start with some pictures of each of the popular DIY options then we will get into which ones work best for different situations. At the end of the article I'll show you some of the systems available that you can purchase ready-made. Note... Don't miss next week's article because I will introduce a new organization product that you can use to Build YOUR Space! I'm excited to unveil this innovative but simple and inexpensive Shop Hacks system to all of you! I've improved on an already great system and I'll offer it in a package that takes the hassle out of organizing your workshop! Stay tuned... French Cleats - everything on my tool wall is hanging on a french cleat. I like them because they make it very easy to evolve my tool wall as my workflow and needs change. It is also cheaper and more versatile than any other system. French cleats are really the most versatile option because you can still use all of the other options on a French cleat wall. You can hang cabinets or drawer modules, shelves or even sections of pegboard is you want to. Pictures of Shop Hacks Facebook Group members French Cleat Setups Pegboard is the next most popular option. That's understandable since pegboard is readily available, is relatively cheap, has a wide variety of accessories available and has been around since our grandfathers were working in their shops. The photos below were submitted by members of the Shop Hacks Facebook group. Particularly interesting is Mike Gallucci's blue powder coated metal pegboard workbench design. Great job Mike and thanks for sharing your innovative creations with the group! Slat Walls show up from time to time and they are just as versatile as French cleat walls but they are not nearly as popular for some reason. I believe they are more popular in Europe than in the US. There are a number of very nice accessories available for slat walls. Shelves, Drawers, and Cabinets - I would venture to guess that 99% of us use some combination of these three in our shops. They are ubiquitous and readily available at any big box store in both ready-made and DIY options. They are the default choice if you don't want to spend your energy trying to make your shop as efficient as it can be. However they are horribly inefficient compared to open tool storage and tend to become dumping grounds and hoarding areas where tools and materials go to die. The Shop Hacks Philosophy - Never put frequently used tools or materials in a drawer or cabinet or on a shelf. Use open tool storage within arms reach of each of your work areas and you will spend much less time walking, sorting, opening, closing and moving things around and more time making, fixing and building. For more about how to organize your tools without feeling overwhelmed, check out these articles... tool-organization-how-to-organize-your-tools-without-feeling-overwhelmed.html workshop-organization-how-to-organize-your-materials-and-hardware-without-feeling-overwhelmed.html I ran a quick time study the other day to see how much time I saved by locating my frequently used tools within arms reach compared to where I used to store them - in a toolbox. It took me 3 seconds to grab a tool, touch the counter and put it back using my french cleat tool holder located next to my main work area. It took me 30 seconds to walk to the toolbox, open the drawer, find the tool and grab it, close the drawer, walk back then repeat the process to put the tool back. I'll let you do the math but I estimate that I buy back between 40 and 80 hours of project time EACH YEAR by having my tools in the open and within arms reach. You can organize all of your frequently used tools and materials in less than 80 hours of work so, IMO, it is a no-brainier to use open tool storage. One caveat... Open tool storage requires you to work on your dust collection first. Without effective dust collection and air filtration you will always have a film of dust on everything that is out in the open. The Shop Hacks Ultimate Air Filtration System will take care of most of the fine dust that settles on your tools after your work session is over but not everything. In future articles I'll show you how to achieve near 100% efficient dust collection on all of your tools (under 2 hp) with just a cheap shop vac. I've proved my methods using laser particle counter testing. Advantages and Disadvantages of Each System The following table is my subjective analysis of each system but think about it and decide for yourself if you think using open tool storage is worth the time it will save you over the years. Keep in mind that French cleat and slat walls may be used with all of the other systems which makes them universally compatible. I.E. you can hang cabinets, drawers and shelves using French cleats or slats. 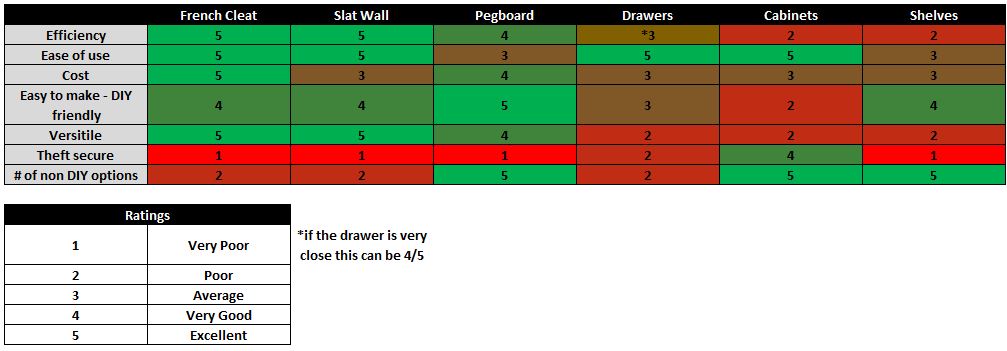 How to Build A French Cleat Wall I'll go into this in more detail next week but here's the general idea. None of this is set in stone so feel free to vary any of these dimensions as you wish. Cut up a sheet of 3/4" birch or Baltic birch plywood into 3" tall strips with a 45 degree bevel on one side. This will give you 15 cleats @ 8' long. That's about $2.33 per 10' of cleat using birch plywood. Birch plywood is not nearly as tough as Baltic birch but it works. You can even use pine, poplar or hardwoods if you are sure you have access to wood that will not warp over time. I hang 40# material organizers on 1/2" Birch plywood and they have held up fine using 2 screws every 8". I suggest using 3/4" material so you don't have to worry about the cleat pulling away from the wall if you can only secure it every 16" or more. The photos below show a 1/2" cleat but I suggest using 3/4". Below you can see tool holders, box/cabinet holders, and a French cleat shelf bracket. The variations are as endless as your imagination but this should give you a good feel for how you can use French cleats to organize tools. Make sure you don't miss next week's article where I will introduce a new Shop Hacks product that will make building your own tool holders much simpler and faster so you can focus more time making, building and fixing and less time organizing. That should give you some great ideas to help you Build YOUR Space. Next week I'll show you more ways to implement French cleats and introduce a great new Shop Hacks product that will make the task much faster and easier for you. Feel free to email me with questions, ideas or comments. I'm always interested in hearing what you are interested in so don't be shy. Check out other popular Shop Hacks Newsletters...
4 Comments
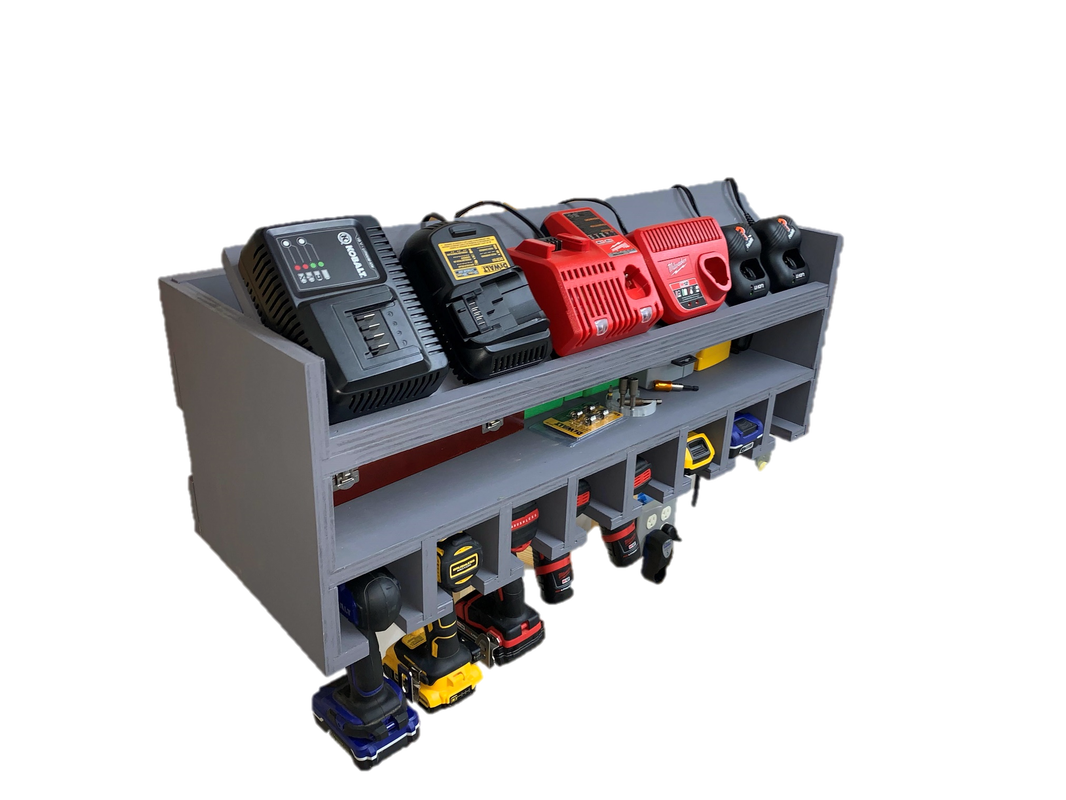
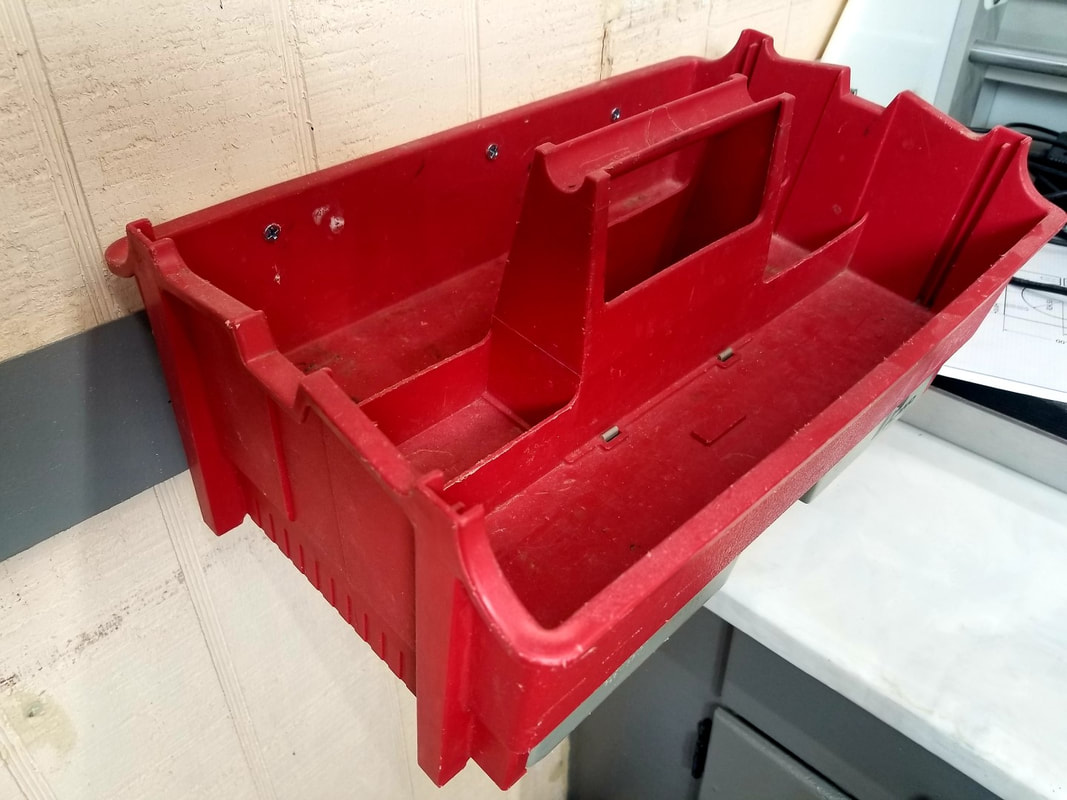
If you would like to receive FREE Shop Hacks like this every Friday at 3:30 Eastern Time... subscribe below... 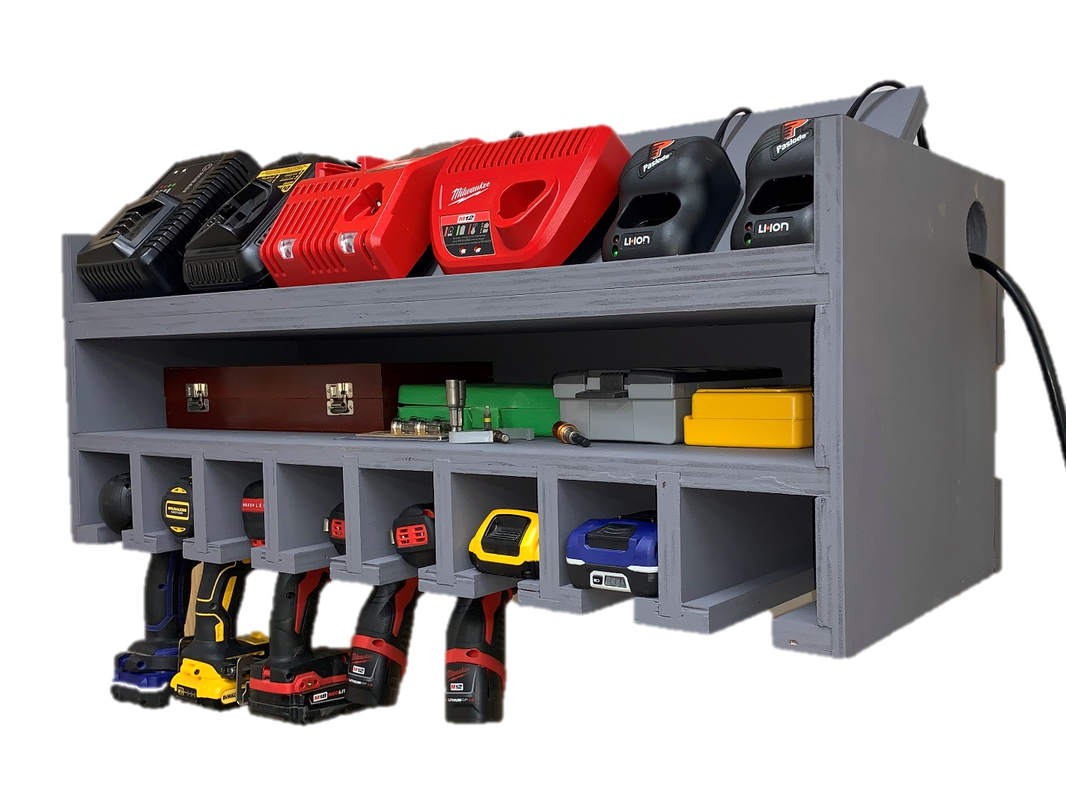 We've seen a number of drill/charger organizing stations over the past year on the Shop Hacks Facebook Group, but this one, designed by Shop Hacks member Tim Key, captured a lot of attention. It includes three useful features.
Let's Get Started Building YOUR Space! The first step is to break down your material per the following cut sheet. Order of cuts and specific dimensions are listed in the plans. Everything is based on 3/4" sheet stock. Tim used painted plywood and it turned out great. You can use any 3/4" sheet stock such as melamine, particle board, MDF or your preferred material. I like to use melamine. With edge banding it has a neat look and the light color has a way of making the shop much brighter once you start covering the walls with more and more white accessories. Baltic birch always looks great too no matter what you make with it. You can order 4x8x3/4 sheets of Baltic Birch through Menards if you have one local or your local lumber yard probably has it available. Note: Most sheet stock doesn't come in exactly 3/4" thickness. It can vary from 0.680" to 0.780" so make sure you measure the stock you use and adjust the dimensions outlined in the plans accordingly. If you would like to save time and make this build as simple as possible, you can support more content like this by purchasing plans for $4.95. The plans include the cut sheets, detailed dimensioned drawings, and tools and materials lists for this project. Shop Hacks is only sustainable through the generous support of those who purchase plans and hardware kits and through affiliate link income. 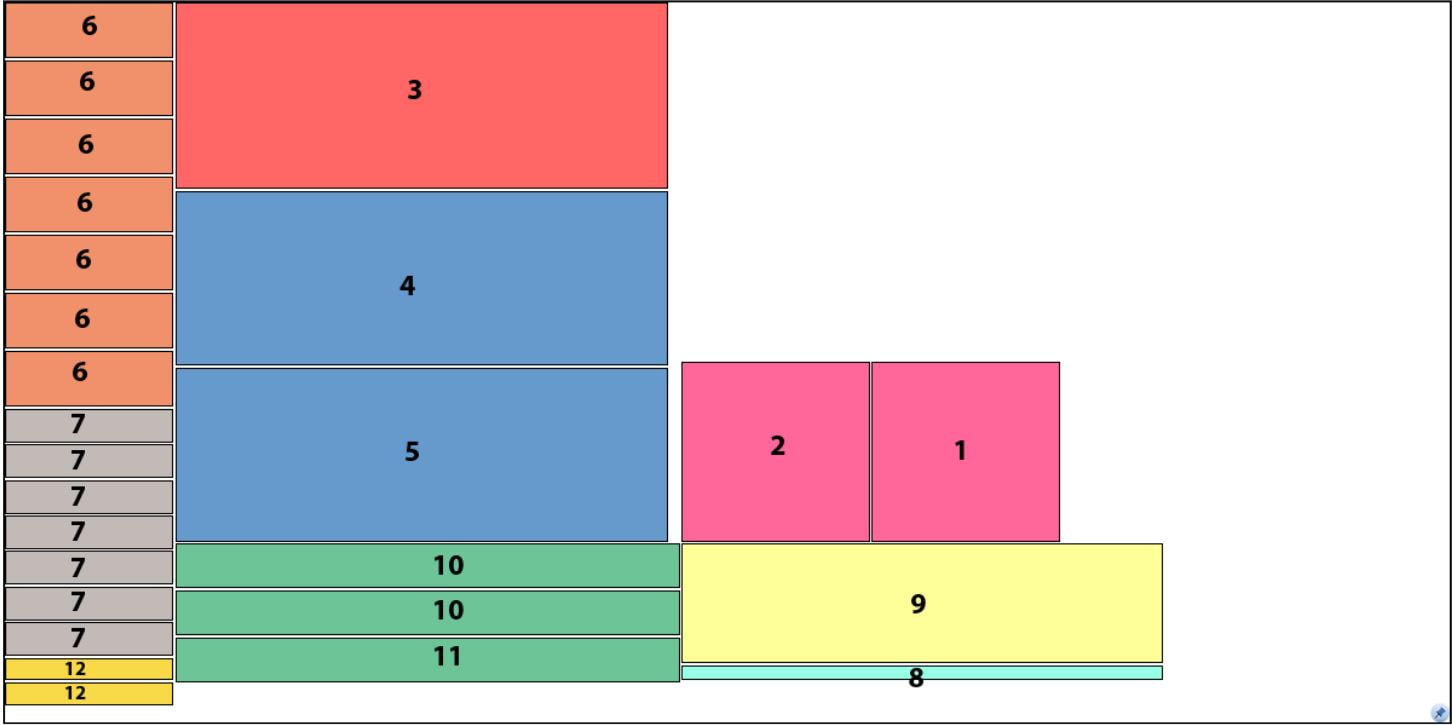 SHOP HACK: Write each part number on a piece of tape and stick them to each piece so they are easier to keep track of later Cut Dados Next, cut the individual features into each piece. The plans include detailed drawings as well as 3D assembly and cross section views to make this step very simple. There are many ways to cut dados. I used a table saw and a Freud 6” x 10T Pro Dado Set (SD206). Another popular option would be to use a router and jig (video link). Cut all of the dadoes to half the material thickness. The grooves are 3/8” deep if you use ¾” material. If you use a material thickness other than ¾” exactly then adjust your cuts accordingly. Assembly If you plan to paint your drill organizer, it is best to do so prior to assembly. At least all the interior parts. Avoid painting the dado and rabbet cuts or you may have a hard time getting it to assemble flush. I got a little paint in them but was still able to get flush joints in my assembly. 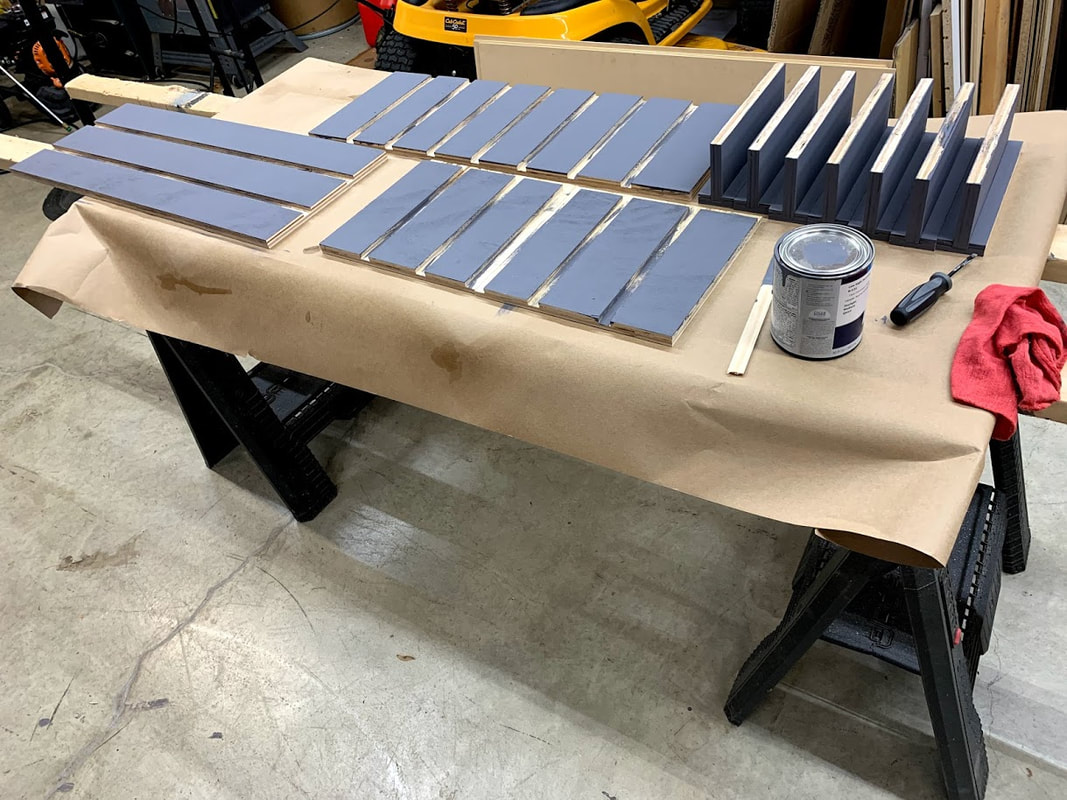 Bottom Shelf and Hangers Flip the bottom shelf upside down and flush the front against a straightedge that is at least ¾” thick. You want it to be easy to flush the front of the hangers with the front edge of the bottom shelf. I only glued the vertical hangers into place. I didn’t use any brad nails or screws. I glued and brad nailed the hanger bottoms with 1 ¼” brads. Get them all glued in and then clamp it down as best you can. I used another board and some weights and left it overnight.  Side Panels, Back Plate, and Shelves This was the trickiest part of the build. My wife helped spread the glue quickly and helped hold parts together until I could get it into clamps. I used the following assembly process
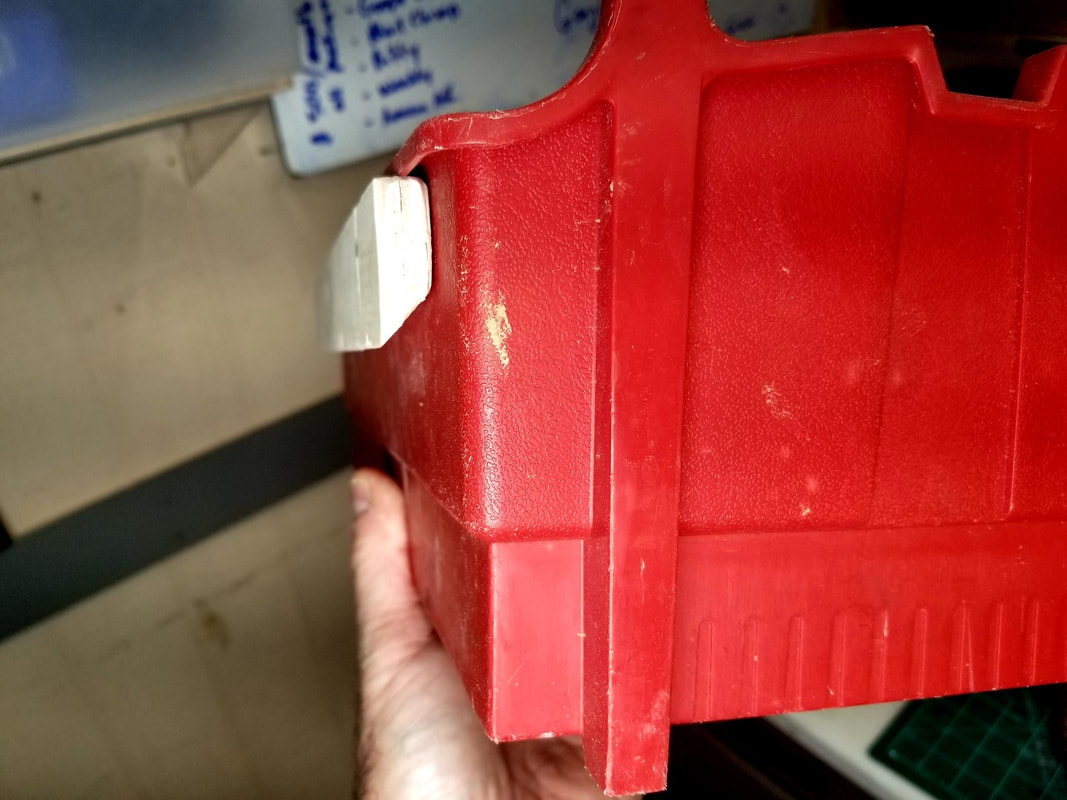
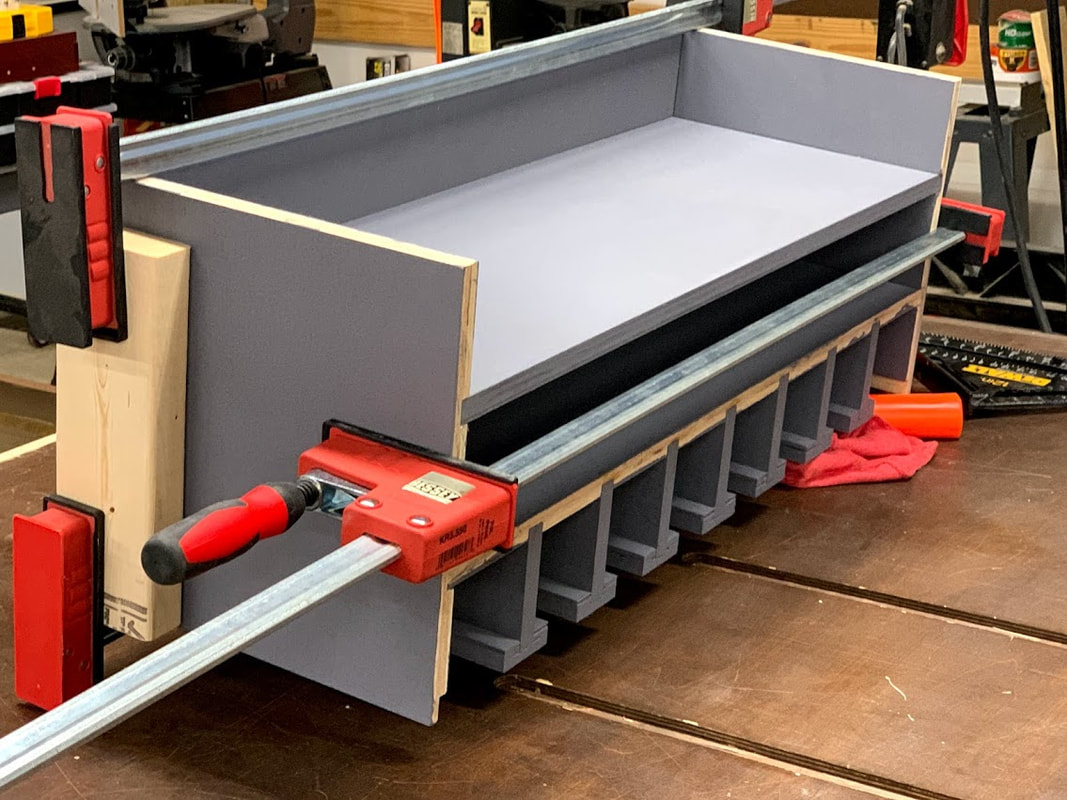 Install the angled shelf lip on the top shelf. Flush the straight edge of the lip with the front edge of the charging station. Use 1 ¼” brad nails along the top flat area of the lip. There is no need to glue this in, but you can if you desire. This component is to keep the chargers from slipping off the angled shelf. There should not be a lot of force against it. To install the angled shelf, I used a DEWALT DWHT46031 Aluminum 7-inch Premium Rafter Square behind the shelf to hold the shelf at the correct angle while flushed the front edge up against the edge of the lip. I used 5/8” brad nails along the length of the angled shelf and the used 1 ¼” brad nails on the sides to maintain the angle of the shelf. There is no need to use glue on this shelf. Install the two end rail hangers. Glue the rabbet joints and use 1 ¼” brad nails to secure them in place. French Cleat Hangers If you aren't using French cleat hangers to secure your tool holders to the wall, this may be a great time to get started. French cleats are a very simple method to hang anything on the wall. It's a very simple system. Just attach a cleat with a 45 degree bevel to the top of the organizer as shown in the figure below. Attach a brace of the same thickness to the bottom of the organizer. Then, attach another cleat with a 45 degree bevel to the wall with the bevel facing up. Now you can hang any tool holder on the wall cleat which allows you to rearrange your tool holders as you are working through your preferred workflow. Install the French cleat flush with the top of the charging station using glue and 1 ¼” brad nails. Attach the mating cleat (not shown) to the wall using screws at the height you wish to hang it. The bottom board keeps the charging station square to the wall. Use glue and 1 ¼” brad nails to secure it to the charging station. 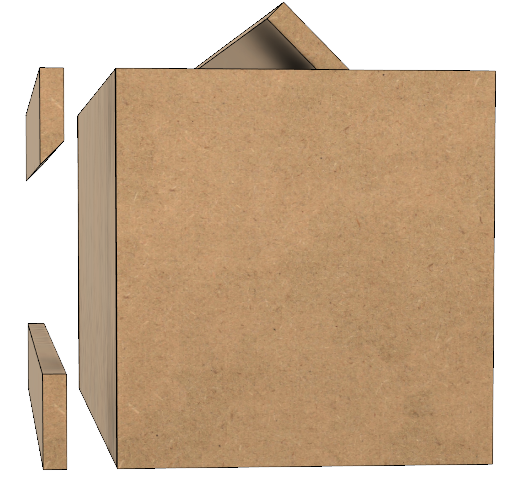 The Power Outlet Cut a hole in the side panel on whatever side of the unit makes sense for your installation. I cut a 1 ½” hole. It needs to be large enough so that the wall plug can pass through. I used double sided tape to attach the power strip to the charging station. The paint would not allow hot glue to adhere to the station. Now you have a nice looking drill organizer that you can enjoy from now on. Don't forget to post a picture of your organizer in the Shop Hacks Facebook Group when you finish! We would love to see how you are Building YOUR Space! 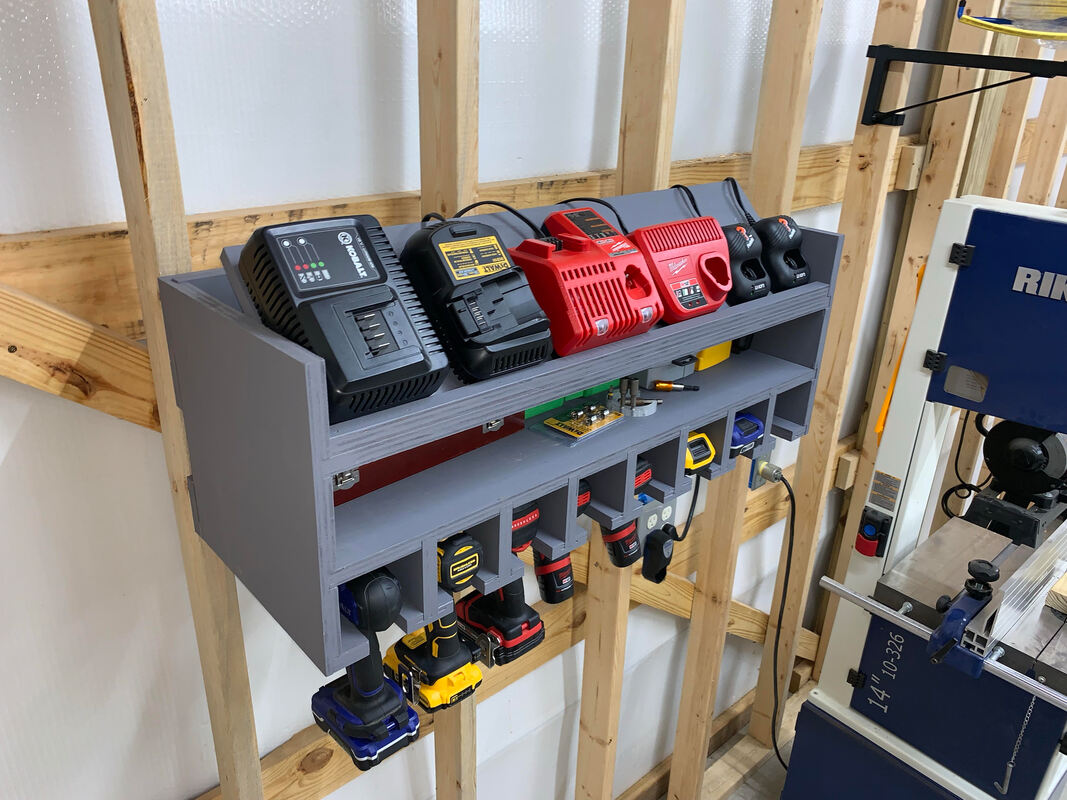 Zig Zigler once said, "You will get all you want in life if you help enough other people get what they want". That saying resonated with my core being and it is the basis of the Shop Hacks Innovators Program. My goal is to help as many of you build your dreams as I can while I'm building my dream. What is this program? In a Nutshell...
My hope is that this program allows motivated and innovative people like you to make money selling your product plans without the hassle and expense of the sales and marketing side. If you want to make $$ from your innovative and proven shop hacks then you will want to check this out. The draft details of the program are outlined HERE. I could have easily put plans together for my own version of Tim's drill organizer design and not split any of the profits. However, the thought occurred to me, "there is 1000x more collective talent in the Shop Hacks community than I have. They have talent and I have a marketing platform so why don't I work with these people in a way that can benefit all of us as a team". Let's partner to create something better than any of us could create on our own. Tim was using Sketchup (a low cost, entry level CAD software) when he first designed his drill organizer but was willing to jump in to learn Fusion360 (a more powerful and free CAD/CAM software). Having his design in Fusion made it easy for me to make the drawing views I wanted to use for the plans. He picked Fusion up very quickly and developed the CAD model and plans in just a couple weeks in his spare time. He put together the plans that are offered here and passed all of the information on to me to add the Shop Hacks branding. He's finished and is already working on plans for two more products. Without lifting a finger, Tim will accumulate residual income every quarter for as long as these plans continue to sell. I'm open to receiving ideas via just napkin sketches but the more work I have to do the less the royalty will be. However, all product ideas will be required to have the program steps completed prior to submission. Right now, for plans, I'm offering 50% of the profits for anyone who goes through all of the steps outlined in the program and summits a set of plans ready for release. We will start there but I will likely accept products that have fully functional prototypes without a CAD model or plans and offer a much lower royalty % . If this sounds like something you might be ready to invest in then go to the link above and read through the program outline. If you are still interested after reading through the program requirements, you will be directed to a link where you can join the innovators group to ask more questions, interact with other Shop Hacks innovators and brainstorm how we can make this program the most beneficial for everyone involved. I'm excited to help as many of you as possible to build your dreams, as I'm building mine! Shop Hacks Innovators Program Check out popular Shop Hacks Newsletters...
Promotion.... Build YOUR Space with these Shop Hacks products...
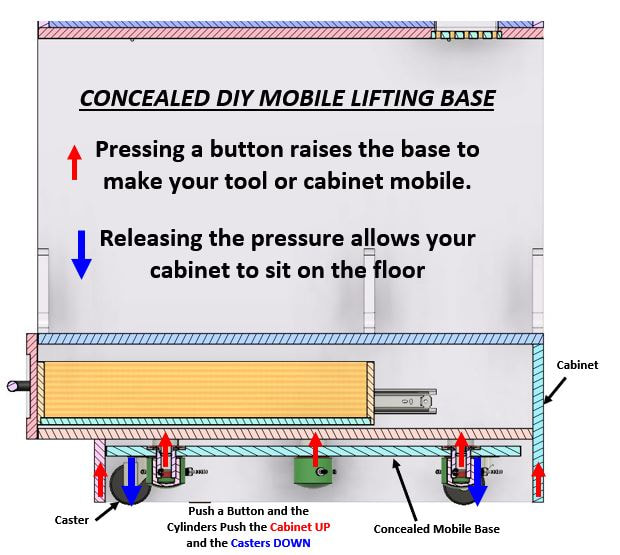
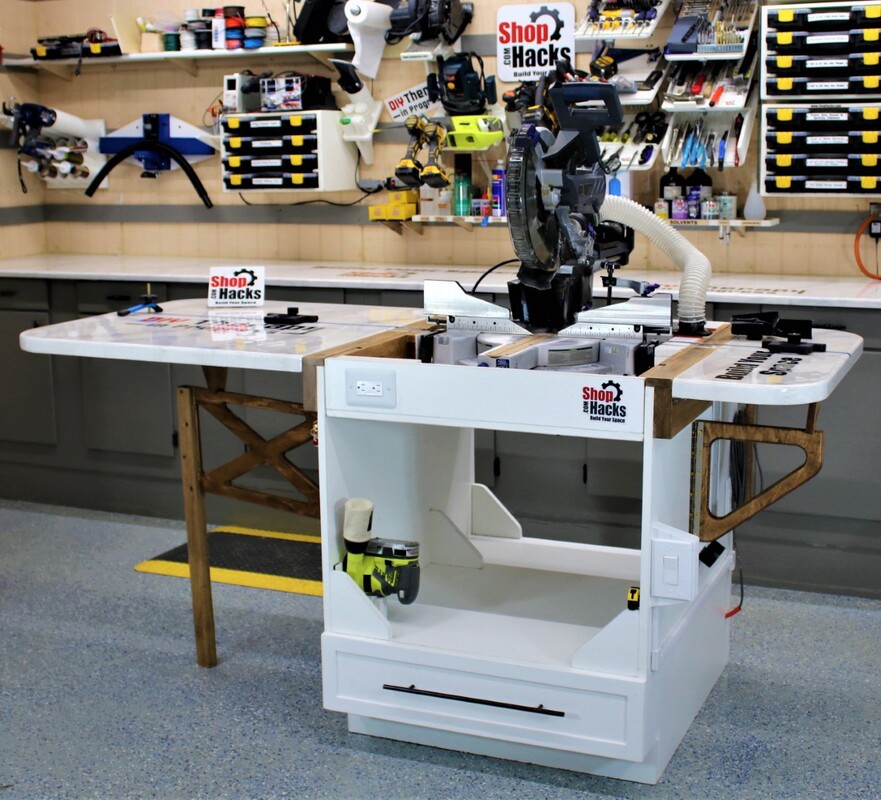
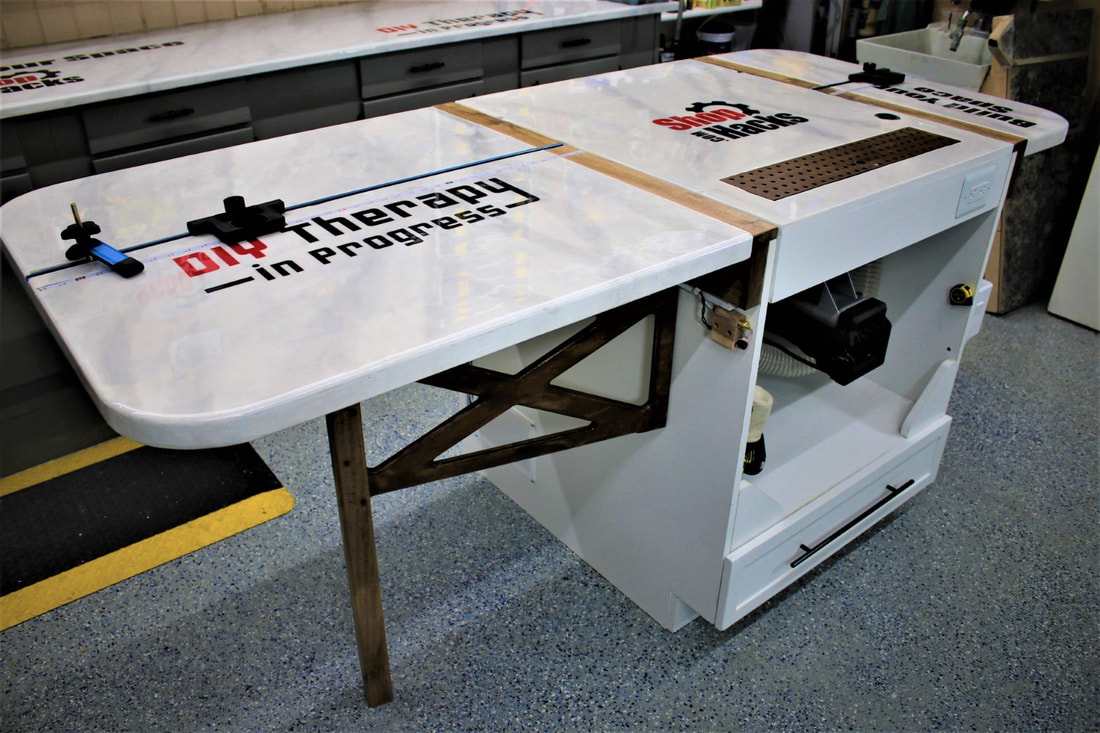
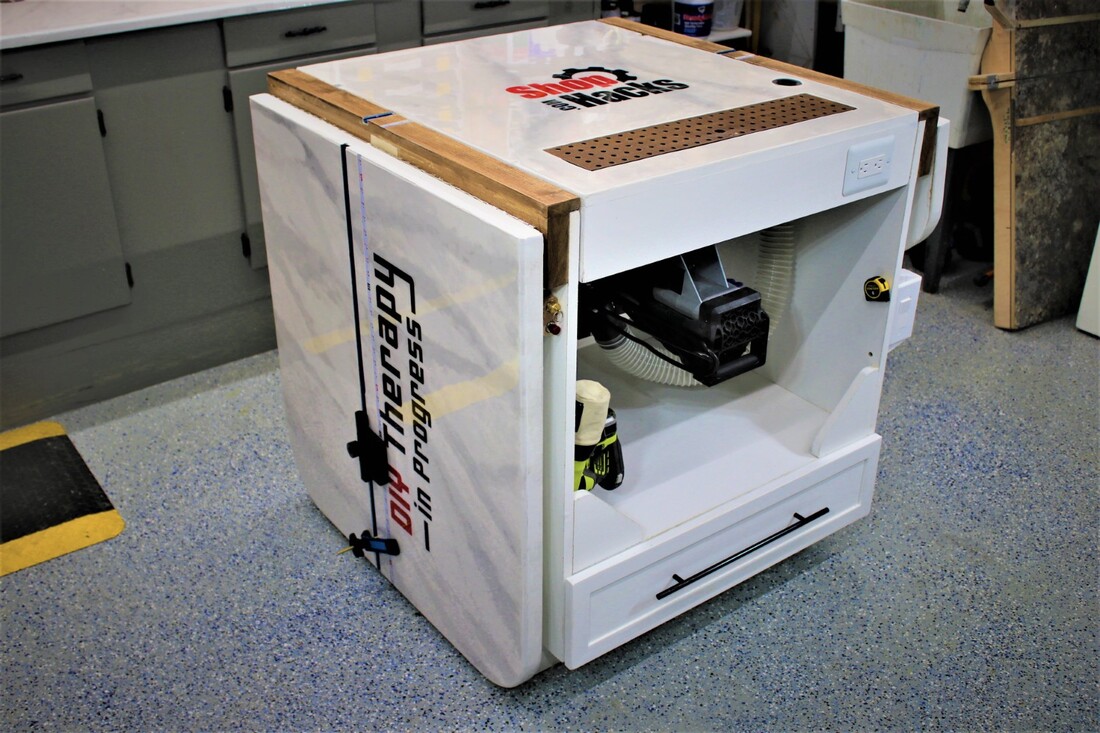
If you would like to receive the Shop Hacks Newsletter every Friday at 3:30 Eastern... just click the button... When I designed the Shop Hacks Ultimate Flip Top Workbench I wanted a way to make it mobile that didn't require any hardware to protrude beyond the base of the cabinet. I couldn't find any mobile tool bases that were concealed so I designed my own using common tools and materials and the DIY Mobile Tool Base that I'll show you how to build today was born.  You may have noticed that I didn't include the adjective "ultimate" in the name of this product. While it works wonderfully and I couldn't be more pleased with it, I see this as more as a idea generator for applications for the cylinder concept used here. There probably won't be that many people who want to build this exact mobile base. However, this cylinder design can be adapted to have anywhere up to 15 feet of stroke if you like. I have made versions of this to lift close to 200 lbs over 3 feet with a residential water supply and a hose. Think outside of the box and consider what you might be able to do with such a low cost DIY hydraulic cylinder design. If you come up with some ideas then post them in the Shop Hacks Facebook group with the rest of us. I can't wait to see what might come out of this.
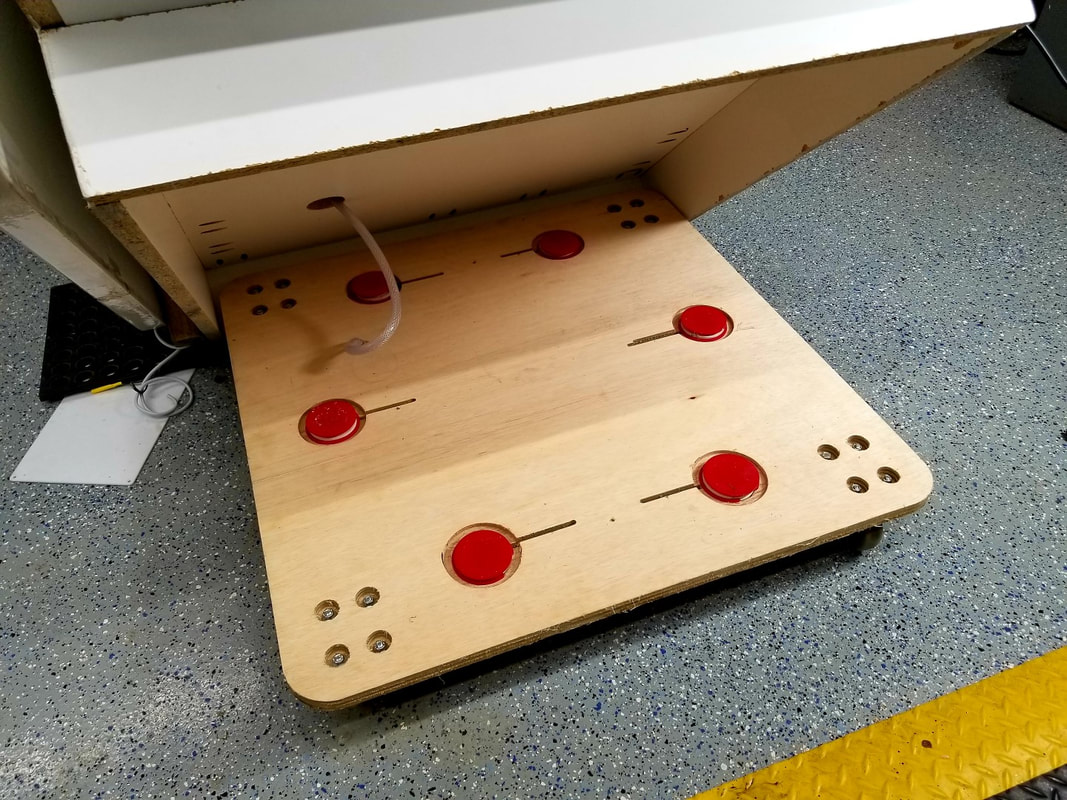
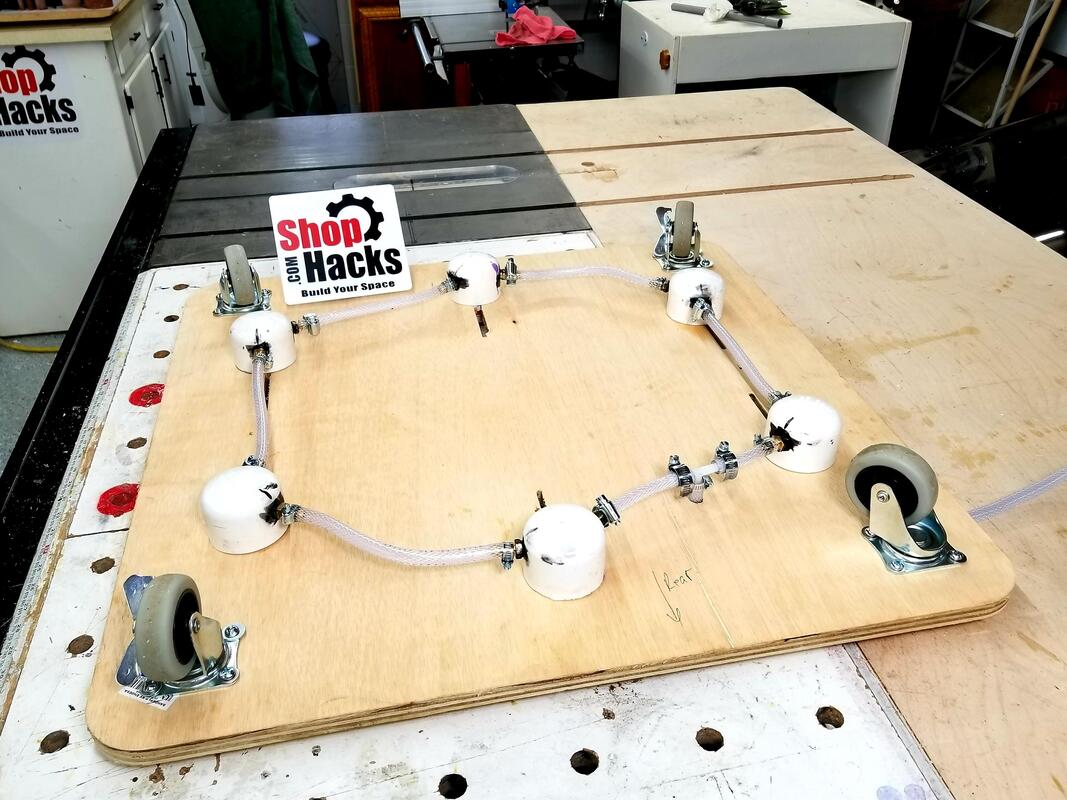
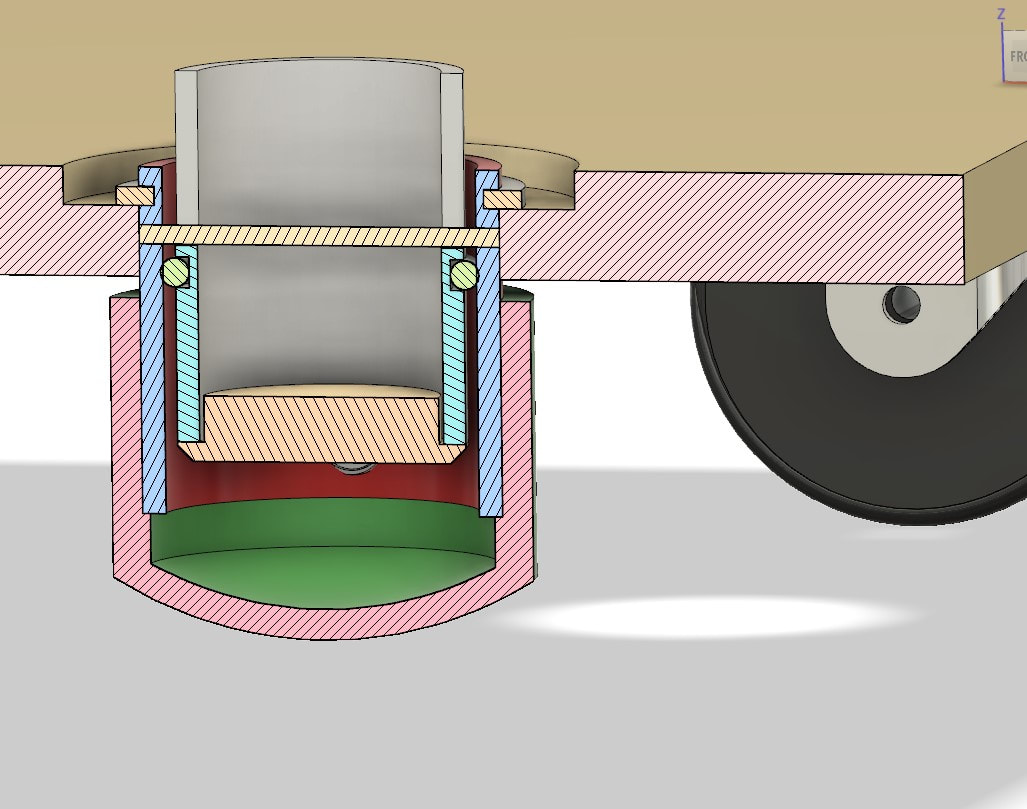
The concept and implementation are fairly simple. I built 6 hydraulic cylinders out of PVC pipe, filled them with water and used a simple 12VDC air pump to pressurize the cylinders that lift the cabinet off the floor. When the cabinet lifts the casters are pushed against the floor which makes it mobile. When the pressure is released the cylinders retract and the cabinet rests firmly on the floor like it would if it didn't have a mobile base. You can see how it works in the short videos HERE. You can see more details about how the system works in the following photos and illustrations... With a little trial and error you will be able to build this system from the information in this article. If you are interested in saving some time by having detailed instructions, more illustrations and detailed drawings for each component you can purchase the plans HERE for the discounted price of $5.95 published only to Shop Hacks Newsletter subscribers until 9/10/19. The plans include 27 pages of photos and dimensioned drawings as well as a complete hyperlinked parts list to you don't have to search for parts. Shop Hacks is solely supported through the sales of plans and affiliate links so thank you for considering a purchase to support more free content like this to help Build YOUR Space! Affiliate links take you to the sales pages for products mentioned in this article. They are listed at the exact same price as you would see if you search on your own but Shop Hacks receives a small commission from anything you purchase within 24 hours of clicking on an affiliate link. Its a free and easy way to support more content. If you are interested in plans for the Ultimate Flip Top Workbench (pictured below) that inspired this build, just click on the link to find out more. Tools required: You won't need any special tools or materials to build the DIY Mobile Tool Base with DIY Hydraulic Lifts. Here's a list of tools that you will need...
The illustration below shows you an overview of the top assembly at a glance. All of the numbered parts have associated drawings or purchase links in the plans.  The illustration below shows you the detailed components of the Hydraulic cylinders. Again, the detailed dimensioned drawings and part links are included in the plans.  The hydraulic cylinder is made from Schedule 40 PVC pipe, a wooden or plastic plug epoxied into the bottom of part number 2, a plastic retaining ring, an O-ring, a steel retainer rod and a couple barbed fittings. The grooves can be cut using a table saw or router table setup. I outline a method to safely and accurately cut the grooves in the plans. You need to drill and tap the NPT holes for the barbed fittings. I made the mistake of just drilling them and trying to tap them with the fittings themselves and it cost me a lot of wasted time trying to fix leaks. WARNING: Do NOT pressurize PVC pipe with air only. Even though this assembly can probably handle much more pressure than the pump can deliver, there is a chance in just the right set of circumstances that it could crack and shatter causing it to send sharp pieces of plastic flying. So, this system is meant to be an "air over liquid" system. All of the cylinders are filled with oil or water and the air pump pressurizes a relatively small volume of air. I used water in mine because my shop never goes below freezing. If your shop goes below freezing then you should add antifreeze or use oil instead of water. The following illustrations show how the system works overall. When you press the momentary switch it turns on a 12VDC air pump that pressurizes the cylinders and they extend. When the cylinders extend they press against the bottom of the cabinet, or against the frame supporting your tool, which forces the casters down and lifts the tool. You can move the tool on the casters. When you want it to be planted firmly you just pull the pressure relief valve which releases the air and forces the cylinders to retract under the weight of the tool. I'll show the cylinders extended and retracted to make it clearer. So, there you have it... a DIY mobile tool base with DIY hydraulic lifts that you can make in your own workshop. Like I mentioned earlier, the plans include 27 pages of detailed instructions, photos and illustrations if you want to save some time.
I may consider selling hardware kits that include the items you might not have readily available. If you are interested in seeing a hardware kit made available for this system just let me know in the comments or in the Shop Hacks Facebook Group. I"ll include a few links to some of the parts I recommend for this build to get you started... Set of 4 @ 3" Casters with a 300 lb each load rating. Sealed lead acid 12V battery 12VDC Air Pump 5A Momentary Switch Don't forget that you can modify this design to have as much stroke as you want and use it for other purposes. I'm looking forward to seeing what some of you will come up with! |
Categories
All
NewsletterShop Hacks exists to help you Build Your Space! Archives |

- Home
-
Improve your Workspace
-
Dust Collection and Air Filtration
>
- Table Saw Dust Collection
- All About Cyclone Separators
- Dust Deputy and Dustopper Review and Comprehensive Scientific Testing
- Dust Sheriff Cyclone Separator
- Dust Collection System Options
- Air Filtration System Options
- Why clean air matters
- Is your shop air safe???
- How to maintain healthy air in your shop
- Dust Collection Resources and Links
- Why I became obsessed with dust collection and air filtration
- Storage, Organization, Efficiency >
- Improve your workshop floors and lighting >
-
Dust Collection and Air Filtration
>
-
Improve Your Tools
- Shop
- Contact


 RSS Feed
Get weekly blog articles and early bird discounts for new products
through the Shop Hacks Newsletter. Every Friday at 3:30 Eastern Time.
SUBSCRIBE to the weekly Shop Hacks Newsletter
through the Shop Hacks Newsletter. Every Friday at 3:30 Eastern Time.
SUBSCRIBE to the weekly Shop Hacks Newsletter
Site Map
© Copyright, Shop Hacks 2019