|
It has finally arrived... the Shop Hacks Ultimate DIY Air Filtration System build article. You can design your system with the information in this article or buy the plans to get all the exact dimensions to speed up the process. I've spent many weeks building and testing many systems and this air filtration system blows them all away. If you are interested in a deep dive into previous articles that cover all of the testing and findings you can find them here... Air Filtration System Shootout Article - Deep Dive Please consider supporting more Shop Hacks content by purchasing the Plans and/or Hardware. They are both discounted 10% for Newsletter subscribers until 8/25/19 . Plans Include
 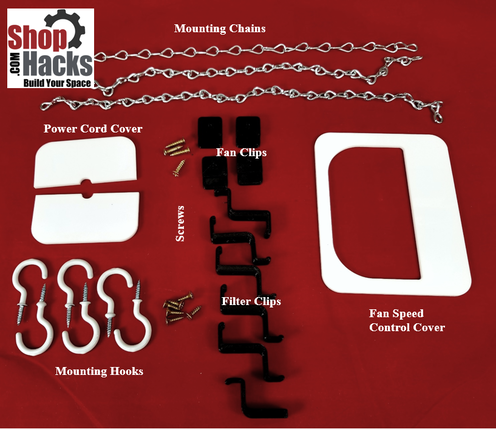 The following summarizes why this system is worth building. You can build it for under $100 if you only use one filter now and for under $200 if you use all five filters to get the max performance and a virtually maintenance free system. Even using only one filter it will still outperform the Powermatic PM1200 but flow will drop off sharply as the filter gets dirty. The more filters you use the less the flow will drop over time. With 5 filters you may be able to run the system for many years without any filter maintenance. 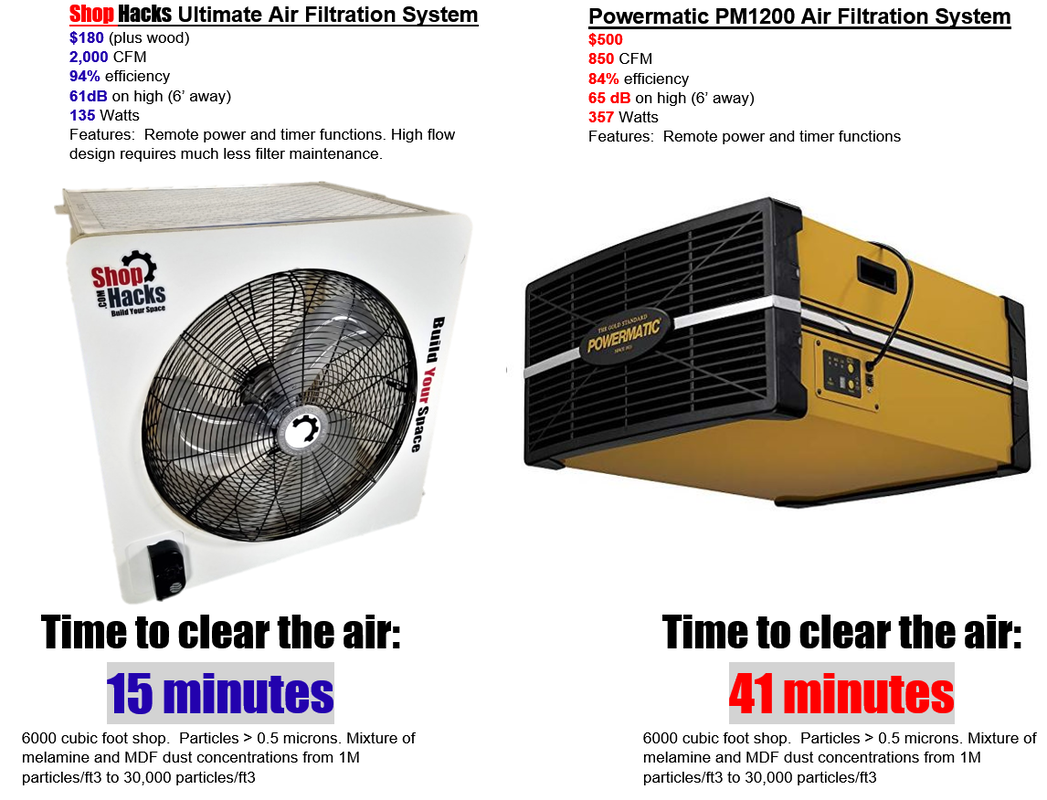 Let's jump straight into the build... Overview and Supporting Notes Depending on your level of experience, this build should take between 3 and 6 hours to complete for a first-time build. Every part is detailed in the drawings throughout these plans. Don’t forget to purchase the remote control timer that allows you to keep the system running for 30 minutes, 1,2 or 4 hours after you leave your shop. You can find it at this affiliate link… https://amzn.to/2ZsvcyA A note about affiliate links… Affiliate links help Shop Hacks offer quality content to you for free via the Shop Hacks Newsletter and Shop Hacks Facebook group. When you purchase anything from Amazon within 24 hours of clicking on an affiliate link Amazon gives Shop Hacks a small commission. Using the link doesn’t affect the price you pay at all but it does help Shop Hacks help you Build Your Space. Thank you for using affiliate links! Required tools: Circular saw or table saw Router Jig saw Drill, bits and a 1.25” spade bit, Forstner bit or hole saw. Pencil Straight edge Optional tools: Pin nailer Caulking gun Here's a copy of the parts list with the part number followed by the part name... 1 20" 2264QM High Velocity Fan (affiliate link) 2 Filter (affiliate link) 3 Front Panel 4 Horizontal Panel 5 Vertical Panel 6 Rear Panel 7 Cord Cover 8 Speed Control Cover 9 Filter Clip 10 Filter Clip2 11 Hanger Block 12 Hook 13 Fan Clip 14 Chain 15 #6 x 5/8" long flat head wood screw 16 #6 x 3/8" long flat head wood screw 17 Caulk 18 Wood glue 19 Construction adhesive A detailed parts list with hyperlinks to all of the hardware used in this build is included in the plans. You can also see the hardware used in the photo earlier in the article.
When you are finished your parts should look something like this… 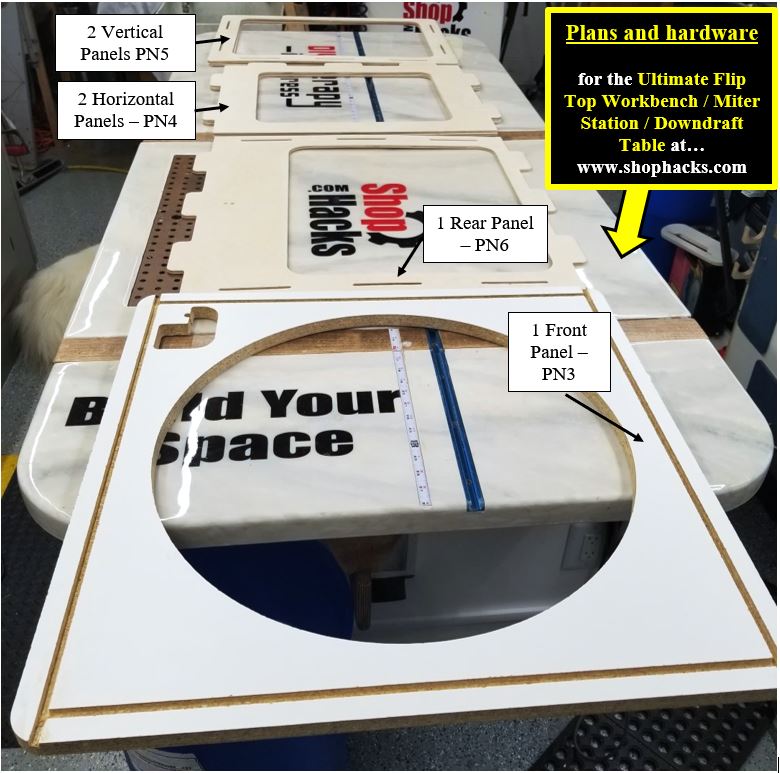 5. Next, dry fit all of the parts to ensure they fit together as required. Don’t worry about gaps here or there. Note: Be careful to place the Rear Panel in the orientation shown relative to the speed control cutout on the Front Panel. This will allow proper placement of the power cord through the Rear Panel. Gaps will be filled with caulk from the inside in a later step. The assembly should look something like ,the following photo… 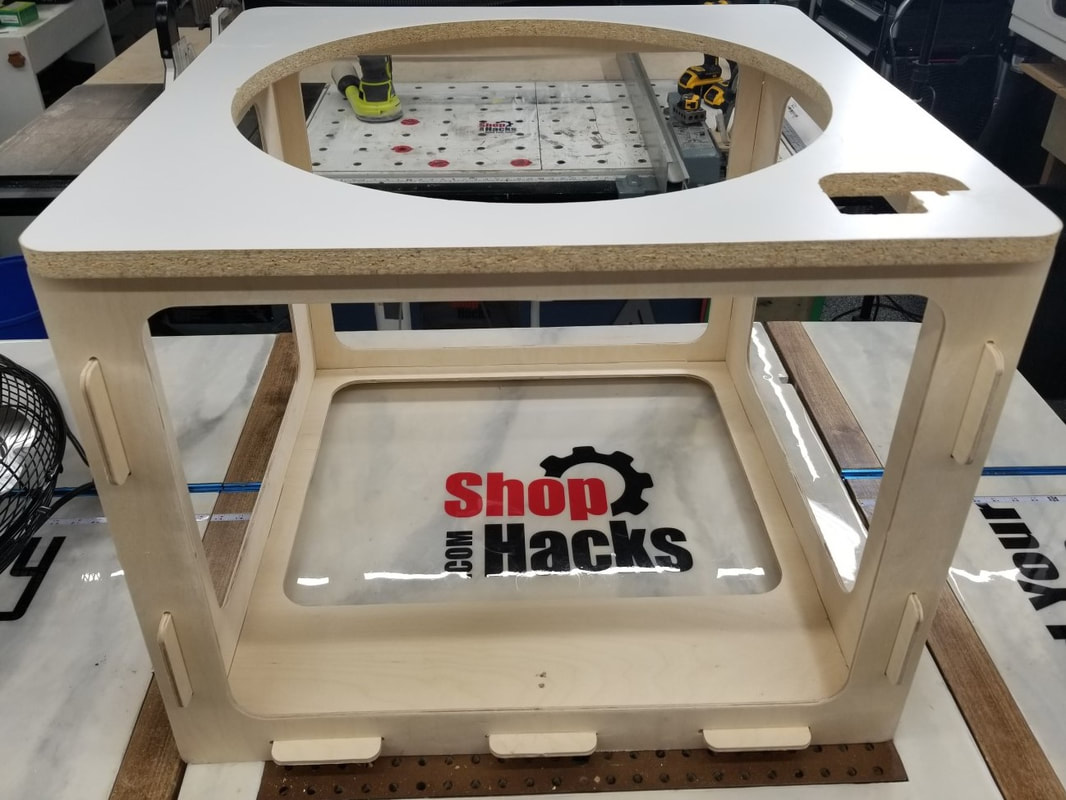 Once you are happy with the dry fit it is helpful but not necessary to pin nail panels in place after you glue and reassemble them. I just pin nailed everything together dry then added glue along the inside joints after it was assembled. This provides more than enough strength to hold the assembly together. I bought a Metabo (formerly Hitachi) pin nailer for this project. It came highly recommended on by a lot of people in the Shop Hacks Facebook Group and I’m super pleased with how it performs. It sets the pins at the right depth regardless of the material type that I’ve used it on. Here’s an affiliate link to the pin nailer the group recommended and that I used… https://amzn.to/31X1qzD Apply construction adhesive along the slots on the back side of the Front Panel (PN3) then clamp it to the frame. Next, insert the fan through the hole in the Front Plate from the back side and install the 4 Fan Clips (PN13) using 4 #6x5/8” flat head wood screws (PN15). It helps to predrill the holes for the clips before installing the screws. 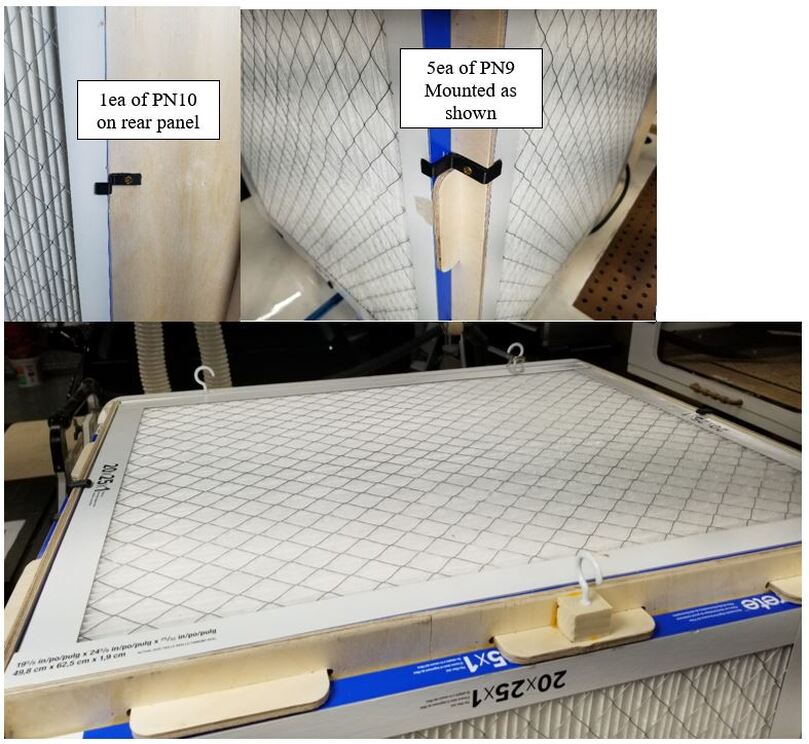
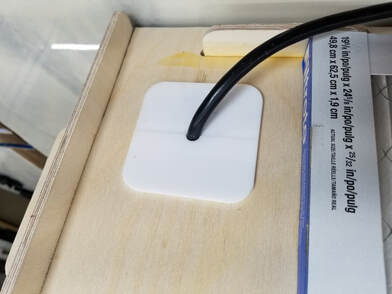
If you used melamine, sand or chip off the area that will be under the Speed Control Cover (PN8). This will give something for the glue to adhere to when you attach it. Slip the fan speed controller through the hole in the Front Panel and install the bolt that came with it to secure it to the Front Panel. Use glue or construction adhesive to attach the Speed Control Cover to the Front Panel over the fan speed control assembly. Place the plug through the hole drilled in the Rear Panel (PN6) then attach the Cord Cover (PN7) with glue or construction adhesive to seal up the hole. I cut the Cord Cover into two pieces to attach it. If you use thin plastic or a flexible material you can just cut a single slit from the hole to the outside. I added a zip tie to the cord to act as a strain relief. Sand down any sharp edges that could damage the cord. Apply caulk over all of the seams and any areas where unfiltered air might enter the housing. You want all of the air to be forced through the filters to get the maximum filtration efficiency. Now you can install the Filters (PN2). They should be a snug fit if your dimensions are just right but you can add small blocks or press in small wedges to hold them in place if they are loose. You should be able to use these filters for years before they need to be replaced so you don’t need install a quick release mechanism unless you just prefer to do so. If you purchased the Shop Hacks hardware kit for this build you can install the optional Filter Clips (PN9 5ea and PN10 1 ea), Hanger Block (PN11) and Hooks (PN12). PN10 attaches to the rear panel only. Iron-on edge banding adds a finishing touch but is certainly optional.  Don’t forget to add the remote-control power switch with timer functions https://amzn.to/2ZsvcyA . This will allow you to turn the system on when you need it and leave it running for 30 minutes to 4 hours after you leave your shop to make sure the fine dust is removed before it settles all over your tools and projects. Does positioning or orientation matter? I ran a test with a smaller air filtration system to see if adding an extra fan in the shop to circulate more air would make any difference in terms of the effectiveness of the air filtration system. As you can see from the figure below, adding a recirculation fan in the shop made no measurable difference. The finest and most dangerous particles act more like gasses and disperse evenly throughout the entire space. This means that as long as your system is placed in the same room as where you are creating the dust the placement and orientation won’t matter. You can place it under a bench or in a loft or wherever you want. 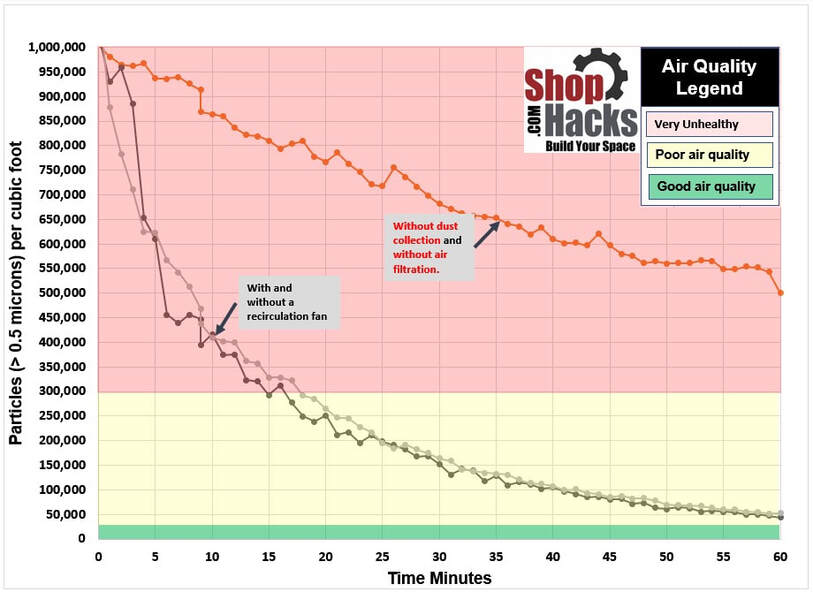 However, temperature differences between the floor and 8’ up can vary as much as 20F so the placement of your system may matter in terms of how hot your shop feels. If you are in a very hot climate then it would be best to draw the air into the system as low as practical. If you live in a very cold climate then try to draw air from up high but try to not allow the air cause much circulation where you work or it will feel like a constant cold breeze.
I don’t have any long term tests on the filters that I recommend for this system, however, I do have a similar system with similar filters that has been running for 3 years now 24/7. I’ve swept the filters a few times but they are caked with dust and still perform very well. They are still 80% efficient at removing particles 0.5 microns and larger and the flow rate hasn’t dropped noticeably. How many filters do you need to use? This system will perform better than the Powermatic PM1200 even if you only install one filter. However, over time the flow rate will drop faster than the PM1200 because the filter area is lower. With two filters you can go longer between cleaning the filters. With five filters you should be able to use it indefinitely without having to clean the filters. I don’t have any tests to see how it performs under heavy dust conditions over long periods so I can’t make any promises but I am confident that it will always outperform the PM1200 system when used under the same conditions. I hope you enjoy your Shop Hacks Ultimate DIY Air Filtration System! It will be a great add to your shop and your lungs and heart will thank you for many years to come.
10 Comments
Scott
3/24/2020 04:49:24 pm
Love this design and the work you put into to testing it out. Makes total sense to not stack the filters like I've seen other DYIers do. One recommendation would be that if you wanted to lower the profile of the unit you could use one large filter opposite the fan and four narrower filters on the sides. I'd bet you'd still get the very good flow and long good filter life as well. This would allow easy ceiling install at a height that would not result in braining. If someone wanted to flush mount to the ceiling they could forgo the big filter and just have four narrow filters. Just means changing a little more often, but good filters don't cost a lot...besides, new lungs do.
Daniel Smith
5/16/2020 01:51:11 am
What direction do the air filters get oriented in? Aka... should air flow arrow be pointed out or in? I'm assuming fan should blow out and not inward, correct?
MJK
5/23/2020 10:09:08 pm
Assuming the fan blows out, the filters in the picture appear to be installed incorrectly.
Steve Harman
9/15/2020 10:01:14 pm
Love your site and appreciate all your efforts.
Uncle Bob
10/18/2020 04:33:01 pm
Question on air filter. Rear Panel shows slot offset as 1.125in, but Verticlal Panel shows same offset as 1.155in. Which is correct? Measure twice, cut once.
Robert
1/27/2021 09:55:13 am
What type of filters do you use, 1 inch or 2. What number filter 1-13 or higher? Thanks
Mark K Klika
10/29/2021 12:57:01 pm
I'm about 75% done with this build, and I can tell you there is no way you could do this in 3 hours..or even 6. And I consider myself an advanced woodworker with a well equipped shop. My advice to anyone about to try this, measure about ten times, then do a few more. Its very easy to screw up, though I just had a minor one, where I drilled that 3/8" hole in the face is specifically oriented in regards to the dado. Couple of things I'd like to know, other than making me buy another router bit, why is the dado on the front panel 11/32" and not 9/64" like the one for the slots? It appears that 11/32" creates too much slop anyway. And if you tweaked the size a bit, it would be less costly. 27" and 21 1/4" are just a bit too big to use a 4'x8'efficiently.
Brian Wolfsohn
1/16/2022 06:31:39 pm
I agree w/ Mark Klika in that it's not a 3 or 6 hour build... (Unless you have a cnc to cut all the pieces.. I completed mine the other day and have it mounted at a bottom height uf just under 6'.
Steve Rose
10/26/2022 10:09:26 am
I have one note, wood glue any type of wood glue sticks and clothes things very well to melamine. I am a retired acrylic fabricator and I used melamine for my entire shop. Acrylic sawdust is white. I didn't think anything would stick to melamine because acrylic glue does not stick to melamine. But wood glue? Oh yes it sticks to melamine like it's made part of it. That's all Leave a Reply. |
Categories
All
NewsletterShop Hacks exists to help you Build Your Space! Archives |

- Home
-
Improve your Workspace
-
Dust Collection and Air Filtration
>
- Table Saw Dust Collection
- All About Cyclone Separators
- Dust Deputy and Dustopper Review and Comprehensive Scientific Testing
- Dust Sheriff Cyclone Separator
- Dust Collection System Options
- Air Filtration System Options
- Why clean air matters
- Is your shop air safe???
- How to maintain healthy air in your shop
- Dust Collection Resources and Links
- Why I became obsessed with dust collection and air filtration
- Storage, Organization, Efficiency >
- Improve your workshop floors and lighting >
-
Dust Collection and Air Filtration
>
-
Improve Your Tools
- Shop
- Contact

 RSS Feed
Get weekly blog articles and early bird discounts for new products
through the Shop Hacks Newsletter. Every Friday at 3:30 Eastern Time.
SUBSCRIBE to the weekly Shop Hacks Newsletter
through the Shop Hacks Newsletter. Every Friday at 3:30 Eastern Time.
SUBSCRIBE to the weekly Shop Hacks Newsletter
Site Map
© Copyright, Shop Hacks 2019